How I Inducted my Brother into Game Development and His First Ever Game Jam

Estimated Reading Time: 15 minutes

Before we start, here are shortcut links if you want to skip to a specific topic:

I am the youngest of four dudes, and my closest accomplice among them is the third one who is just one year older than me. Suffice to say, he has been my partner-in-crime ever since we were kids. We are both gamers at heart, with him being “way more of a gamer” than me. He plays a lot of games across multiple platforms. I, on the other hand, only play a couple that I actually like (and test some games for like an hour just to see what’s up).

Career-wise, we chose very different paths – I pursued game development; and, he got jobs from working in the government as a facilitator for recovering drug addicts, to working as a technical support for a Fortune 500 company. His last job was stable compared to the indie life I’ve been doing for almost a decade now. But, unfortunately, it’s also the most stressed he’d been in the recent years. That said, he wanted nothing else but to get out of there.

I’ve been trying to convince him to try out game development for years now, because I believe his talents and vast knowledge of video games, are great assets that’ll help him in the industry. During one of our family dinners just this last holiday 2022, I opened the idea again – the idea of him trying out game design, and this time, he agreed.

To be honest, I was probably more excited than him. I gifted him two Udemy courses last December 27, 2022 – The Psychology of Games – Secrets of Good Game Design; and, Code Monkey’s Make Games Without Code? Master Visual Scripting in Unity!

As you can see in the courses above, there are no programming involved. He tried almost two years of Computer Science in college, and it just didn’t work out for him. I didn’t want to bring him back to those dark days, so I bought courses about game design and visual scripting instead.

He started right away with the game design course until the New Years, when we rested for the holidays and spent time with our family. But, after the that, he went to work.

January 1, 2023 – he started Code Monkey’s visual scripting course in Unity. I’ve been watching Code Monkey‘s YouTube videos ever since Brackeys retired. So, I was confident that his course will help my brother get started with game development using Unity. But, we quickly realized that the course was slightly out-of-date.

Don’t get me wrong, the concepts discussed in the course are still usable today, but the buttons and the interface are different already. In Unity’s language, even the packages and versions are different. This might not be difficult for intermediate to experienced Unity developers, but the different interface and terminologies are very confusing for a first-timer.

That said, I searched around Udemy again for a more up-to-date visual scripting course that uses at least Unity 2021 LTS (Long-term Support) and the built-in visual scripting package. Luckily I found GameDev.tv Team and Taryn McMillan’s Unity Visual Scripting: Learn Game Coding The Easy Way.

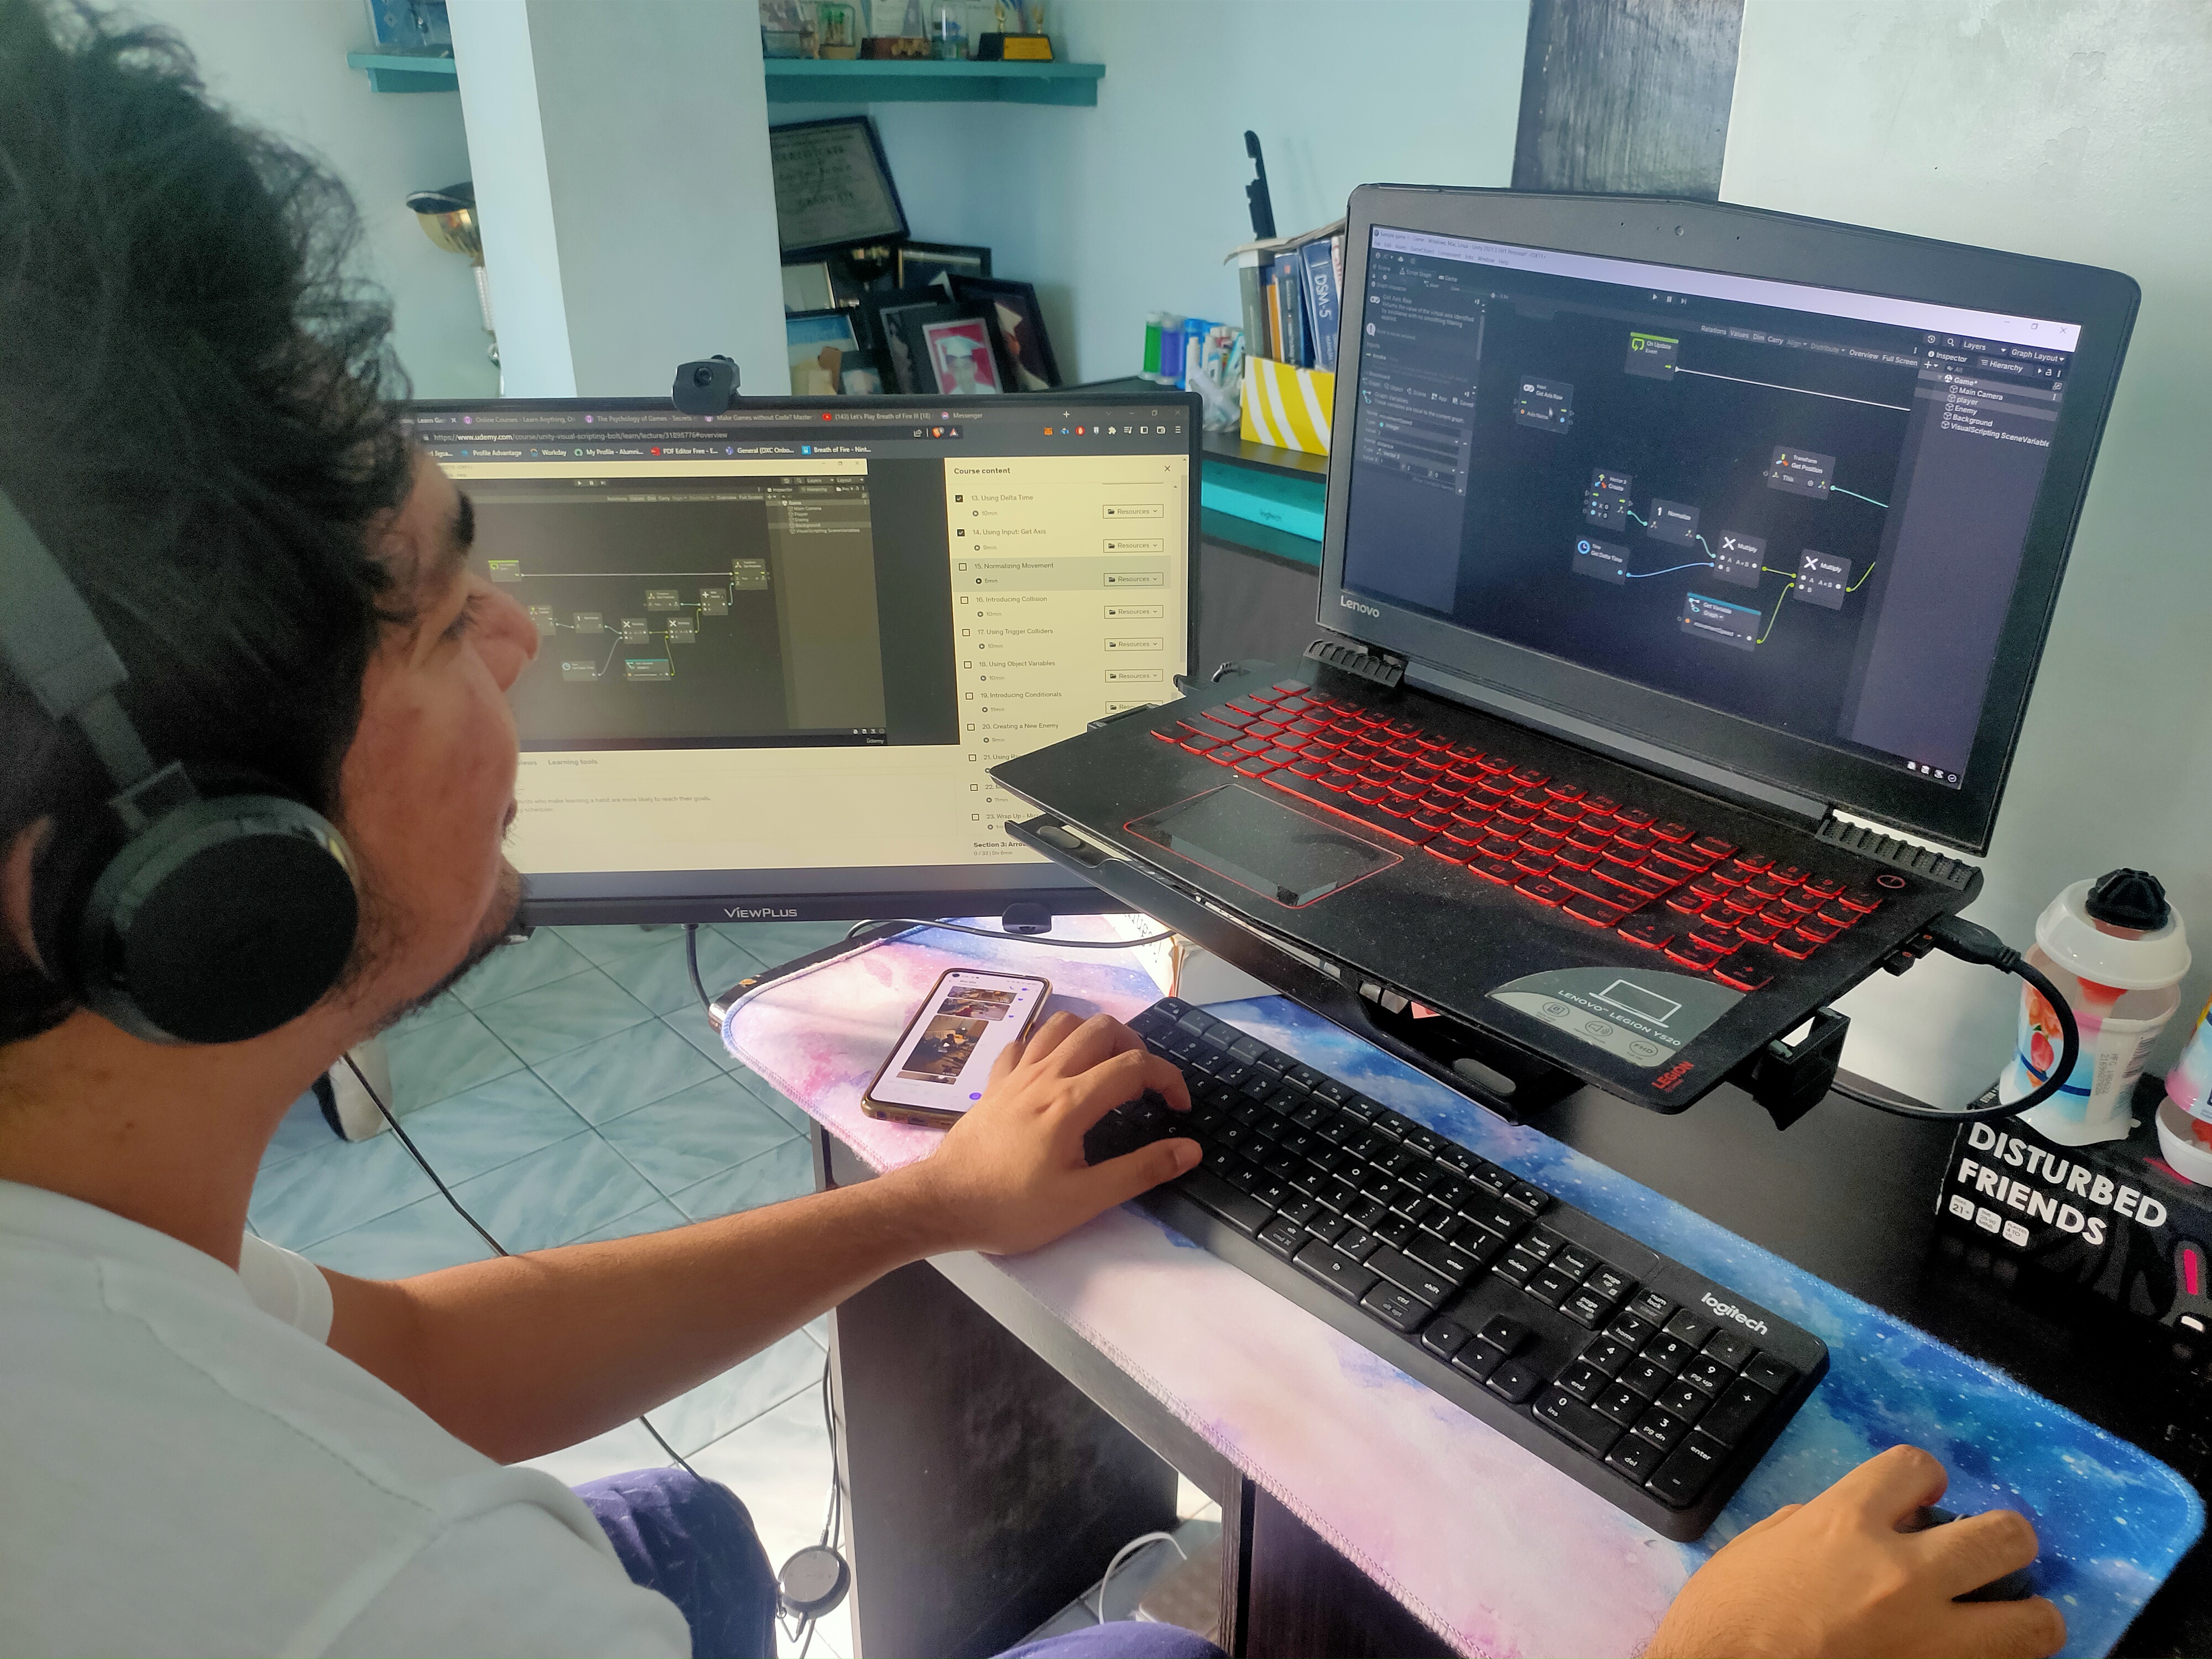
Taryn McMillan’s course is exactly what works for my brother – concise explanation that shows which button to click and where it is in the interface; and, based on my brother, the exercises after each lesson helps a lot in putting what he learned into practice.

I agree with this kind of learning (exercises after each lesson) as it prevents the trivial way of learning game engines – which is to just follow along a tutorial without understanding what you’re doing. Here are good videos by Andrzej Gieralt Creative and Game Maker’s Toolkit discussing this way of learning game development.

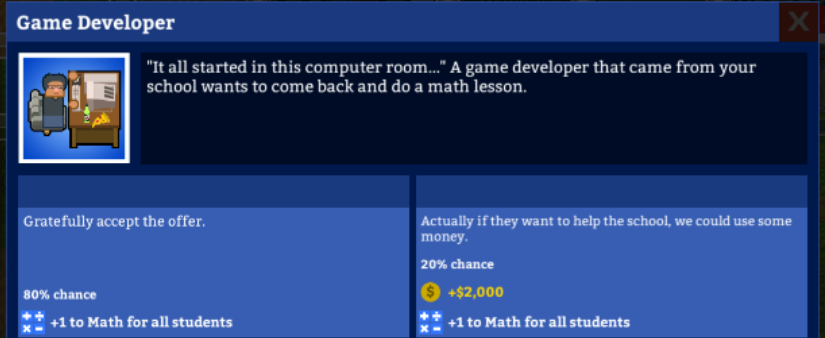
In any case, my brother played around Unity and finished Taryn’s visual scripting course. At this point, my brother created a simple game where you control a bacteria-like character with collision around a map; and a simple 3D archery game, complete with scoring and restarting the stage. He is doing well so far; but for me, there is still one thing he needs to experience to fully indoctrinate him to game development – game jams.

Luckily, Ludum Dare 52 was just a couple of days away and it was a good opportunity to throw him in the lava pit right after learning the basics of visual scripting in Unity. **evil laughter**

Kidding aside, here were my goals going into the game jam with my brother:

  • Teach him how to write a Game Design Document (GDD)
  • Teach him how to use version control software (we used GitHub and Fork)
  • Teach him game design and balancing concepts
  • Make him experience game development, from brainstorming to releasing a game
  • Make him experience crunch so he’ll never want to experience it again in game studios (half joke)

January 7, 2023, 3:40 PM – we did not start off on the right foot – WE WERE ALMOST 12 HOURS LATE!

Because I forgot how time zones work. I thought the timer in the Ludum Dare website was Pacific Standard Time (PST), that makes the 8AM start time would be around 8PM here in the Philippines. But, apparently, the website synchronizes to the device’s time zone. Meaning, the “PST” on the website was actually Philippine Standard Time. Oh. My. God.

In any case, we wasted no time, gathered our devices, prepared a table for our junk foods, and started brainstorming game ideas for the jam’s theme, “Harvest”.

We gave ourselves one hour to go wild with ideas – just right them down, drain our brains of mechanics and features no matter how crazy they were; then after an hour, we deliberate and remove ideas that seem impossible in the 60 hours that we have. Here are some of the ideas we had during the brainstorming phase:

  • A game similar to Stacklands where you manage a farm using cards
  • A village management game similar to Breath of Fire 3‘s faery village, where you manage faeries and even turn some of them into faery dust if their stats are too low
  • Poop (because poop is always funny) harvester where the player harvests different types of animal poops, each with different prices
  • A game where you play as a Valkyrie harvesting souls for the upcoming Ragnarok
  • and many more…

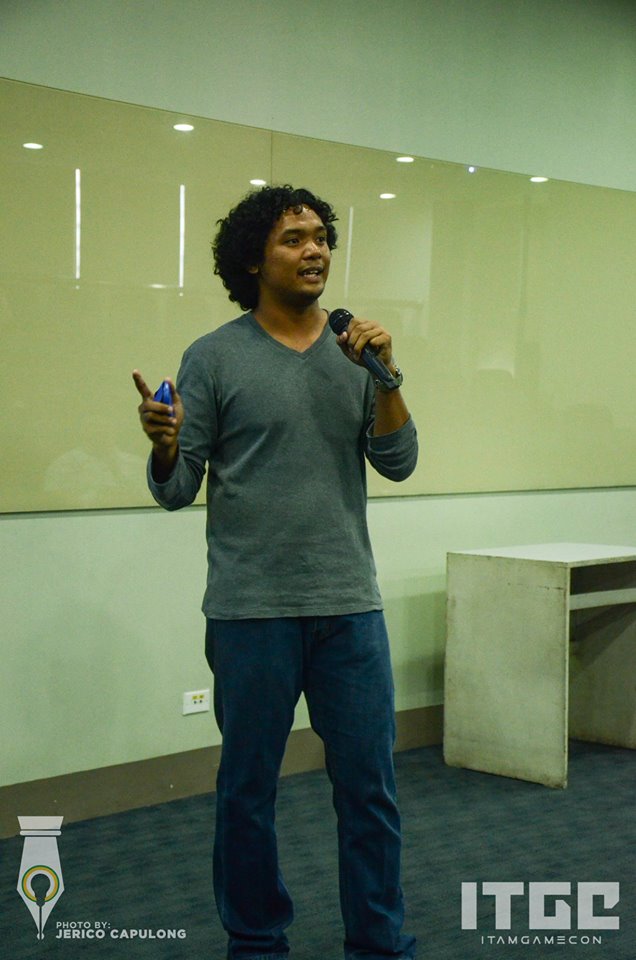
We ranked these ideas using Google Sheets where we had columns for Pros, Cons, and a 0-10 rating on how much we are willing to die for the idea. I got this from Ryan Sumo of Squeaky Wheel, it’s something we used to do when thinking of features for Academia: School Simulator.

During the process, most of these ideas were scrapped either because we didn’t feel that strong about the idea, or because we thought it’ll take the whole month to finish the game. During the discussion, we introduced the idea of having a dice for randomization since we both love Dungeons & Dragons; and to mix that dice mechanic with the village management from Breath of Fire 3. To further simplify the gameplay, there’s only one control – drag and drop (which later turned into just button clicking).

At the time, we didn’t know we’re making a management game but in hindsight, it worked well because we played to our strength – I mostly made management/simulation games in the past, and he also played a vast amount of games in those genres.

After brainstorming, we went to work – I started making a quick prototype on Unity, and he started working on Game Design Documents for each feature. We guided each other throughout our process to make sure I’m implementing his vision of the game properly, and I’m making sure he won’t go crazy on the GDDs and start feature creeping.

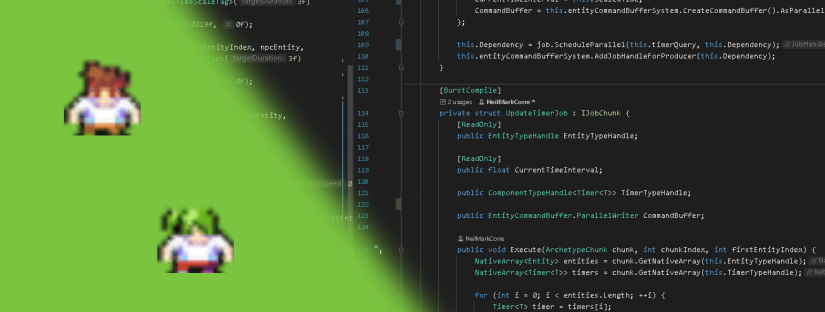
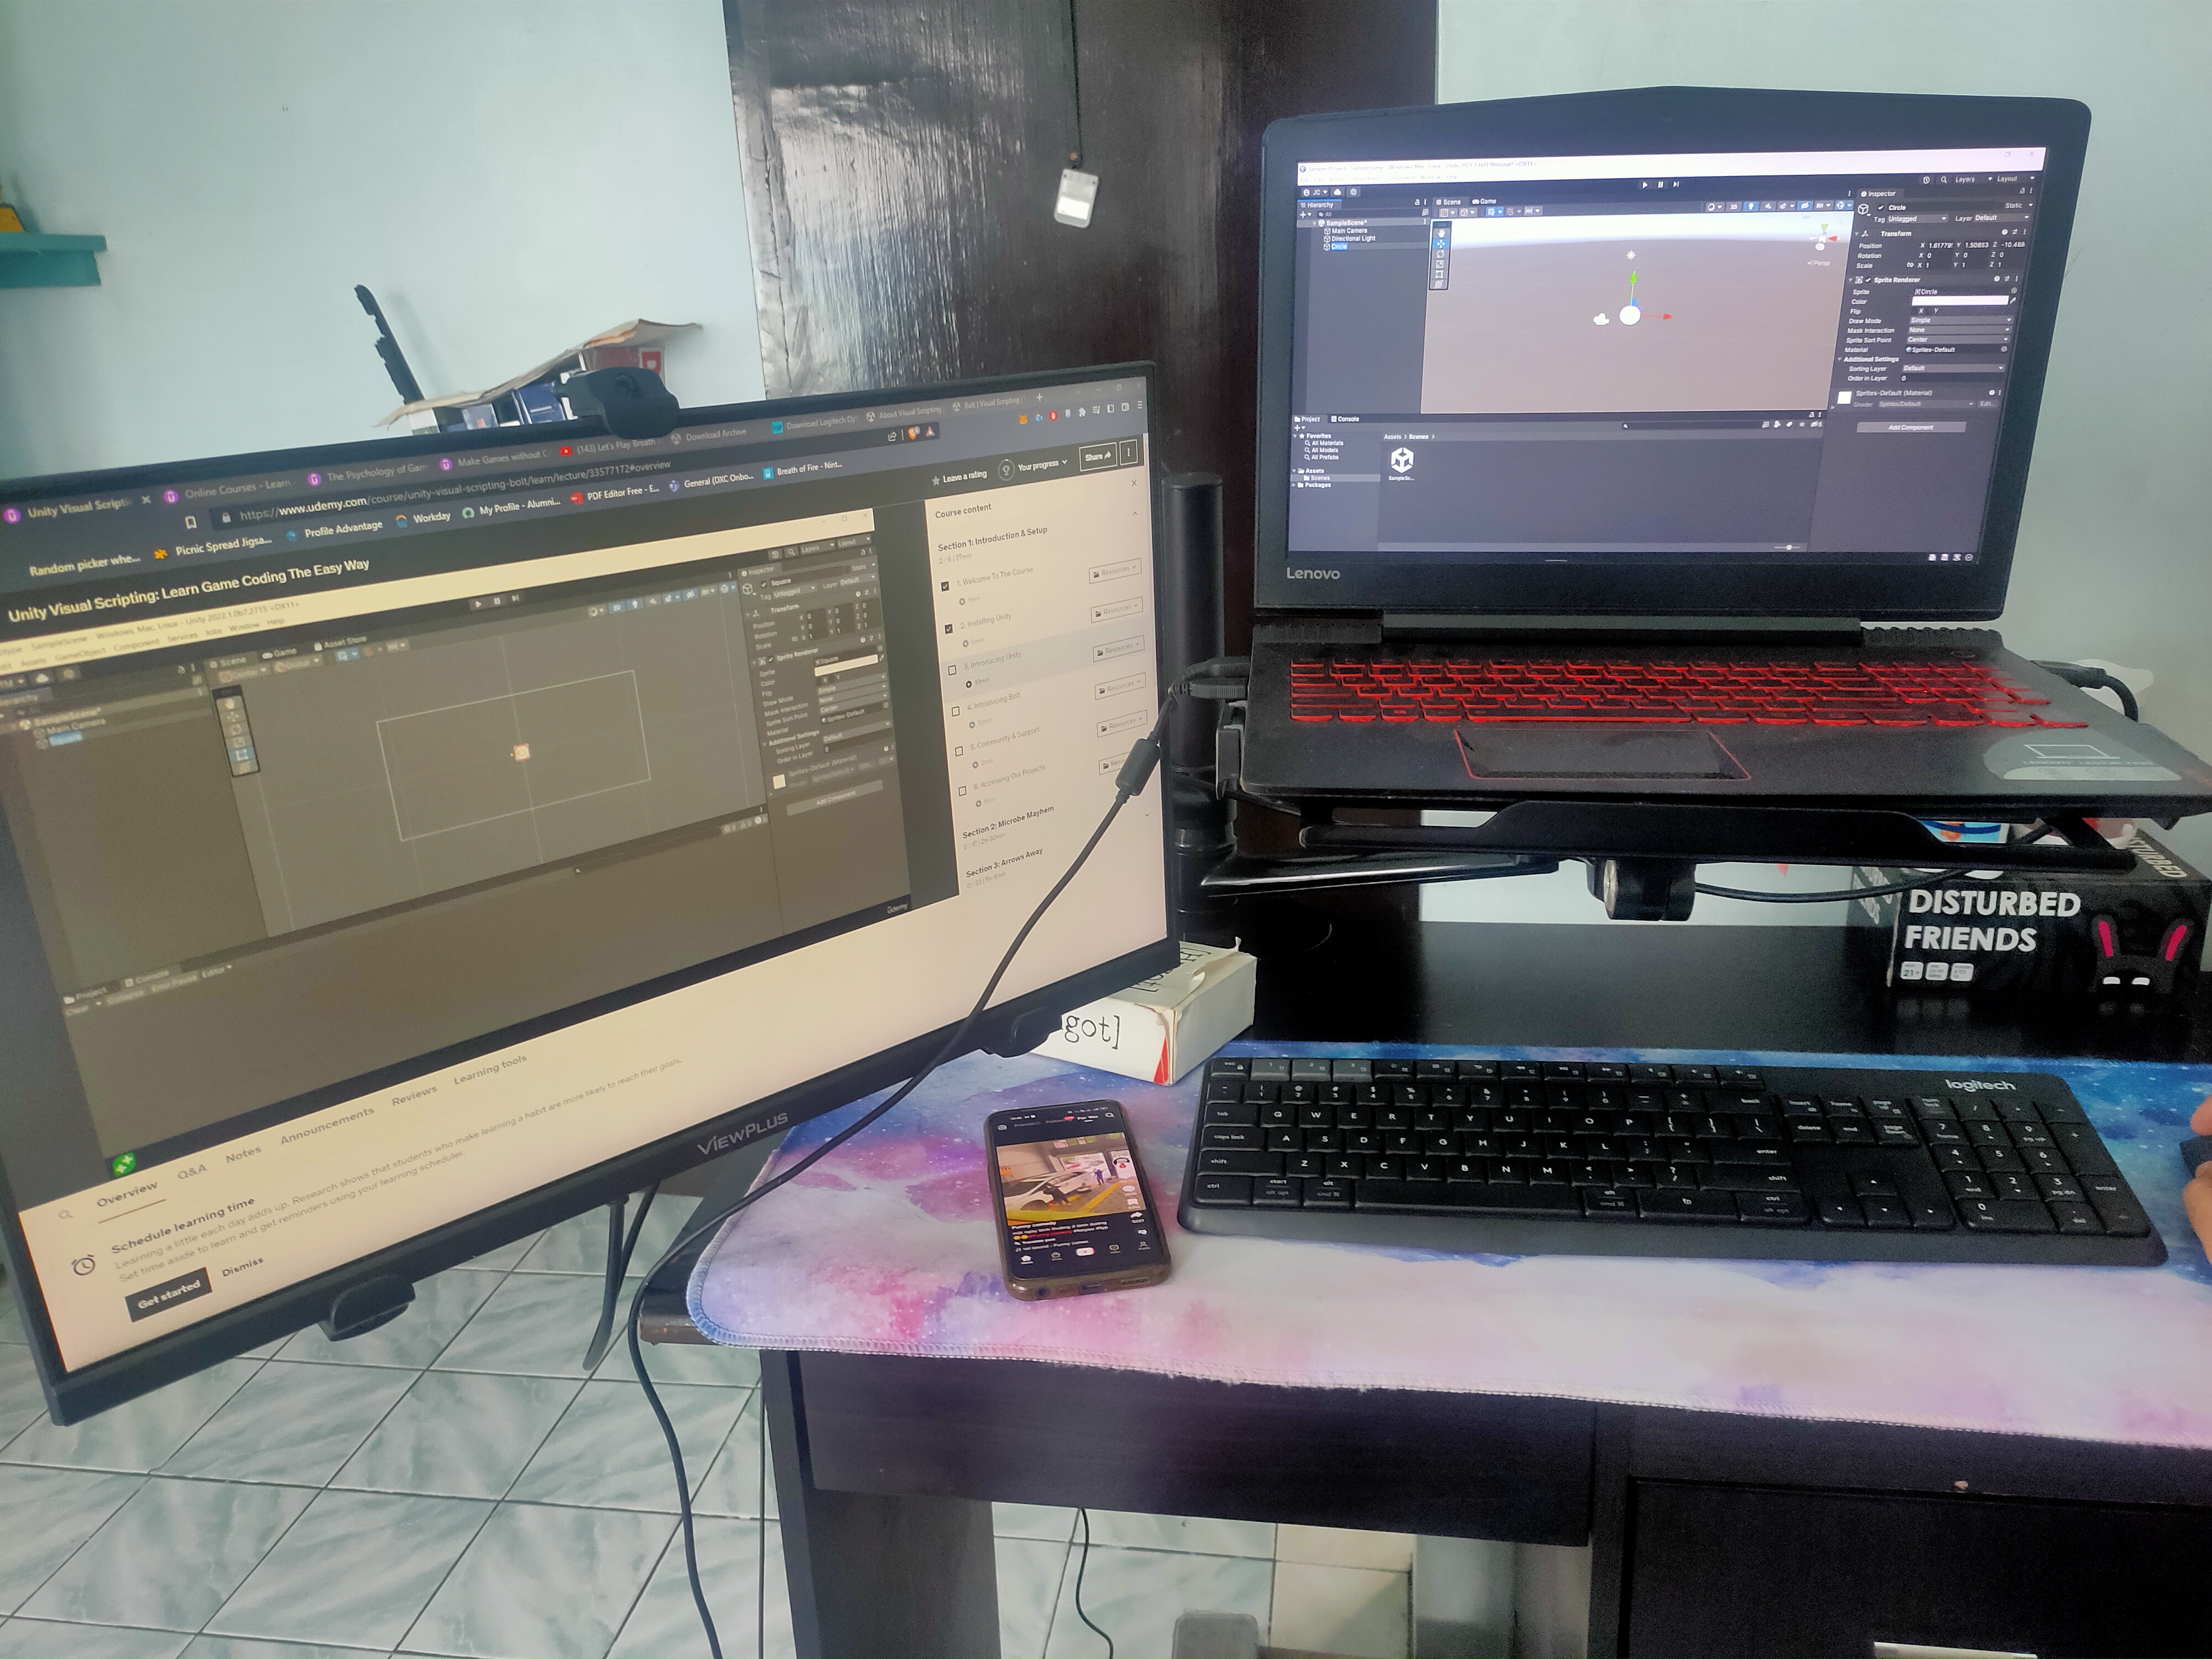
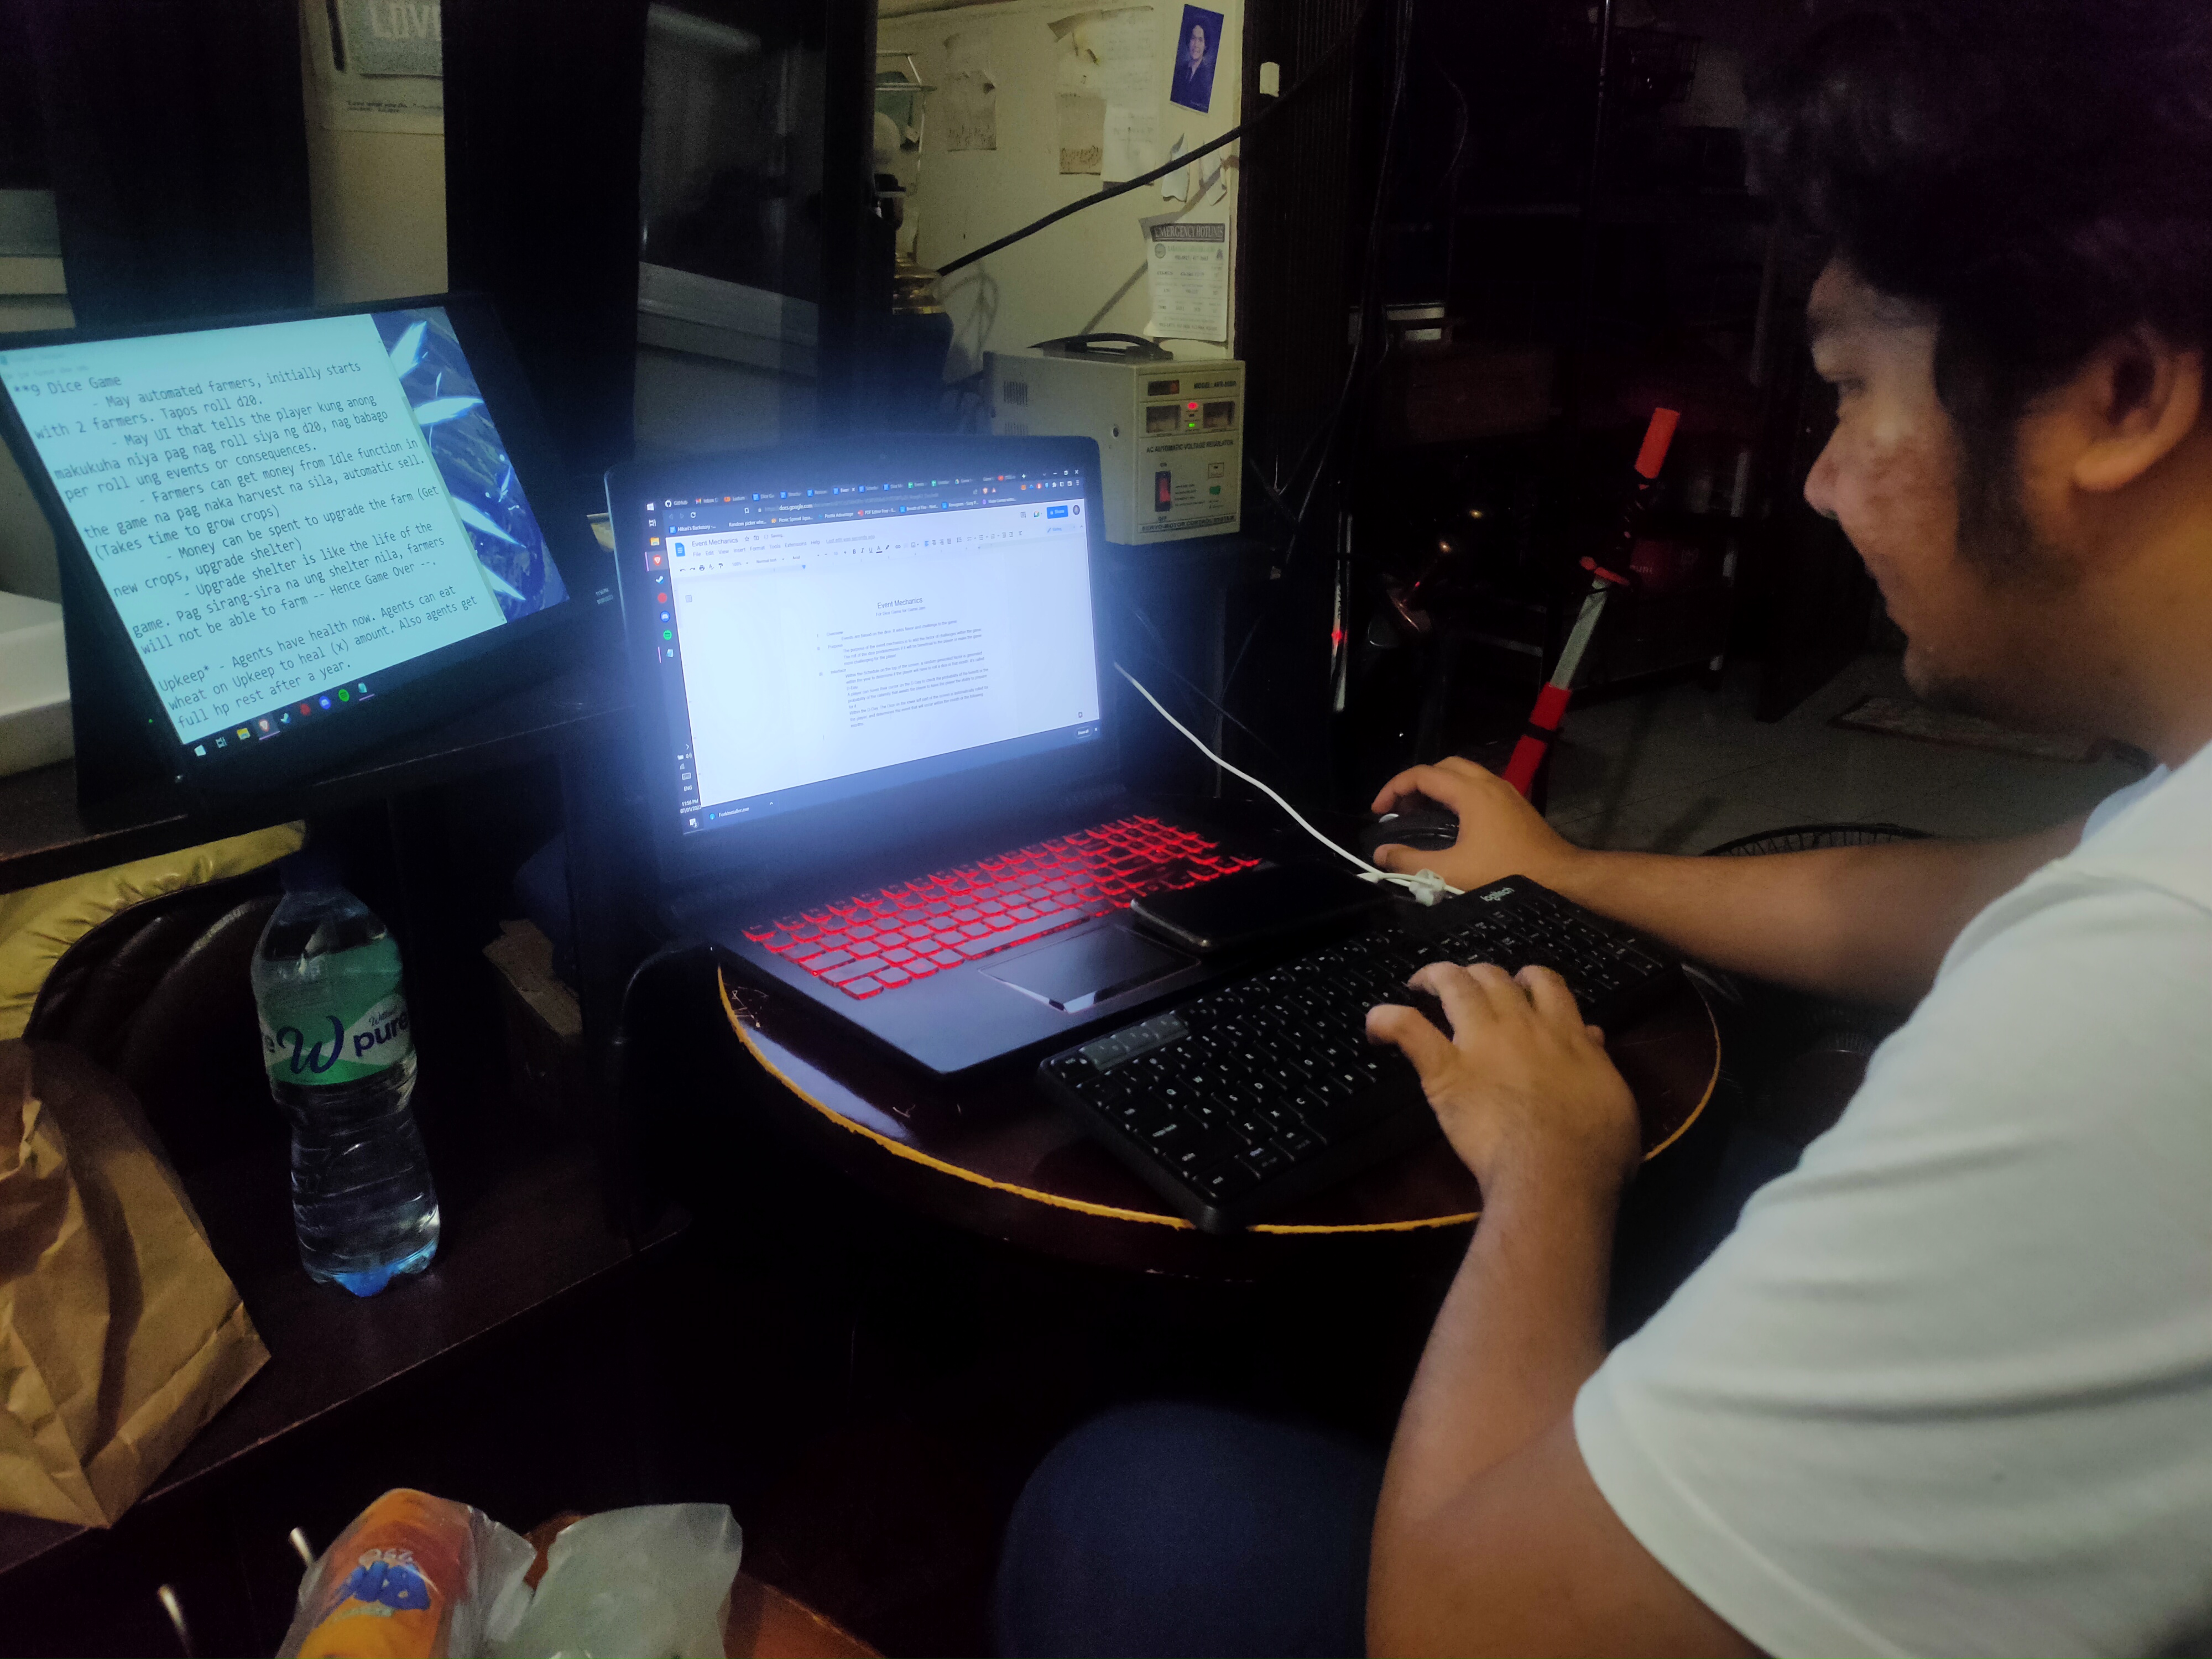
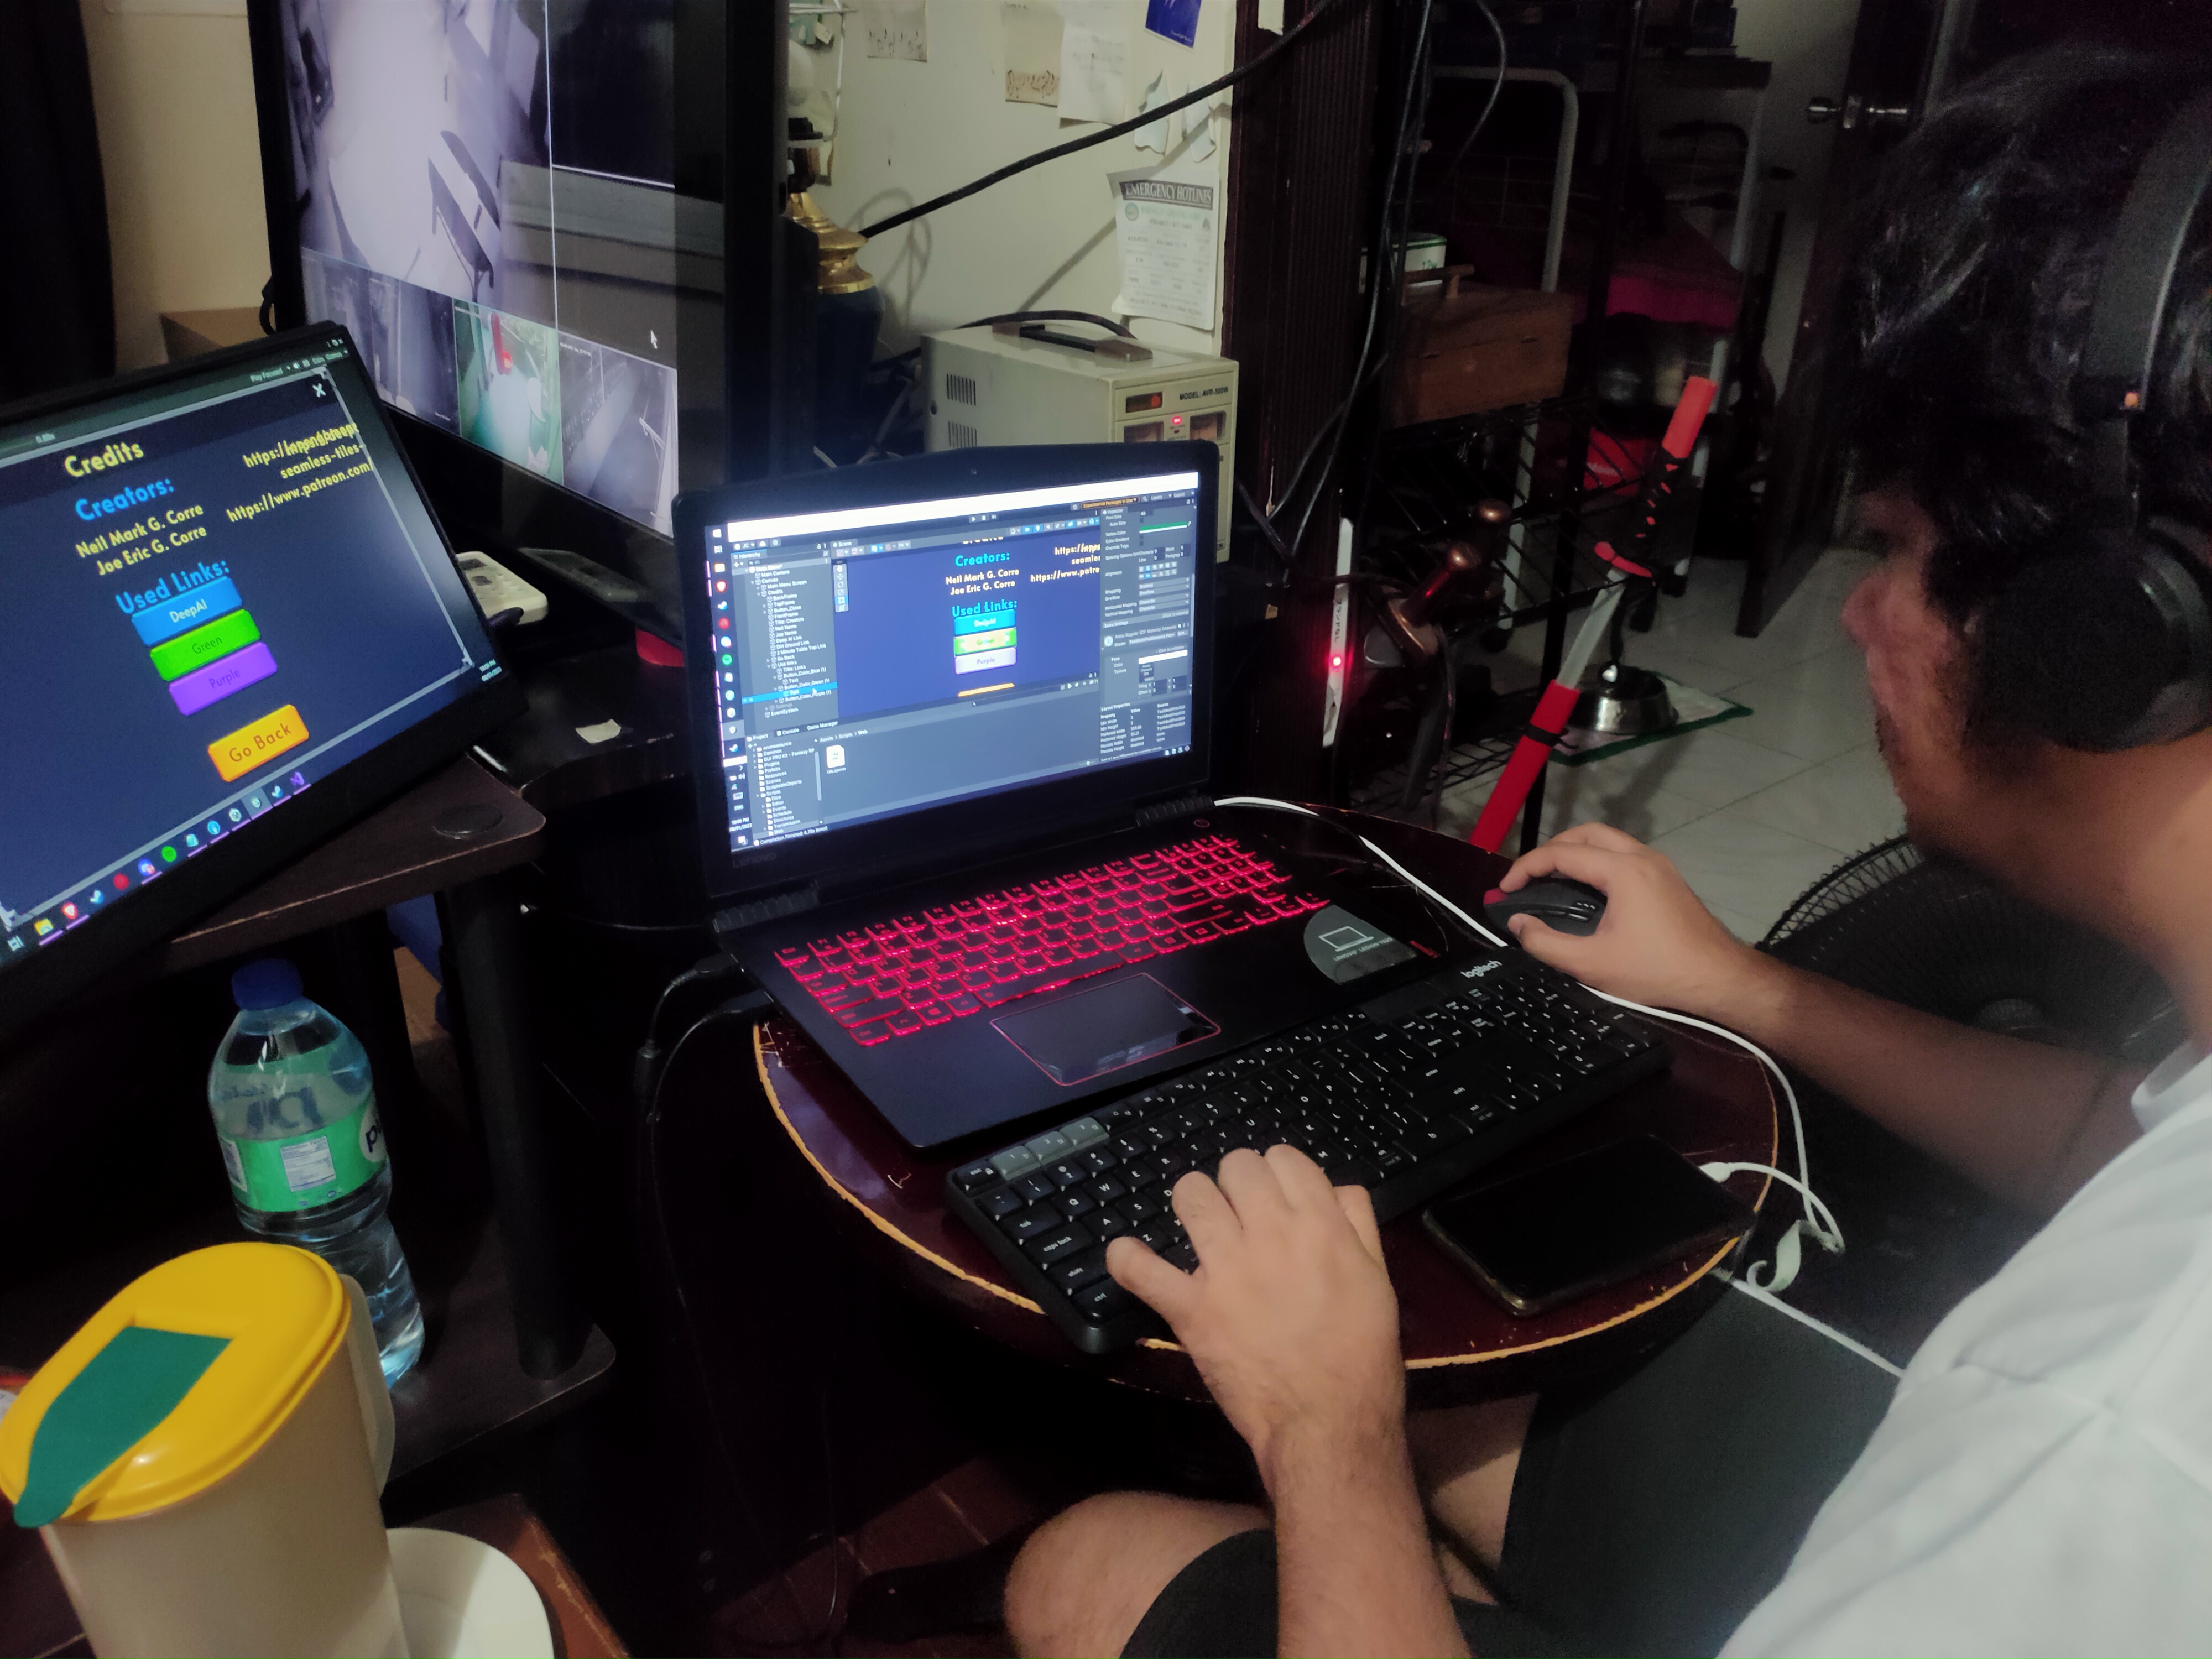
During the development, I also worked on different editors (with the help of Odin Inspector) for him to edit game variables for balancing and adding content, such as events, to the game. My brother also volunteered to work on the different UI panels for the game, as I got stuck in the events system during the second day. Plus, my computer decided to act up. Thank you, Murphy’s Law.

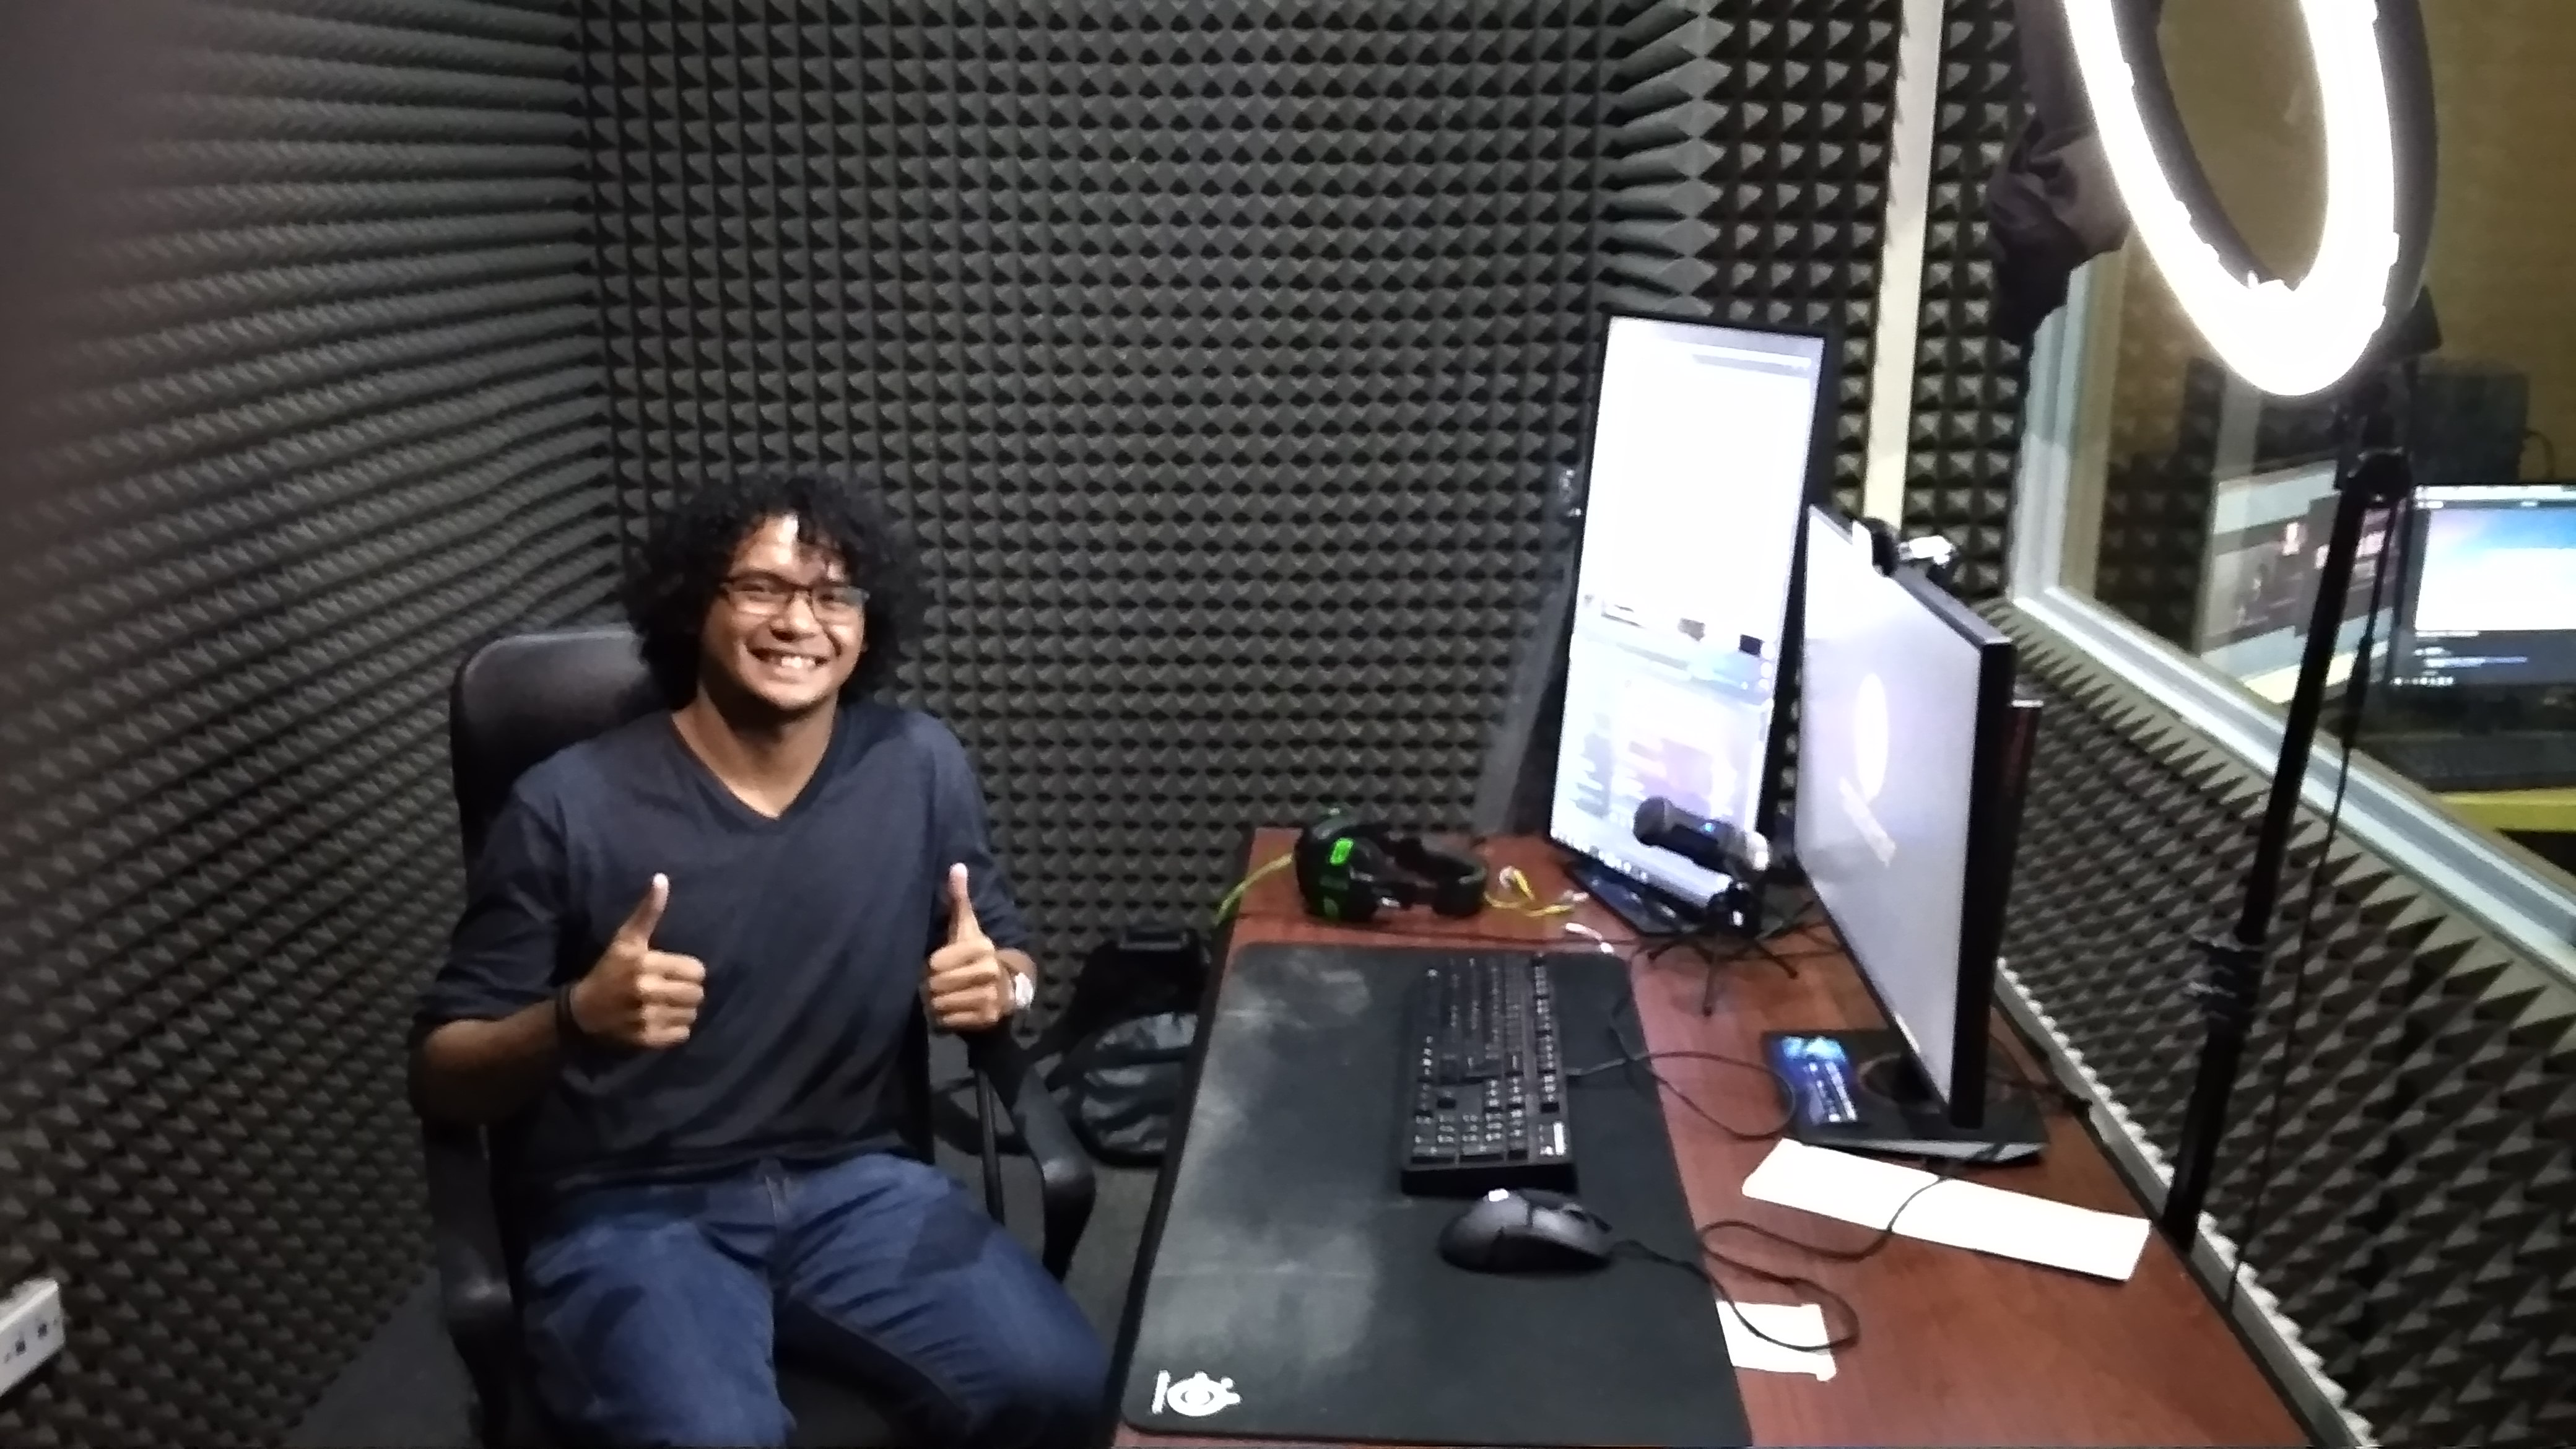
Here’s my brother working on different UI interfaces.

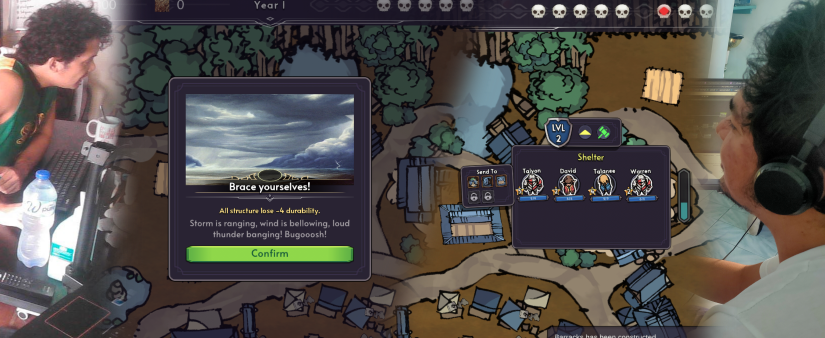
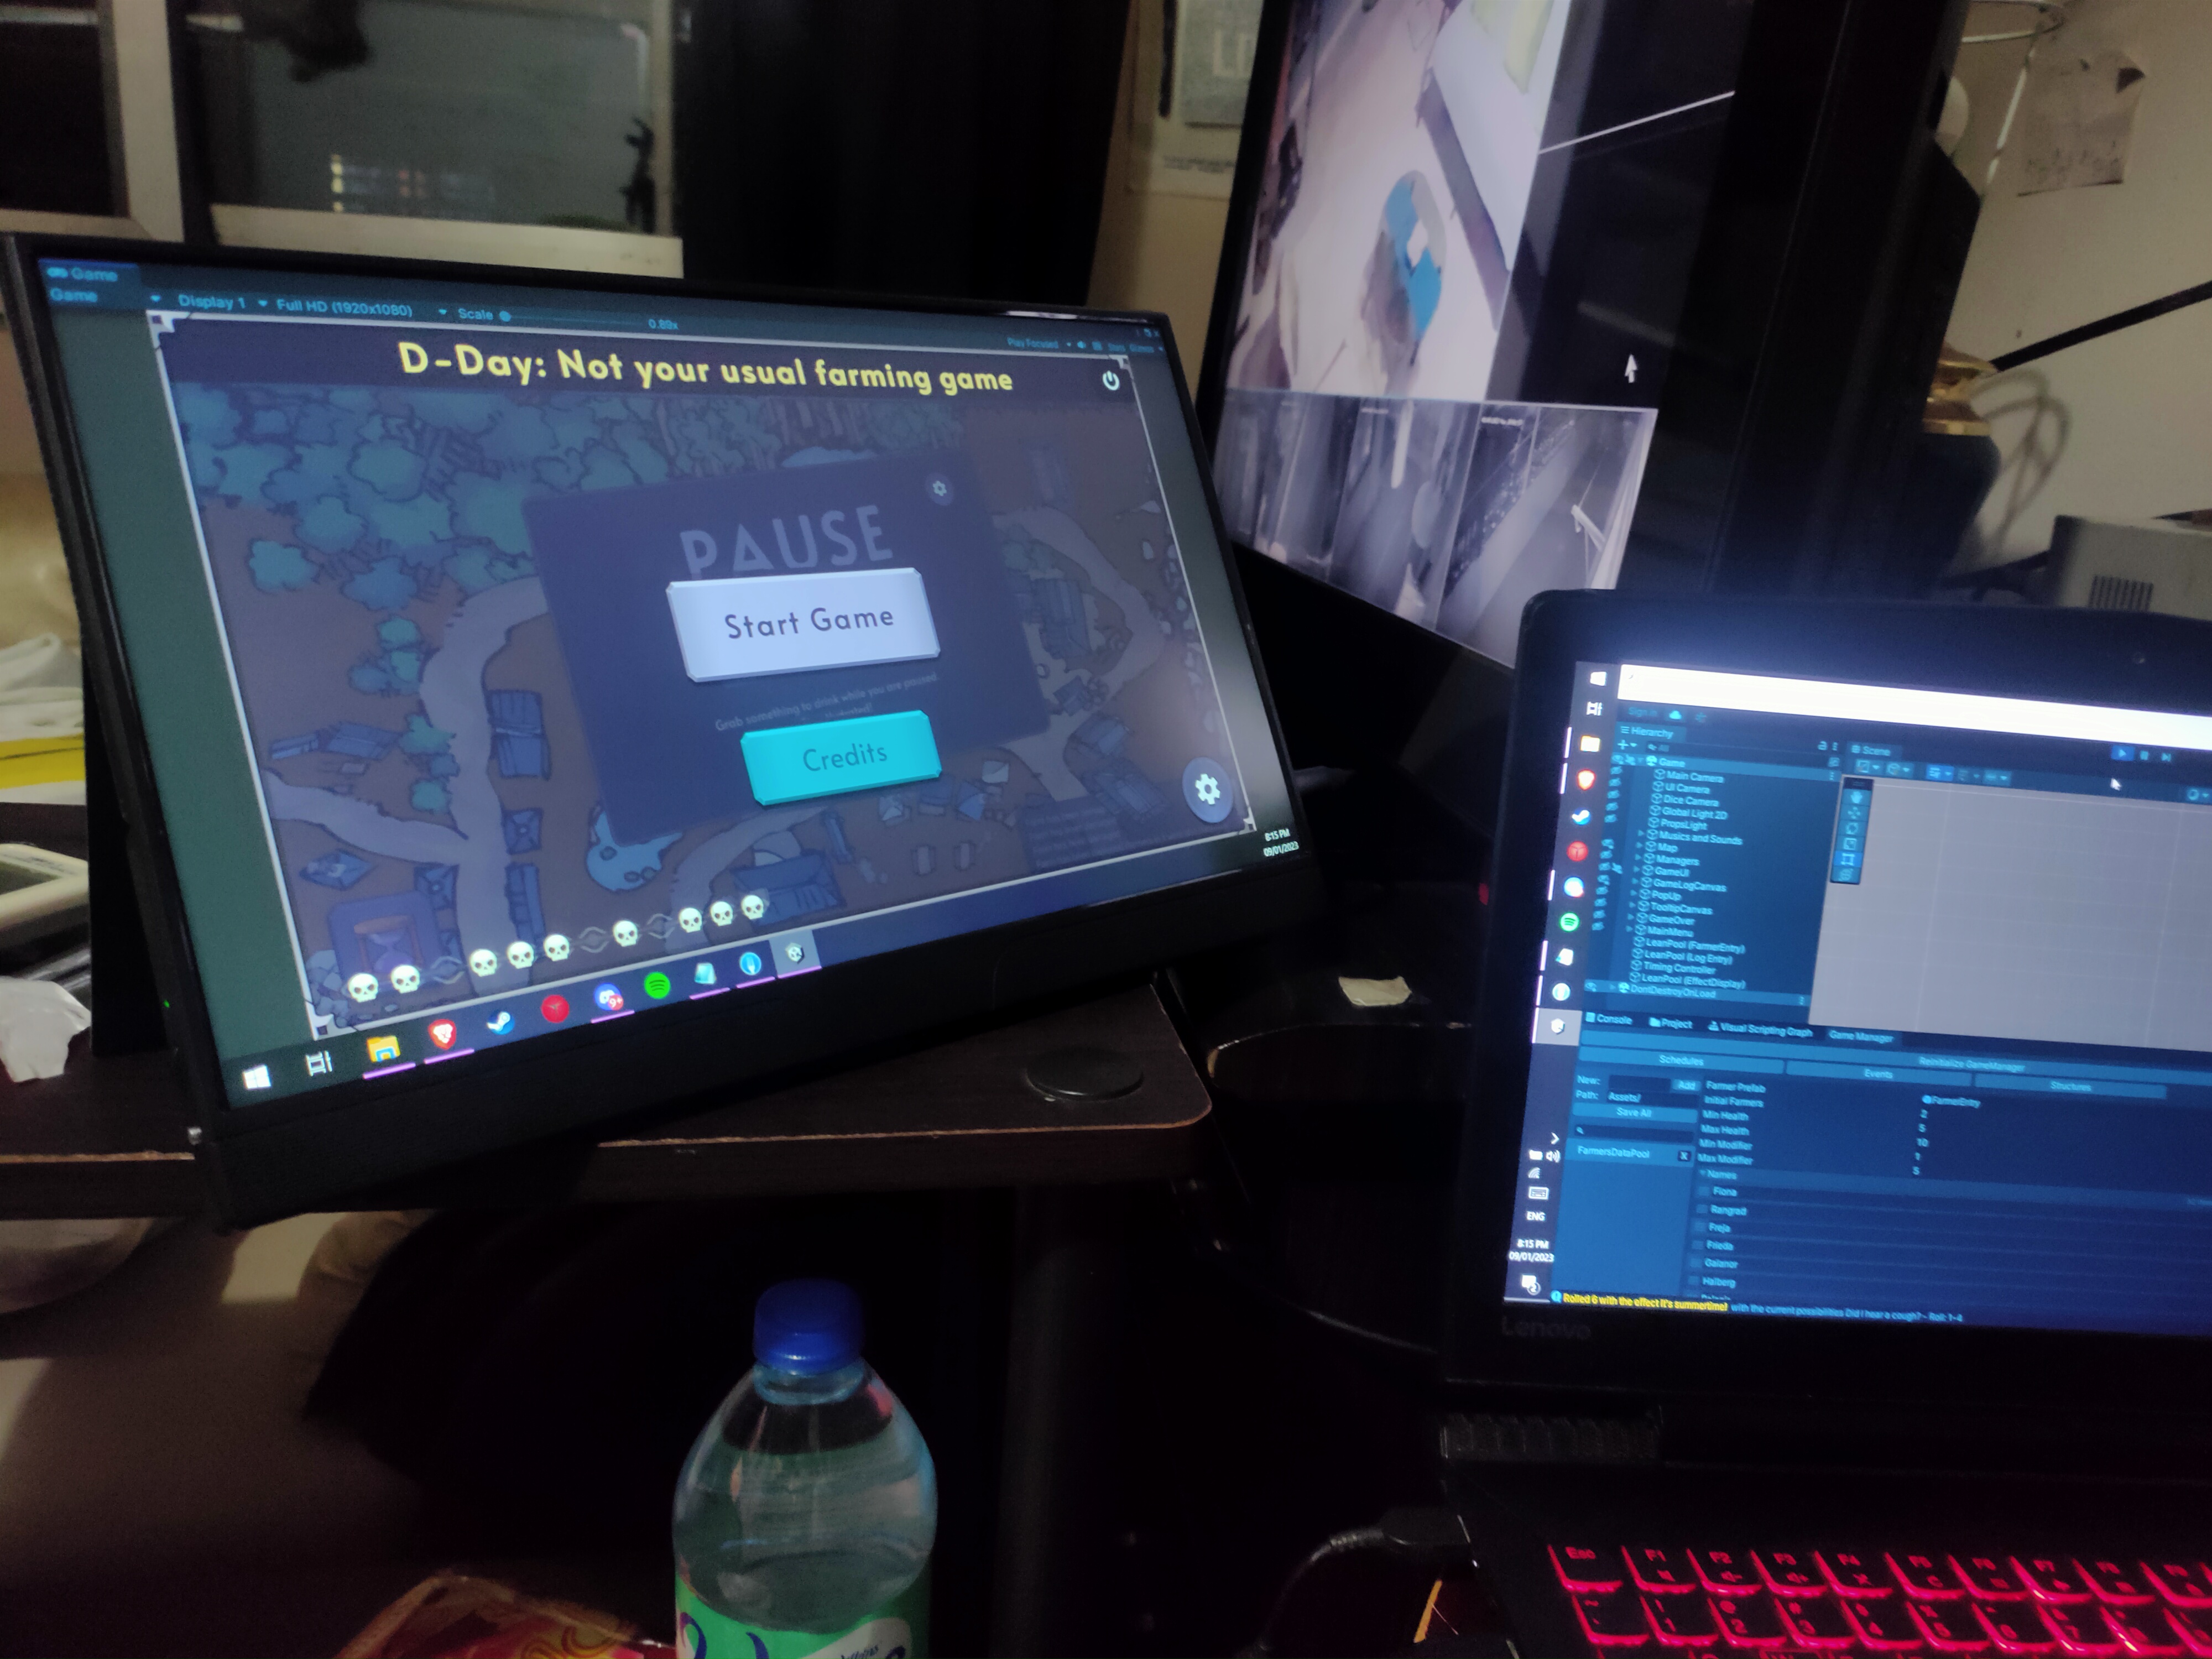
Still working on the game’s UI with a sneak peek on the initial title of the game.

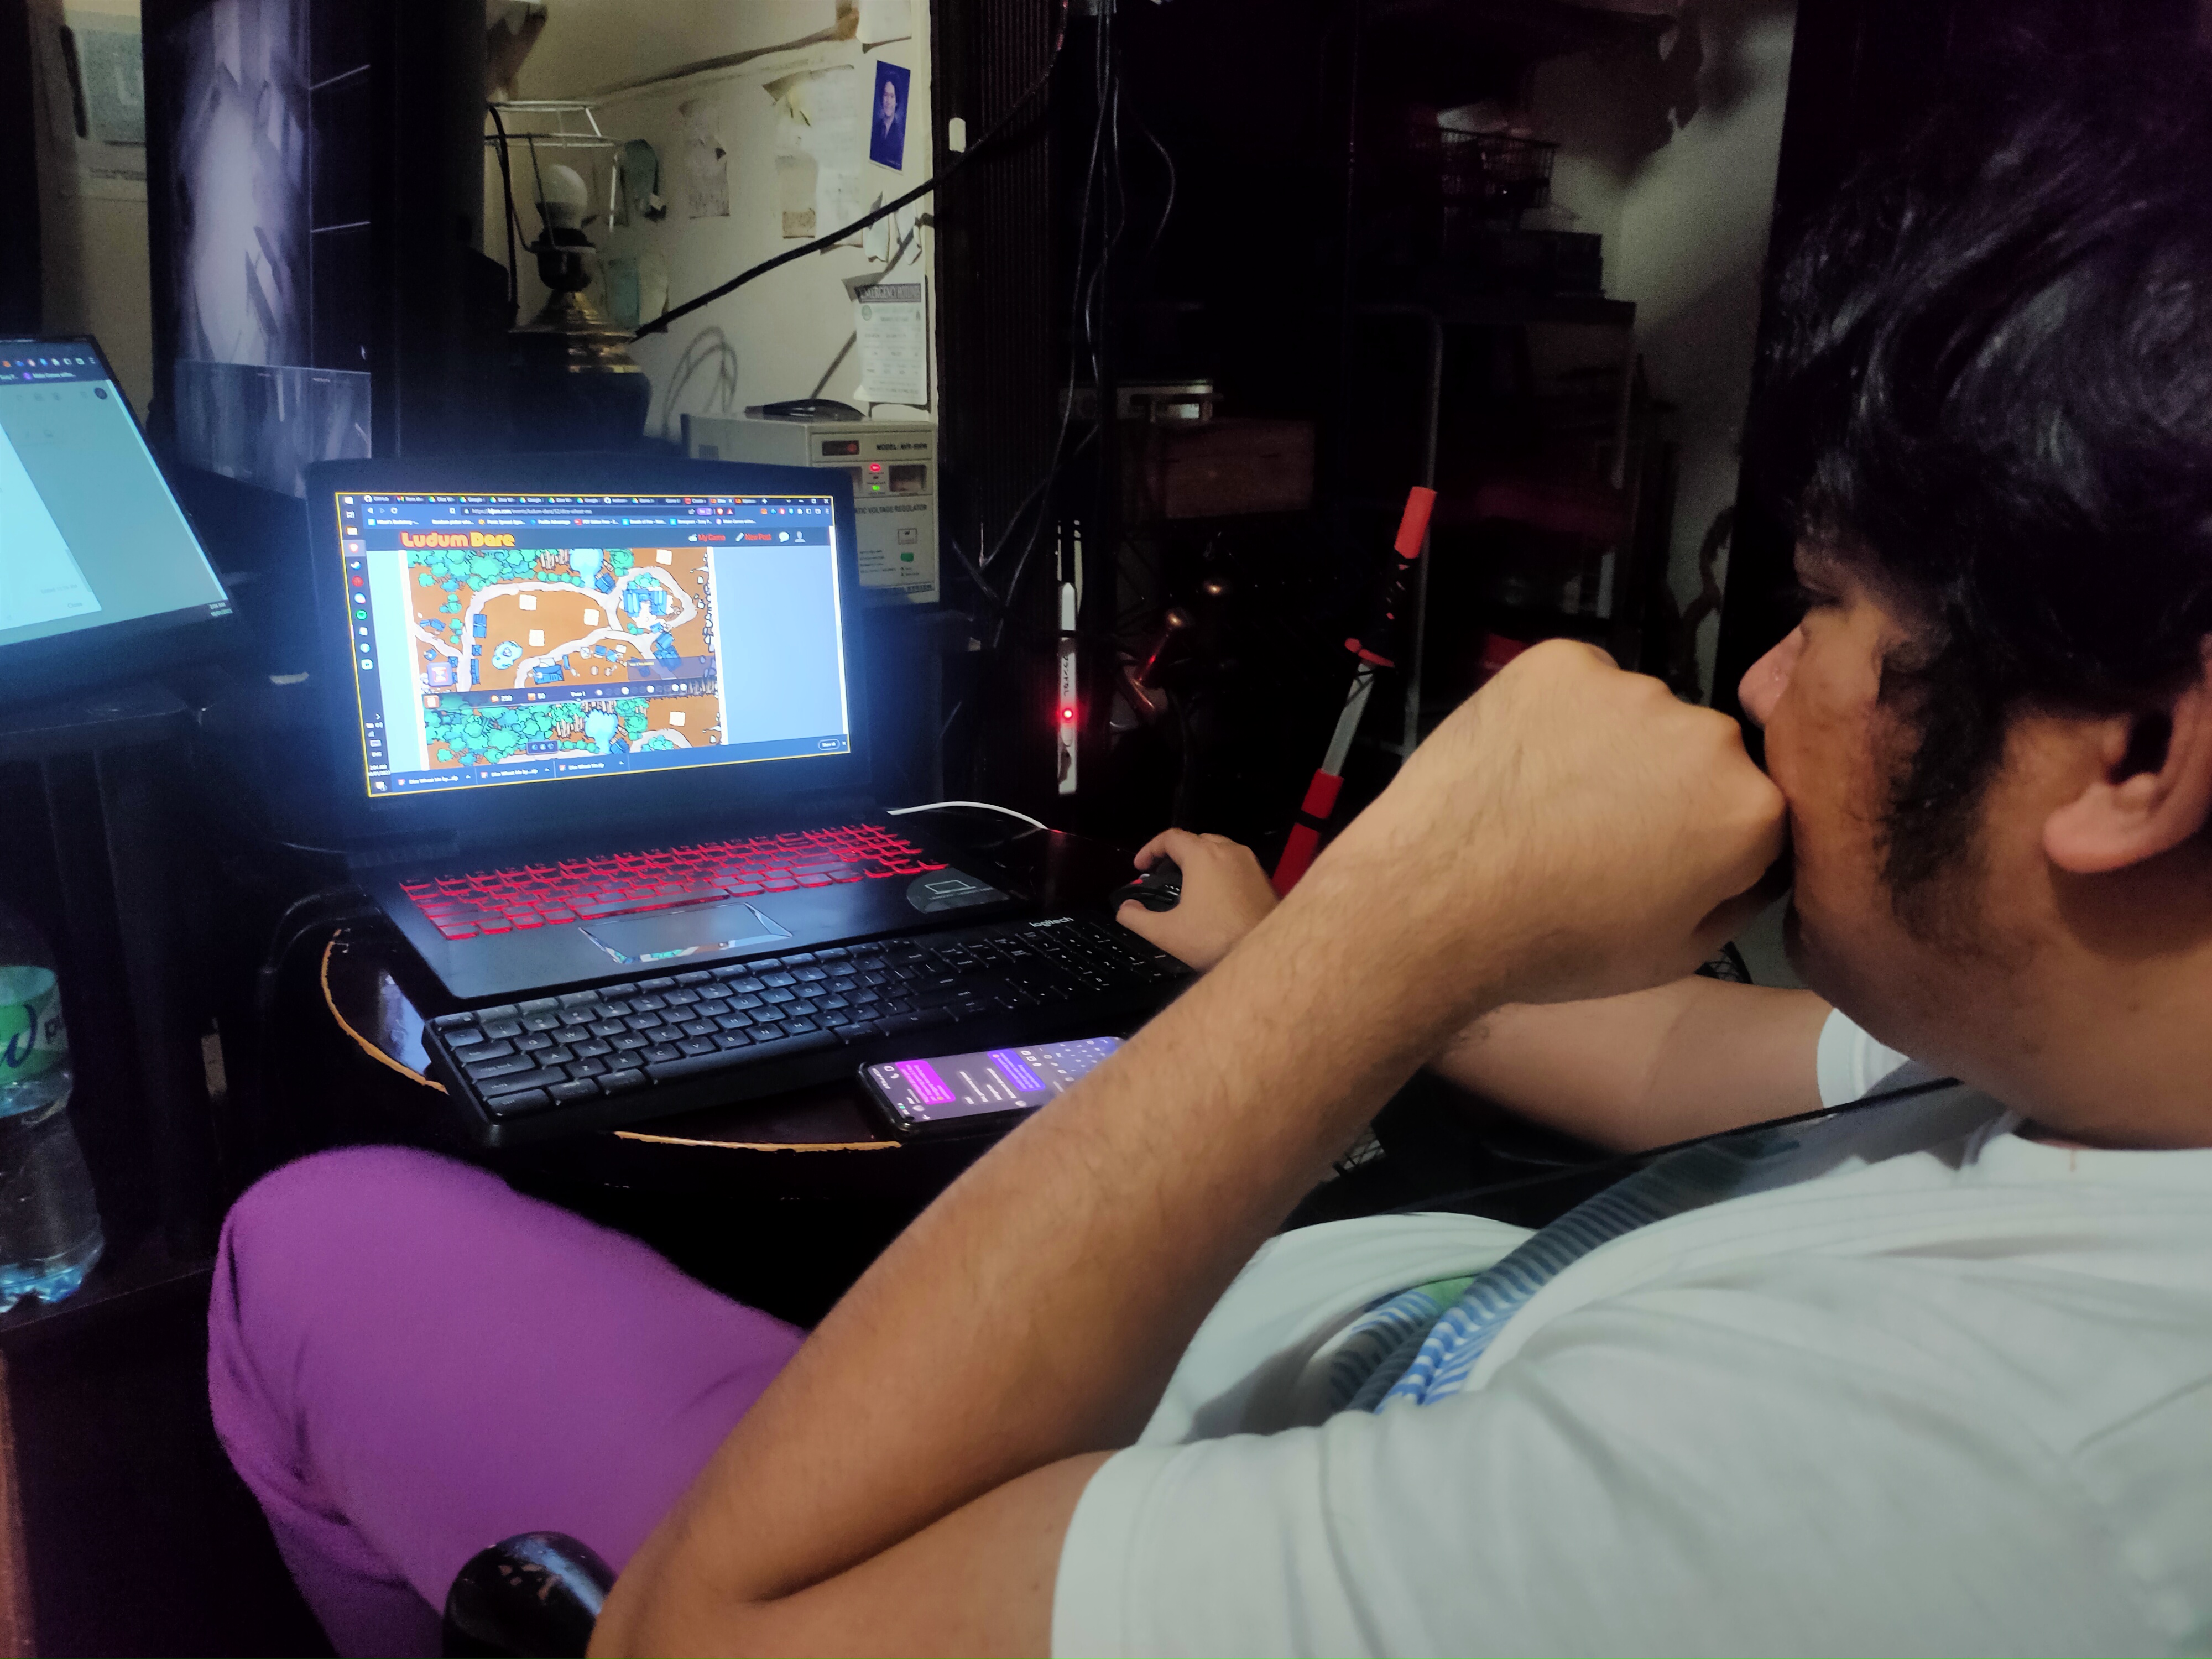
January 10, 2023, 2:38 AM – less than 2 hours into the end of the jam, we finished and submitted “Dice Wheat Me” to Ludum Dare’s website and to my brother’s Itch.io. Here’s my brother looking at his page after setting it up. We are heavily sleep-deprived at this point.

Then, we both went to sleep.

The next day came and we both felt somewhat rested, we checked the feedback on his first ever game on his first ever game jam, and – boy oh boy – the comments and reception were very positive!

Now, I can’t stop myself from comparing my brother’s first experience with my first game in Newgrounds last 2008, where a person used all of the available characters in the comments to fill up the box with “F*ck You!”…and did it twice.

In any case, I’m glad my brother’s first game was received this well. A Twitch streamer called jitspoe even played the game on stream and gave my brother some advice on what to expect as a new guy in the industry.

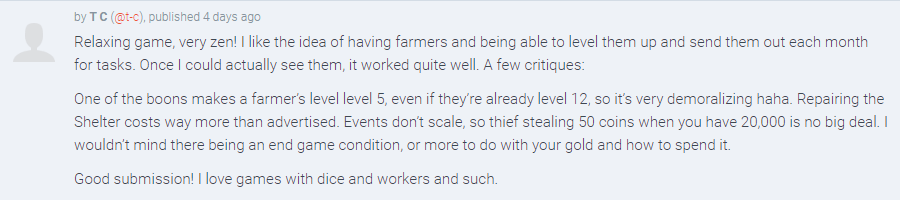
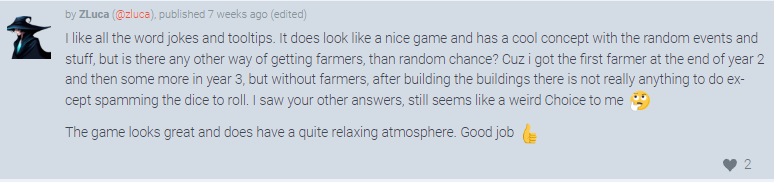
Here are some of the comments on his Ludum Dare page:

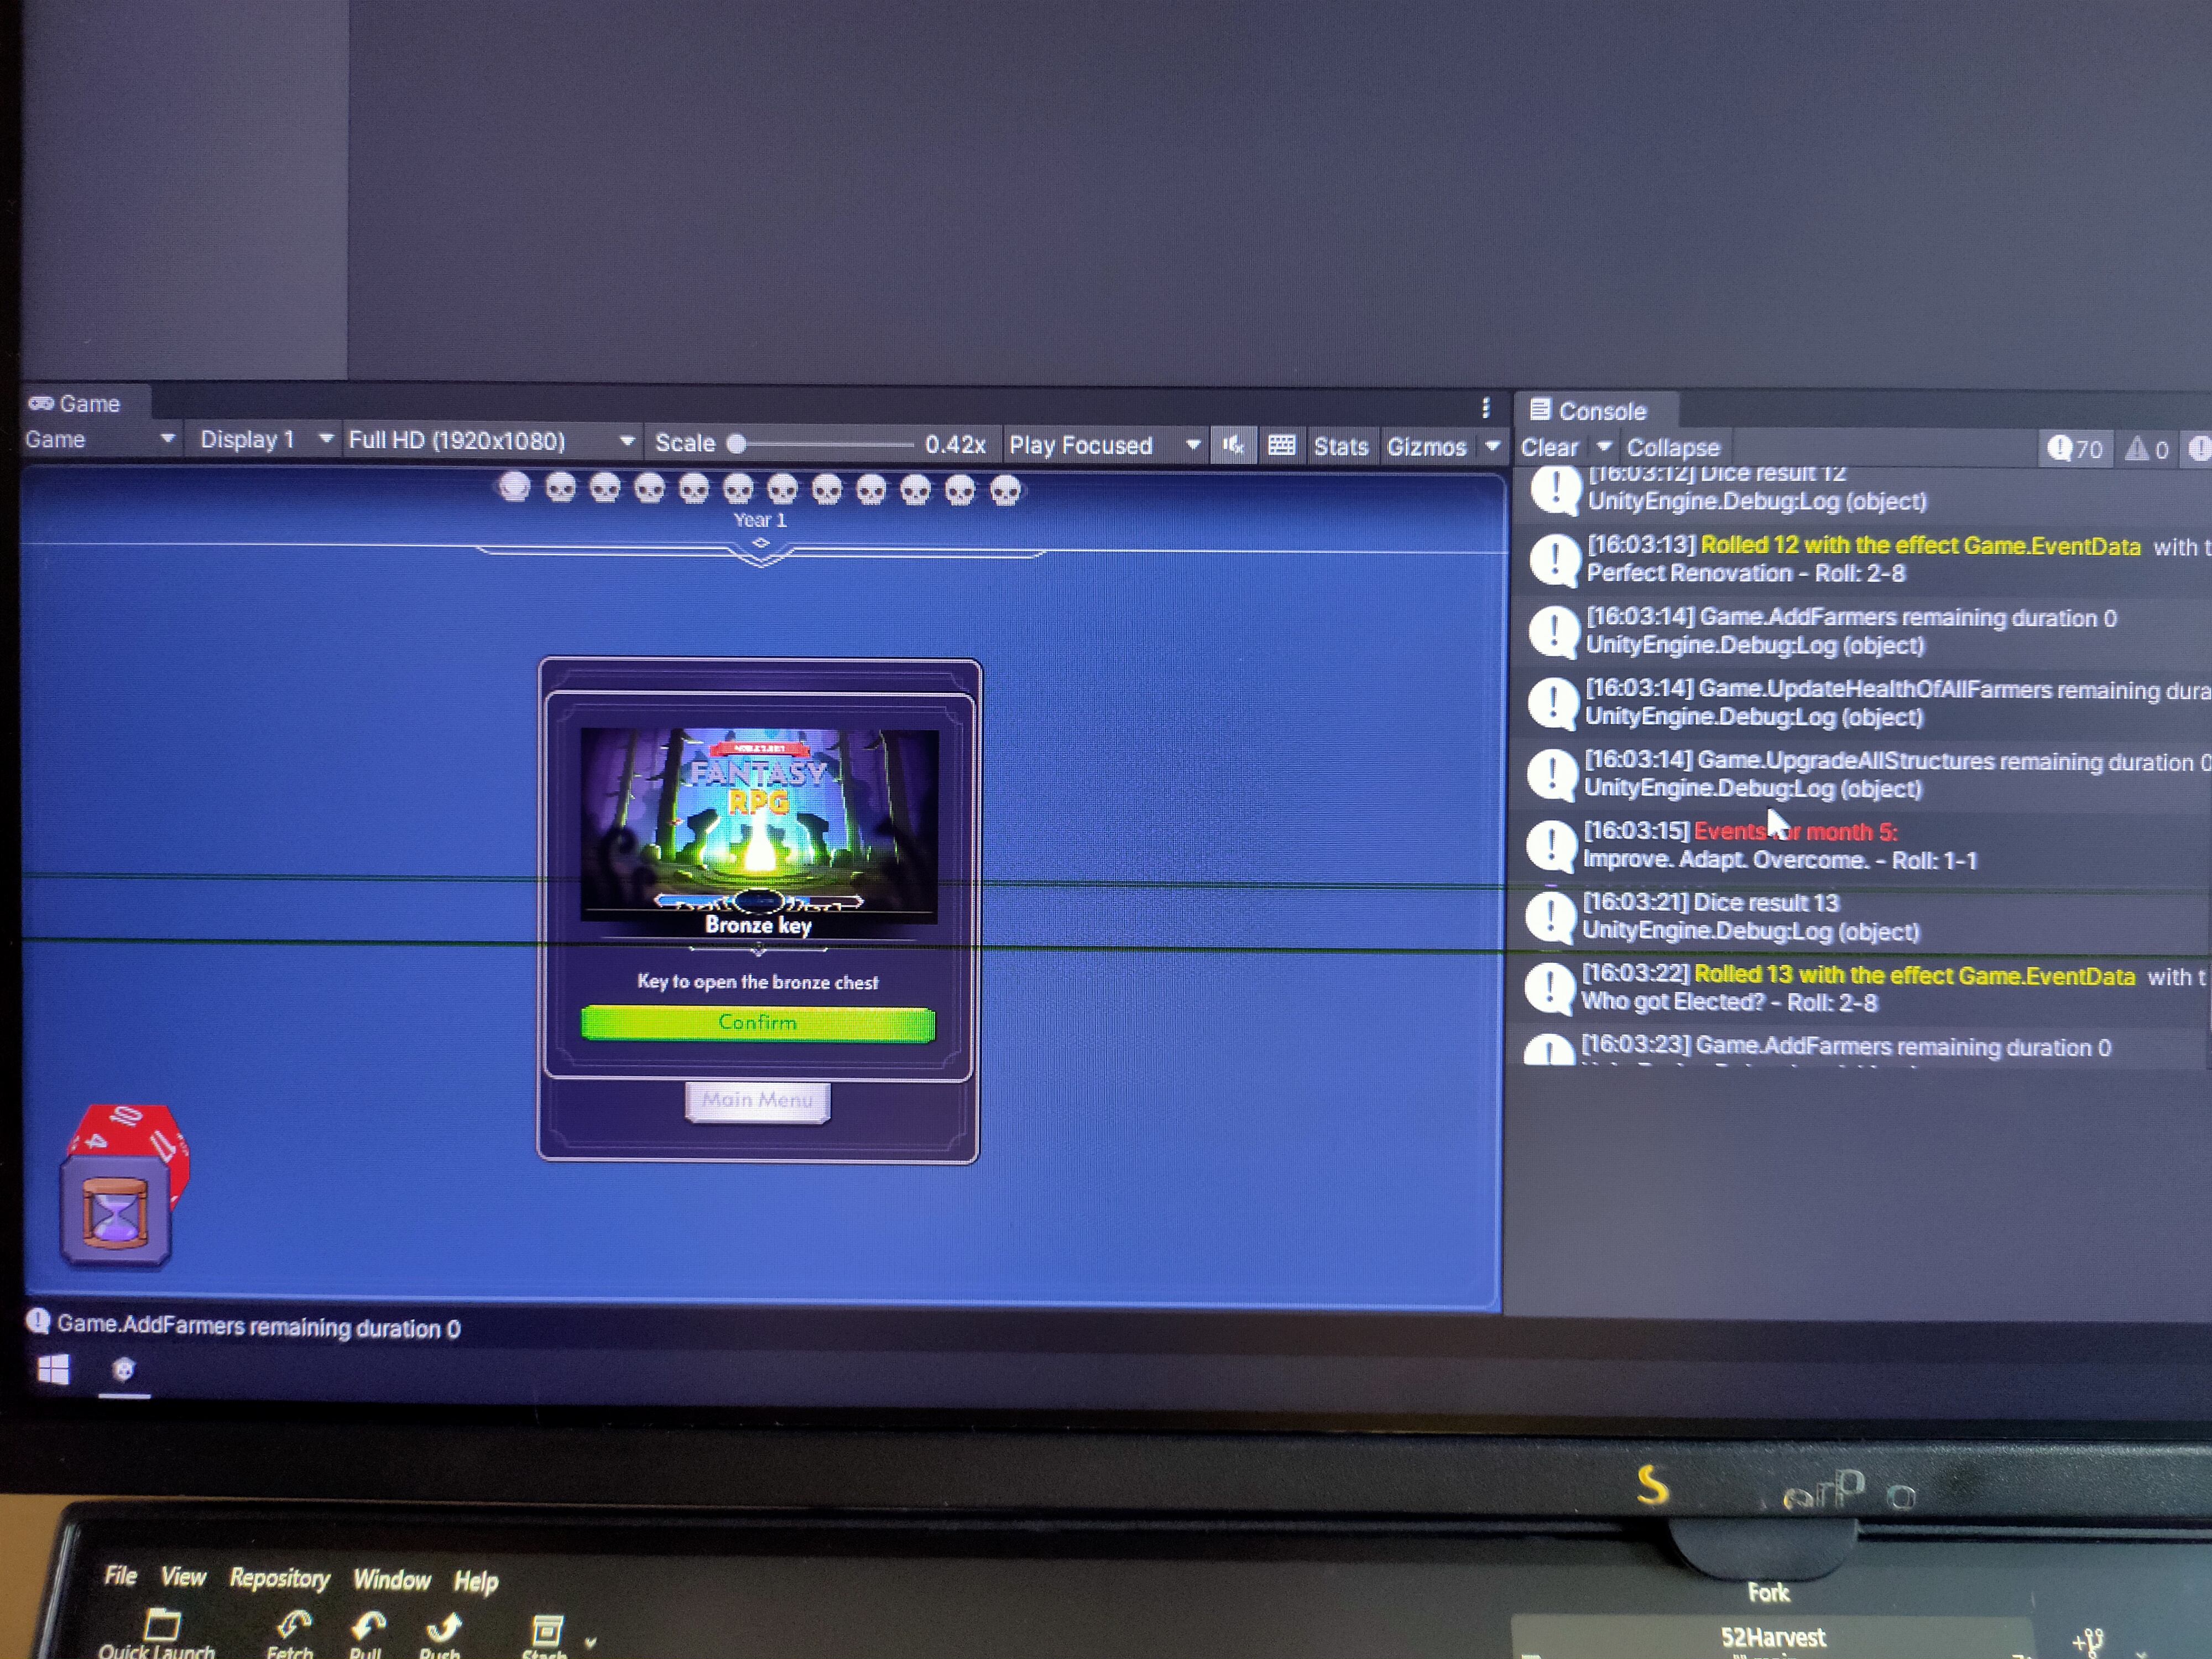
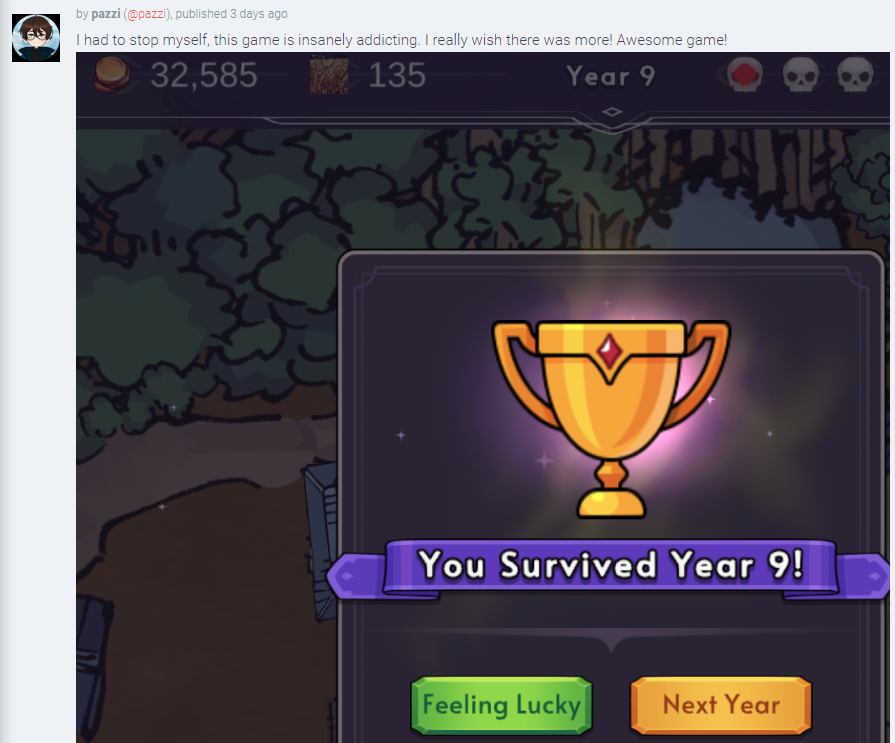
A player even reached Year 9 in the game!

There are still a couple more days before the voting ends. If you want to try the game, here are the links – Ludum Dare and Itch.io.

[EDIT March 7, 2023]

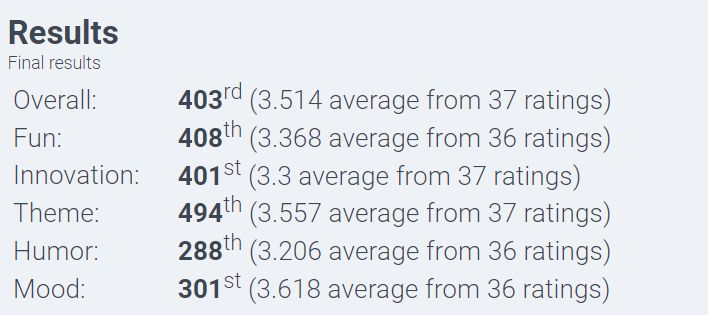
Here’s my brother’s overall results, out of 1649 entries. Honestly, not bad for a first game jam! If you’re interested he made a LinkedIn post expressing his excitement for the next Ludum Dare.
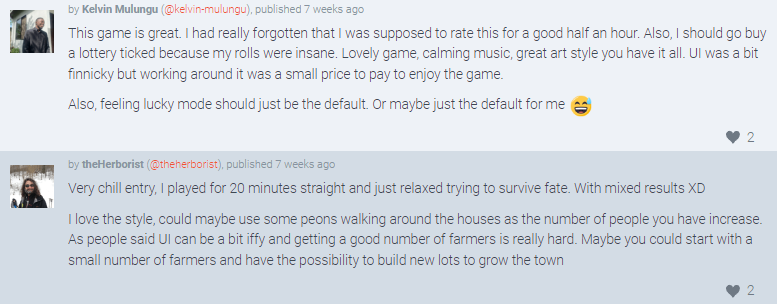
More Comments:

[/EDIT]

This whole venture has been a success not only for my brother turning his idea into his first game, but also for me seeing if I can teach game development to someone who has zero experience with the discipline. That said, there’s one lesson I keep going back to and I think would change this whole experience if I approached it differently – hand-holding, or whether I did too much of it.

Let me explain. Throughout my brother’s learning process, I always emphasized making simple games such as a Flappy Bird clone, or an endless runner. I believed that would further enhance his familiarity with Unity and with visual scripting. But, at the same time, I also wanted him to make a game that he wants to play.

I’m afraid that, given the time constraint, I took up most of the programming and left all the design decisions to him. Now, the good thing about that was, he was able to flex his game design muscles making Game Design Documents, and even using tools such as Google Sheets to list and balance events in the game. But, I felt like I took away his opportunity to learn Unity and/or apply his visual scripting knowledge during the jam. Yes, he worked on UI canvases, panels, and sprites in Unity, but he didn’t use any of the visual scripting knowledge he learned in the Udemy courses. That said, in our next jam, I’m letting go of some of the mechanics implementation, to give him an opportunity to use visual scripting on an actual project.

That’s it! This whole experience was fun from the get-go, and I would like to hear what you think – how would you introduce someone to game development? would you use online courses? do you think I did a lot of hand-holding during the process?

Let me know in the comments below or you can reach me out on Twitter.

Have a good one, and stay safe!

Farewell Blog for 2022

Estimated Reading Time: 12 minutes

Happy New Year! My last farewell blog was 2 years ago, and I called 2020 a b*tch. 2022 is not that different from a world or international point of view; but despite all the negative news of yesteryear, I tried my best to grow personally. I won’t be listing each points by month but by category instead. Enjoy and I hope you can also learn from my mistakes.

As usual, here are quick links to skip ahead:

Let’s start!

Think Simulator

With the disbanding of Squeaky Wheel last May 2021 and the acquisition of Academia: School Simulator by Paradox Interactive, Marnel (one of the cofounders of Squeaky Wheel) and I set out to start our own studio – Think Simulator – and work on a simulation game called City Hall Simulator.

A quick side note – if you’re interested in the lessons during the 5-year development of Academia: School Simulator, Marnel and I wrote our own lists. Marnel’s 20 Lessons, and my “more lessons“.

I gave myself one month of break to cool down from the crazy and very eventful experience that was working with Squeaky Wheel. But, I was very excited to start in this new venture with Marnel, that I actually started diving deeper into Unity’s DOTS during that break.

After the break, Marnel and I hit the ground running. About 2 or 3 months in, we already have a game with time controls, AI, and basic building mechanics. At first, we wanted to make a space game called Stellar Transit Enterprise, where the player manages cruise ships that has different amenities, taking passengers from one planet to another. But, there’s A LOT of space games already this year. So, during one of our calls, Marnel shared his realization that our city hall kind of looks like a mini city already, suitable to be a game. Thus, we pivoted our effort from the space game to City Hall Simulator.

We immediately started working on the design, the features, and started preparing materials for marketing. I even started being more active on Twitch to make people aware of our game early on. More on my streaming experience later in this blog. We also started our social media – Twitter, Discord, YouTube, and even our own website (now deactivated).

Development-wise, it’s important to note that from the very start we decided to implement systems using “pure ECS”, which if you’re familiar with Unity, was still in development at the time. Here’s a tech blog from Marnel on how he converted our agents’ actions to Entities. Now, this is great for our game which we expected to have thousands of agents. But, in hindsight, the tech debt was quick to accumulate. Here are some of the complexities we encountered:

  • Lots of boilerplate classes to create GOAP actions. This has to do with the fact that, at the time, it was not easy and it involves a lot of workaround to make custom editors for Unity’s ECS.
  • Debugging was also tricky. It’s not impossible but tricky, and it took more time to debug entities compared to MonoBehaviours that you can just select in the hierarchy.

That said, after more than a year of development, we decided to no longer continue. Marnel got a job from KING Art Games in Germany, and I went on a job hunt.

Job Searching

With all honesty, I didn’t know how to search for jobs anymore. If you’ve read how I got into the industry, you might remember that my experience with looking for jobs involve submitting proposals in a platform like Upwork, or referrals. Both of which are different from submitting CVs or resumes to studios.

I didn’t know where to start, I didn’t know what to look for, and I didn’t even know what I wanted in a studio at the time. But, I was sure I want to work overseas somehow, and if possible, expand to a different game genre. An opportunity to be mentored about marketing and managing a studio was also a huge plus.

Luckily, my mentors – Marnel Estrada, Ryan Sumo, Tristan Angeles, my brother Ben, and others – were kind enough to have a quick chat, and/or have blogs and guides about job searching and interviews that were very helpful.

Since I was lost and didn’t know where to start, my brother Ben (a senior in the “common/usual” tech industry) shared what he looks for from an employer, in no specific order:

  • Healthcare benefits (for him and his family)
  • Dental care
  • Number of vacation leaves (important to him now that he has a family)
  • Paid Sick Leaves
  • Salary
  • Work-life balance
  • Company culture (is it toxic? family oriented?)
  • Day-to-day tasks (is there a crunch culture?)

Marnel also motivated me by telling me my experience already looks good, having worked with Squeaky Wheel for Academia: School Simulator. He shared these with me to help with preparing for my job search and the interviews, in no particular order:

  • Leetcode for practicing exams
  • Think long term if the games are going to be prestigious
  • Don’t be afraid of “job requirements”, most of the time they are just “wishlists”

With these in mind I looked for job openings in LinkedIn, Indeed, WorkWithIndies, and in career pages of different game studios. After about 2 weeks of searching, I ended up with 2 choices – General Interactive (via LinkedIn) or BoomZap (via their career page). Both have similar offers and benefits. Both also work on genres and games that I’m interested in. But, there’s one difference, a chance to work overseas. It took me 3 days, and a detailed Google Sheet, to compare the offers and to imagine myself working with either companies.

Chris Natsuume of BoomZap gave a really great advice that still echo in my head to this day – if I plan on starting a studio in the future, it’s best to stay here in the Philippines and not go abroad (potentially to a more expensive country) to save. Because going overseas will also kind of double my expenses, given that I am still paying our house’s mortgage here in the Philippines. BoomZap is also one of the longest living studios here in Southeast Asia, and it would be wise for someone who wishes to start a studio to learn from them.

Ryan Sumo, on the other hand, pointed out that I am still young and still have the opportunity to take risks that won’t break me. He also shared that moving abroad is going to be an experience that will broaden my horizons. Once more, Ryan reiterated his faith in my skills, adaptability, and ambition. Being a person with “mababaw na luha” (shallow tears), these words made me cry a little. Dang it, Ryan sure is a person who’ll make you think deep about your choices in life – and I am forever grateful.

In the end, I accepted General Interactive’s offer. Mark Fillion‘s offer as a mentor for advertising and marketing sounded really good, given that it is also his day job. Plus, the opportunity to relocate (yes, I’ll take the leap).

General Interactive Co Logo

General Interactive

I started in General Interactive around July 2022 as a Senior Game Developer. That said, this is a step up to what I’ve been doing in the last 7 years. Back then, I would just work on top of or improve upon existing systems, usually written by Marnel from scratch during my time with them. I did work on independent systems before, but it’s not a recurring task as most of the core systems were already been made by Marnel, the CTO and cofounder of Squeaky Wheel. Now, as the senior game developer for General Interactive, the role of designing and implementing core systems now lie on my shoulders. Thus, my long-time companion in this industry – imposter syndrome – says hi.

I am aware of my skills, and I do think I can perform my duties well. But, every now and then, there’s that voice at the back of my head saying, “someone out there can do this better than me – like a hundred times better.”

Luckily, watching a lot of developers work in the past has prepared me for this responsibility, despite that bugging voice. I can’t share much of what we’re working on right now, but it’s going to be fantastic. Also, Ricardo Juchem, the artist for Chinatown Detective Agency, shared this link about dealing with impostor syndrome. Also by someone with a familiar name – Neil Gaiman.

That said, if you haven’t yet, check out Chinatown Detective Agency.

Aside from meeting the incredible cast of international talents in General Interactive, one fantastic experience this year with the studio was my first convention in a very long time – Gamescom Asia 2022. I say “long time” but hey, 3 years stuck at home felt like forever.

Gamescom Asia was a fantastic experience – it was my first time in Singapore, met old and new gamedev friends, also had the honor to introduce our junior producer, Francis, to the people in the industry. He’s a new bud, and I believe letting him have a conversation with these industry veterans would motivate, inspire, and hopefully challenge him to be an ace developer.

Oh, and we also met Mr. Shuhei Yoshida! I have no words for how awesome this opportunity was.

With Shuhei Yoshida of PlayStation Indie

Another convention that I missed due to the pandemic was the convention that helped me land my first job in the local game industry – the Electronic Sports and Gaming Summit (ESGS).

This was a continuation of my goal to introduce our junior producer to different game developers, this time to the local scene. It’s also a great way to make him feel the difference between Gamescom’s B2B atmosphere to ESGS’s B2C environment. Personally, it’s a great time to say hi to gamedev friends.

That is just less than a year of experience with this new studio. I do believe there are more grand things to happen this 2023 and the years to come – and I am excited.

Personal Health

Mental Health

This year was probably the best my mental health had ever been. Ryan Sumo gave me books to read before he moved to Sweden, and they’ve been a great help to understand my thoughts.

I also bought “The Art of Thinking Clearly” by Rolf Dobelli. It’s a book about the myriad of cognitive biases and fallacies that we all fall victim to, at one point in our lives, if not everyday. I still catch myself whenever I say something that doesn’t make sense. But, now I can hear the difference between a sound reasoning and a feeble one.

Another thing that helped me mentally this year was being open. I am now more honest on what and how I feel. Before I would shrug off being angry or sad, and just let it pass without processing it. Now, I acknowledge the emotion, identify what made me feel that way, and act appropriately without harming other people, or myself. It took a while, but it’s definitely worth practicing and getting used to asking myself, “am I angry? why?”. If you’re wondering where and with whom to practice, try your relatives. They always make us feel something.

Physical Health

This year has also been my most physically active in the last couple of years. Every week, my friends and I play badminton for at least an hour, with 3 hours being our longest. Yes, we were exhausted like crazy.

Aside from badminton, I also started incorporating Muay Thai in my workout schedule. My dad was a boxer in his teens to early 20s, which is a great help to train my punches and agility, he’s a quick-on-your-toes-than-strength-in-your-punches kind of guy. My eldest brother has a 2nd degree black belt in karate, and also trained Muay Thai. They both help me with my form and in conditioning my body. I have to say, stretching and conditioning – especially shin conditioning – can make a grown man cry.

I still continue weight lifting, but I think I need to buy heavier equipment to proceed. And, I still don’t want to go to the gym – err, more like pay for the gym.

I also started tracking my calories using MyNetDiary, but I stopped after 5 months of daily tracking. What I eat don’t change that much, so I can gauge *roughly* how much calories is in my plate.

Finance

I can gladly say that I finished the year 2022…DEBT FREE! Yey!

Ok, there’s our house mortgage – but, no credit card debts, and my cash flow has been on the green for the past 5 months. Although, I don’t yet know how far I can continue this, given the current inflation rate.

I also pulled all my investments from the PH Market to the New York Stock Exchange via GoTrade (referral code). GoTrade is a mobile brokerage that allows users to trade in partial stocks or in fractions of US stocks. It’s riskier than the PH Market (bigger loss because my expenses are still in Philippine Peso), but investing in NYSE blue chips, ETFs, and REITs, return far more than their counterparts in the PH Market. At least, in my experience.

Another thing I started doing religiously is tracking the flow of my money using Bluecoins every start of the month. I try to track everything, except for some of my cash transactions that don’t have receipts. I catch the cash transactions based on the gaps in my bank statements. This is why I tend to use services that issue receipts instead; or use my credit card or my debit card, so that the transaction will either be sent to my email or be recorded in my bank statement. I also use mobile or virtual wallets, like GCash here in PH.

Tracking my finances via Bluecoins was a great way to check if I can still spend, to avoid going red in the current month.

Other stuff going on

Gags N Geeks

The entertainment studio my friends and I started was disbanded last July of 2021. We still meet every now and then, play badminton, talk around cups of coffee in local coffee shops, and play board or video games. After Gags N Geeks, everyone went on to pursue their professional careers, and everyone’s doing a great job!

Twitch

I continued streaming after Gags N Geeks, but this time I streamed the development of City Hall Simulator, and lots of Chess streams. It was fantastic! I met a lot of other game devs on Twitch, exchanged notes, they even helped me solve design and programming problems I encountered on stream (thank you Zaysha for the camera fix!). But, I had to go on a hiatus to focus more on getting my health back on track, as I started getting sick. I want to continue streaming game dev and chess again, maybe sometime in 2023.

Art

I still draw every now and then. Ryan Sumo provided me with books on finding and improving my own style – and I resorted to using charcoal and graphite pencils, with emphasis on subject’s accessories, eyes, and hair.

I also started making timelapses on YouTube about the drawing process and my thoughts on the techniques I did.

Mentorship

Around October of 2022, my former professor reached out to me if I can speak to some of his game dev students to motivate and inspire them. I made myself available to them via Discord and shared with them the best practices and tricks I learned in my years of experience. I’m still not as hands-on or as involved in their development but I’ve always wanted to do to new developers what my mentors did to me when I was just starting – help, guide, and nurture them personally and professionally. This surely is in my plans for 2023. Maybe help GameDev PH organize a game jam? We’ll see.

In closing, here are some photos from our trip to Singapore. Have a great day ahead, and have a fantastic 2023!

The great gamedev job hunt

COFFEE BRAIN GAMES

I don’t know if you’re familiar with Philippine politics but last May, the people elected the son of our infamous dictator. And it’s not just winning by a hair. It was a massive 2 to 1 landslide with the second place candidate.

It wasn’t supposed to happen but it did. I’ll no longer explain why or how. It makes me angry just thinking about it. All I know is that the Philippines is in a precarious position over the next 6 years and beyond. The elected president is incompetent with their family having a history of corruption and human rights violations. On top of this, half of Filipinos support them. Thus, I don’t feel confident in my country. I don’t feel comfortable and I no longer feel safe. I’m also not getting any younger so fuck it! I’m going to be one of those Filipinos that gave up on their…

View original post 2,838 more words

Using Odin Inspector to Create a Game Manager

Tools, whether plugins for game engines or separate standalone software, are useful to streamline the different processes involved in game development. Some of which even makes a character for you, rigs and animates models, and a lot more! In this tutorial, I’ll share with you how we use Sirenix‘s Odin Inspector to amp up our custom editors and create a Game Manager inside Unity.

As usual, if you want to jump ahead, you can click on a specific topic here and there are references at the end of the tutorial:

Looking for a Game Manager Solution

Our team is working on a management-strategy game called City Hall Simulator; and games in this genre involves A LOT of data that is spread across different scriptable objects from different mechanics that interact with each other. That said, if you’ve used Unity before and encountered multiple tabs, I’m pretty sure you are familiar with the crazy amount of tabs a designer needs to be opened to add and/or modify contents for your game.

To give you more context, here’s a screenshot of all the scriptable objects that we have for the AI alone for the agents we have in our pre-alpha development.

Note that this doesn’t involve data for other mechanics like Agent Needs, Zones, Objects, etc.; and we are certain that there are more content to be added to the game during our development.

Since we are a small team, I wanted to create something that will make it easier for anyone in the team to add content to the game without having to rummage through our project’s folders. With that in mind, these are the criteria for the game manager solution:

  • Can easily be expanded for new scriptable objects:
    • Adding a new editor should be as easy as adding an entry to an Enum;
    • No need to write rendering code from scratch to focus more on gameplay and systems programming. That said, we should be able to reuse our old editor windows;
  • Easy to use – have a central hub for all the game data that can easily be accessed

Now that we have the criteria, let’s move on to this tutorial’s setup.

Setup

A brief introduction on Odin Inspector – it’s (as of this writing) a third party plugin for Unity that allows developers to create custom editors without the burden of writing it from scratch. It’s as easy as adding attributes to your scriptable object’s member variables and you’re good to go. That said, here are the versions that we will be using for this tutorial:

Full disclosure: Normally, I won’t spend as much as the original price tag of Odin Inspector which is, as of writing, $55. Luckily, the plugin was included in Humble Bundle’s Fantasy Games & Game Dev Assets bundle last September 2021. Our team quickly bought the bundle in just about $25 or 1.2k Philippine Pesos, per seat.

Limitations

One last caveat before we jump into the code – limitations of using Odin Inspector. Just like any third party plugin for Unity, there are limitations with using Odin Inspector. Be sure to keep these in mind before buying the plugin so that you won’t experience hurdles in your development:

  • As of writing, Unity’s build configuration editor is not accessible. It’s part of the Platform Package from Unity for supporting build targets for DOTS. I considered this a limitation since we want all the inspector editors related to our game to be in the game manager.
  • Not redistributable, meaning everyone in the team should have a license or a copy of the plugin for them to benefit from Odin Inspector. This maybe crucial for teams using the same repo.
  • Performance – as mentioned by Sirenix themselves:

“The inspector does, of course, suffer a small performance hit in order to offer you more features; But nothing that we’ve been able to notice on our rather weak laptops.
However, when it comes to objects containing lists with thousands of elements, Odin currently suffers. We are planning on reworking how our property tree works internally in the near future, and one of the main reasons for this rework is performance.”

Code

Those out of the way, let’s start coding! If you’re not familiar with how to use Odin Inspector’s Menu Tree, I suggest starting with their videos or documentation, before continuing. I’ll still be here, don’t worry. Here are some links to the videos to help you out:

To start off our code, let me introduce the test data that we want to show in our Game Manager:

First, the AgentNeeds.cs:

[Serializable]
public class AgentNeedsMapData {
    [SerializeField]
    private string agentId;

    [SerializeField]
    private List<NeedsEditorData> needsMap;

    public AgentNeedsMapData(string goapDomainId) {
        this.agentId = goapDomainId;
        this.needsMap = new List<NeedsEditorData>();
    }

    public string GoapDomainId => this.agentId;

    [Serializable]
    public struct NeedsEditorData {
        [SerializeField]
        private NeedsEnum needId;

        [SerializeField]
        private int minHour;

        [SerializeField]
        private int maxHour;
    }

    public enum NeedsEnum {
        Bladder = 0,
        Bowel = 1,
        Food = 2
    }
}

Ideally, the NeedsEditorData struct and the NeedsEnum would be in a separate file. But, for simplicity’s sake, I included them in a single file.

The scriptable object script for the Agent Needs would look like this:

[CreateAssetMenu(fileName = "AgentNeeds", menuName = "Game/AgentNeeds", order = 0)]
public class AgentNeeds : ScriptableObject {
    [ShowInInspector]
    // [SerializeField] can also be used here
    private List<AgentNeedsMapData> agentNeedsMap = new List<AgentNeedsMapData>();

    public List<AgentNeedsMapData> AgentNeedsMap => this.agentNeedsMap;

    // =====> Getters and other resolvers needed for this mechanic is added here
}

For our second test data, we’ll be creating a simple List of colors:

[CreateAssetMenu(menuName = "Game/GameColors")]
public class GameColors: ScriptableObject {
    [ShowInInspector]
    private List<Entry>? entries;

    [Serializable]
    public struct Entry {
        public string id;
        public Color color;
    }

    // =====> Getters and other resolvers needed for this mechanic is added here
}

We could use a Dictionary here and have Odin Inspector display the Dictionary in our editor but, Dictionary is not serialized by default in Unity. Meaning, the data will be wiped out next time Unity refreshes. There is a solution for this but, that is outside of the scope of this tutorial. Let’s keep it simple for now.

Now that we have the data, let’s introduce the interface that all of our scriptable object drawers will have to implement for them to be added to the enum inside our game manager.

/// <summary>
/// This is the interface for all custom editors that will be added in the <see cref="GameManager"/>.
/// </summary>
public interface IGameManagerDrawer {
    /// <summary>
    /// This is called when building the menu tree via <see cref="GameManager.BuildMenuTree"/>
    /// </summary>
    /// <param name="tree"></param>
    public void PopulateTree(OdinMenuTree tree);

    /// <summary>
    /// This is called before the default <see cref="GameManager.DrawMenu"/>
    /// </summary>
    public void BeforeDrawingMenuTree();

    /// <summary>
    /// This is called in <see cref="GameManager.Initialize"/> when the game manager is first initialized/created.
    /// </summary>
    public void Initialize();

    /// <summary>
    /// This determines whether the game manager will use a custom editor window to render the target scriptable object
    /// or use Unity's or Odin's default window.
    /// </summary>
    public bool DisplayDefaultEditor { get; }

    /// <summary>
    /// This is the target scriptable object of this drawer.
    /// </summary>
    public object? Target { get; }
}

Now, let’s make a concrete implementation of this interface that we can inherit for custom game manager editors or just use as is for simple scriptable objects:

/// <summary>
/// A common concrete implementation of the <see cref="IGameManagerDrawer"/> interface.
/// </summary>
/// <typeparam name="T"></typeparam>
public class DrawScriptableObject<T> : IGameManagerDrawer where T : ScriptableObject {
    /// <summary>
    /// The current target scriptable object of this drawer.
    /// </summary>
    protected T? target;

    /// <summary>
    /// Cached array for where to search for the existence of a new scriptable object, when creating a new object.
    /// </summary>
    protected readonly string[] searchInFolders = new string[1];

    private const string DEFAULT_ASSETS_PATH = "Assets/";
    protected string path = DEFAULT_ASSETS_PATH;

    /// <summary>
    /// This is the path where new instances of <see cref="T"/> will be saved
    /// </summary>
    protected string Path {
        get {
            return this.path;
        }
        set {
            this.path = value;
        }
    }

    /// <summary>
    /// The current target scriptable object of this drawer.
    /// </summary>
    public virtual object? Target {
        get {
            return this.target;
        }
    }

    /// <summary>
    /// Display the default editor by default which will use whatever Unity or Odin uses in the inspector.
    /// Defaults to true so that clients can just add a new scriptable object to the game manager without worrying
    /// if a drawer/renderer is available.
    /// </summary>
    public virtual bool DisplayDefaultEditor {
        get {
            return true;
        }
    }

    public virtual void PopulateTree(OdinMenuTree tree) {
    }

    public virtual void BeforeDrawingMenuTree() {
    }

    public virtual void Initialize() {
        // Get the scriptable object from the default location
        string typeAsString = typeof(T).ToString();

        this.searchInFolders[0] = "Assets/Game/ScriptableObjects/";
        string[] foundAssetGuids = AssetDatabase.FindAssets($"t:{typeAsString}", this.searchInFolders);

        if (foundAssetGuids == null || foundAssetGuids.Length <= 0) {
            EditorUtility.DisplayDialog($"{typeAsString} Not Found!", $"There is no {typeAsString} defined anywhere under Assets/Game/ScriptableObjects/. Did you forget to create one?", "OK");
            return;
        }

        // Set the first found scriptable object of this type as the target for this drawer
        string firstMatchPath = AssetDatabase.GUIDToAssetPath(foundAssetGuids[0]);
        this.target = AssetDatabase.LoadAssetAtPath<T>(firstMatchPath);

        if (this.target == null) {
            EditorUtility.DisplayDialog($"{typeAsString} Not Found!", $"There is no {typeAsString} defined. Did you forget to create one?", "OK");
            return;
        }

        if (string.IsNullOrEmpty(firstMatchPath)) {
            EditorUtility.DisplayDialog($"{typeof(T)} Found!", $"There is no {typeof(T)} defined. Did you forget to create one?", "OK");
            return;
        }

        // Null check is performed above
        this.path = firstMatchPath;
    }
}

Note that this class is very bare-bones except for the Initialize() method which we set so that the drawer itself will search for the first available scriptable object of the specified type, instead of the user having to drag-and-drop the scriptable object as a target for this drawer.

Last thing to note here is the DisplayDefaultEditor boolean set to true by default. This is so that we can just add a new tab to the game manager without having to worry if we’ve created a custom editor for that specific type or not.

Now, for the game manager itself. This is where we will be utilizing Odin Inspector’s OdinMenuEditorWindow. Let’s start with how we want new editors to be added:

public class GameManager : OdinMenuEditorWindow {
    // ==========================================
    // =====> ADD NEW DRAWERS IN THIS LIST <=====
    // ==========================================
    // Scriptable object drawers to display in the game manager
    private readonly List<IGameManagerDrawer> drawers = new List<IGameManagerDrawer> {
        new DrawAgentNeeds(),
        new DrawScriptableObject<GameColors>()
    };

    // ============================================================
    // =====> ADD NEW GAME MANAGER STATES IN THIS ENUM (TAB) <=====
    // ============================================================
    private enum ManagerState {
        AgentNeeds,
        GameColors
    }
    
    [OnValueChanged("SetGameManagerDirty")] // Call the method "SetGameManagerDirty" when this enum changes
    [LabelText("Manager View")]
    [LabelWidth(100f)]
    [PropertyOrder(-1)] // Ensure that this enum is always drawn first
    [EnumToggleButtons] // Render this enum as toggle buttons
    [ShowInInspector]
    private ManagerState currentManagerState;


    /// <summary>
    /// Force the game manager to be dirty so that the window will be redrawn.
    /// </summary>
    public static void SetGameManagerDirty() {
        IS_DIRTY = true;
    }

    // =====> Rest of the editor code...
}

As mentioned in the goals section of this tutorial, I wanted to make adding an editor as easy as adding an entry to an enum. Luckily, this is achieved above using the attributes provided by Odin Inspector. The important attribute here is the [EnumToggleButtons] which will render the ManagerState enum as toggle buttons, which we will use as header tabs to transition between drawers or editor windows.

Another attribute that we add is the [OnValueChanged()] attribute, which we use so that we can inform Unity to re-render the game manager when the user switches tabs. We don’t want the game manager to show the Agent Needs when we’re already in the Game Colors data.

As for accessibility, let’s make a static method that we can access through Unity’s toolbar and a keyboard shortcut to open the game manager:

/// <summary>
/// Add a button in the toolbar to open the game manager with shift+alt+G as the shortcut
/// </summary>
[MenuItem("Game/Game Manager #&g")]
public static void OpenGameManager() {
    if (INSTANCE != null) {
        // If a window exists already, focus on it
        INSTANCE.Focus();
    } else {
        // Create a window and show it
        GetWindow<GameManager>().Show();
    }
}

protected override void OnDestroy() {
    base.OnDestroy();
    INSTANCE = null;
}

Next, we want to initialize the drawers and inform the renderer to draw the enum toggle buttons first before the scriptable object. First, we initialize:

/// <summary>
/// This is the index of the toolbar or the enum toggles. Cached here so that it's easy to pull it from the list and render it first
/// before the selected manager state.
/// </summary>
private int topToolBarIndex;

/// <summary>
/// This is a list of selected values in each of the manager states. This is used so that the user does not
/// need to select the same item again when returning to a state.
/// </summary>
private List<object?>? drawerTargets;

protected override void Initialize() {
    if (INSTANCE == null) {
        INSTANCE = this;
    }

    this.drawerTargets = new List<object?>();

    for (int i = 0; i < this.drawers.Count; ++i) {
        this.drawers[i].Initialize();

        // Start the target for this drawer as a null at first.
        // These values will be set when the user selects a value from the menu tree (left side)
        this.drawerTargets.Add(null);
    }

    // Add the enum tabs as the last element so that the other targets will follow their enum indexes
    // when being rendered.
    this.drawerTargets.Add(base.GetTarget());

    // Then, we just get the index of the enum tabs,
    // so that we can select it and render it at the top of the manager
    this.topToolBarIndex = this.drawerTargets.Count - 1;
}

protected override IEnumerable<object?> GetTargets() {
    // Return the cached targets if the list exists
    return this.drawerTargets ?? base.GetTargets();
}

In the Initialize() method, we basically just populate the drawers indicated in the list above and set the targets to null. These targets are the data that will be rendered by the drawers. Note that we can’t cache the base.GetTarget() and render it since OdinEditorWindow.DrawEditor() takes the target’s index as its parameter. So, we cache the index of the enum toggle buttons instead. That said, in our OnGui() method:

protected override void OnGUI() {
    // Layout event is when the content and sizes of the window is subject to change and is being computed by UnityGUI
    if (IS_DIRTY && Event.current.type == EventType.Layout) {
        ForceMenuTreeRebuild();

        if (this.currentSelectedValue == null) {
            // The selected value for the current game manager state is null, we clear the selection 
            // so that there will be nothing to render in the right side.
            // i.e. Prevent the manager from rendering the wrong value for the current selected game manager state (or scriptable object)
            this.MenuTree.Selection.Clear();
        } else {
            // The user selected a value before in the current game manager state (or scriptable object),
            // we try to select the same value again and render it.
            TrySelectMenuItemWithObject(this.currentSelectedValue);
        }

        // Reset the flag so that we don't rebuild again in the next frame
        IS_DIRTY = false;
    }

    EditorGUILayout.Space();
    // Draw the top tool bar, the enum toggle buttons
    DrawEditor(this.topToolBarIndex);
    EditorGUILayout.Space();

    // Then, render/draw the rest of the manager. See BuildMenuTree(), DrawEditors(), and DrawMenu() methods.
    base.OnGUI();
}

We call DrawEditor(this.topToolBarIndex) first to draw the toggle buttons first before allowing OnGUI() to render the rest of the editor window.

Since our game manager will have a sidebar where we can select the data to render and edit, let’s first introduce those methods:

/// <summary>
/// This is the current drawer that will be used to render/draw the <see cref="currentSelectedValue"/>
/// </summary>
private IGameManagerDrawer? currentDrawer;

protected override void DrawMenu() {
    if (this.currentDrawer == null) {
        return;
    }

    if (this.currentDrawer.DisplayDefaultEditor) {
        // Don't display the left menu if the current drawer will display the default inspector
        return;
    }

    EditorGUILayout.Space();
    // Draw the menu items based on how the drawer wanted them to look like
    this.currentDrawer.BeforeDrawingMenuTree();
    EditorGUILayout.Space();

    // Draw the menu items based on the list made in BuildMenuTree()
    base.DrawMenu();
}

The menu referred to here is the left sidebar. Note that, we don’t draw the side bar if the current drawer wants to display the default Unity or default Odin editor. The BeforeDrawingMenuTree() method of our interface allows the drawers to include other buttons, labels, or images relevant to the current target scriptable object, if they want to.

Next is how the buttons in the left sidebar is populated. For that, we’ll need to override the BuildMenuTree() method and use Odin Inspector’s OdinMenuTree:

/// <summary>
/// This is used to store the selected value before moving to a new tab. So, that the user
/// does not need to select the same item again when returning to the previous tab.
/// </summary>
private ManagerState previousManagerState;

/// <summary>
/// This is the current selected value in the <see cref="currentManagerState"/>.
/// This is the value inside the target ScriptableObject that will be rendered by the <see cref="currentDrawer"/>.
/// </summary>
private object? currentSelectedValue;

/// <summary>
/// Cache the menuTree so that we don't build a new one every time the manager is drawn.
/// We just update the contents of this instance.
/// </summary>
private OdinMenuTree? menuTree;

/// <summary>
/// This builds the tree menu at the left side of the editor window
/// </summary>
/// <returns></returns>
/// <exception cref="ArgumentOutOfRangeException"></exception>
protected override OdinMenuTree BuildMenuTree() {
    if (this.menuTree == null) {
        // Create a menu tree and cache it so that we don't create a new one every frame
        this.menuTree = new OdinMenuTree();

        // Draw the search bar for the menu tree in the left side of the manager.
        // This will search through whatever the drawer will add in its PopulateTree() method.
        this.menuTree.Config.DrawSearchToolbar = true;
    } else {
        this.menuTree.MenuItems.Clear();
    }

    if (this.drawerTargets == null) {
        return this.menuTree;
    }

    // Save the target of the previous drawer, so that the user won't need to select it again 
    this.drawerTargets[(int)this.previousManagerState] = this.currentSelectedValue;

    // Get the stored selected value for the current state
    int currentStateIndex = (int)this.currentManagerState;
    this.currentSelectedValue = this.drawerTargets[currentStateIndex];

    // Update the previous state
    this.previousManagerState = this.currentManagerState;

    // Populate the menu items (left side( based on the drawer
    this.currentDrawer = this.drawers[currentStateIndex];

    if (!this.currentDrawer.DisplayDefaultEditor) {
        // Populate the menu tree only if we're going to render it
        this.currentDrawer.PopulateTree(this.menuTree);
    }
    
    return this.menuTree;
}

Here, we cache the menuTree to prevent garbage every time the game manager refreshes. This is the root of the tree where the drawers will add different data as OdinMenuItems.

With the above code, we now have a game manager window and a left sidebar for the buttons representing the data in our scriptable object. Lastly, for our game manager, let’s introduce the method that will render the actual editor for the data which will occupy the rest of the right side of our game manager window:

protected override void DrawEditors() {
    if (this.drawerTargets == null) {
        // The targets list has not been initialized yet
        return;
    }

    if (this.previousManagerState != this.currentManagerState) {
        // The manager haven't drawn the updated menu tree yet
        return;
    }

    int currentStateDrawerIndex = (int)this.currentManagerState;
    
    if (this.currentDrawer != null && this.currentDrawer.DisplayDefaultEditor) {
        // Display the target by default based on how Unity and/or Odin normally display that type in the inspector
        this.drawerTargets[currentStateDrawerIndex] = this.currentDrawer.Target;
    } else {
        // Get the target for the current drawer from the menu tree (left side)
        OdinMenuTreeSelection? treeSelection = this.MenuTree?.Selection ?? null;
        this.currentSelectedValue = treeSelection?.SelectedValue;

        if (this.currentSelectedValue == null) {
            // Don't draw the editor if no menu item is selected. Keep the right side empty.
            return;
        }

        // Set the current selected value as the target to be displayed in the Manager's main body panel (right side) 
        this.drawerTargets[currentStateDrawerIndex] = this.currentSelectedValue;
    }

    // Draw the editor based on the data type of the current target, based on the current manager state
    DrawEditor(currentStateDrawerIndex);
}

The gist of this method is that we use the current tab’s index by converting the current enum, and use that index to get the drawer from our list of IGameManagerDrawers. Once we have the drawer, we set the current selected value from the left sidebar buttons as the target to be rendered by that drawer.

We should already be able to render a simple scriptable object like the GameColors data above:

But, for more complex scriptable objects, we will have to write our own custom drawer which still utilizes the IGameManagerDrawer interface. Let’s make one for our Agent Needs:

public class DrawAgentNeeds : DrawScriptableObject<AgentNeeds> {
    private string nameForNew = string.Empty;

    public override bool DisplayDefaultEditor {
        get {
            return false;
        }
    }

    public override void BeforeDrawingMenuTree() {
        if (this.target == null) {
            return;
        }

        GUILayout.BeginHorizontal();
        GUILayout.Label("New: ", GUILayout.Width(40));
        this.nameForNew = EditorGUILayout.TextField(this.nameForNew).Trim();

        if (GUILayout.Button("Add", GUILayout.Width(40), GUILayout.Height(15))) {
            if (!string.IsNullOrEmpty(this.nameForNew)) {
                // Add the new item
                CreateNew();
                this.nameForNew = "";
            }
        }
        
        // ...more buttons relevant to agent needs
    }
    
    // ...rest of the code
}

Notice that we now set the DisplayDefaultEditor boolean to false, since we want Odin to render this custom editor instead of the default one.

We also now override the BeforeDrawingMenuTree method to allow us to add functional buttons or labels in the left sidebar of the window. In our case, this is usually creation, deletion, or save buttons, and some warning or clarification labels.

Lastly, we want to populate the left sidebar’s menu tree with the agent needs so we can easily switch from one agent data to the other. To do that, we override our interface’s PopulateTree() method:

public override void PopulateTree(OdinMenuTree tree) {
    base.PopulateTree(tree);

    if (this.target == null) {
        return;
    }

    List<AgentNeedsMapData> agentNeedsMap = this.target.AgentNeedsMap;

    // Add a menu button for each goal selectors
    for (int i = 0; i < agentNeedsMap.Count; ++i) {
        AgentNeedsMapData needsMapData = agentNeedsMap[i];
        string goapDomainId = needsMapData.GoapDomainId;

        OdinMenuItem newMenuItem = new OdinMenuItem(tree, goapDomainId, needsMapData);
        newMenuItem.OnDrawItem = delegate(OdinMenuItem item) {
            GUI.backgroundColor = Color.red;

            Rect rect = new Rect(item.LabelRect);
            // This is width plus padding
            rect.x = rect.xMax - 25;
            rect.width = 20;

            // This adds a red "X" button at the right side of the menu item
            if (GUI.Button(rect, "X")) {
                if (EditorUtility.DisplayDialog($"Delete {goapDomainId}",
                    $"Are you sure you want to delete {goapDomainId}? "
                    + "This can't be undone.", "Delete", "Cancel")) {
                    this.target.AgentNeedsMap.Remove(needsMapData);
                    EditorUtility.SetDirty(this.target);
                    AssetDatabase.SaveAssets();
                    GameManager.SetGameManagerDirty();
                }
            }

            GUI.backgroundColor = Color.white;
        };

        tree.MenuItems.Insert(i, newMenuItem);
    }
}

Here we create new instances of OdinMenuItem per AgentNeedsMapData in our scriptable object. As indicated in the creation code, if you want to render more functionality in each menu item, you can set the OnDrawItem action and use GUI or GUILayout, just like you would when making custom editors in Unity. For our case, I added an “x” button to delete an entry in our AgentNeeds list.

With the DrawAgentNeeds code finished, we can add this in the drawerList and enum inside our GameManager script and have this:

This tutorial is long already but, I want to share one last piece of code. Since, I mentioned in our goal above that we want to reuse already existing editor windows that we used before, inside our game manager. To do that, instead of inheriting from Unity’s Editor class, I just adjusted our custom editors to inherit from this class and directly add them in the GameManager list and enum:

public abstract class GameManagerEditor : OdinEditor, IGameManagerDrawer {
    public virtual void PopulateTree(OdinMenuTree tree) {
    }

    public virtual void BeforeDrawingMenuTree() {
    }

    public virtual void Initialize() {
    }

    public virtual bool DisplayDefaultEditor {
        get {
            // Display the default editor by default which will use whatever Unity or Odin uses in the inspector
            return true;
        }
    }

    public virtual object? Target {
        get {
            return null;
        }
    }
}

The DisplayDefaultEditor boolean is set to true inform Odin that we already have an editor for this data type and just use that.

If you want to check the whole project, you can do so here.

One Final Note

Odin also has attributes that you can use to query all scriptable objects you want to include in the game manager automatically, as shown in this video. But, I did not use that since our project uses submodules for common utility extensions and backend systems. One of these submodules is GOAP AI which we also need in our game manager. To lessen the pain of fixing assembly references, we stick to manually adding the scriptable objects to the enum inside the GameManager.cs class. This way, we don’t need to add a dependency to Odin Inspector inside our submodules which will be used in other projects which may not support the plugin.

And there you go, this game manager has helped me in adding objects and zones to the game with ease and hopefully, it’ll help you too in making powerful tools to boost up your game development process.

If you like our posts, please subscribe to our mailing list and be among the first to know what we’re up to. You’ll also get a free game upon subscription.

If you want to see more of City Hall Simulator, please visit our YouTube channel for dev vlogs. You can also join our Discord server and directly chat with us if you have questions about this tutorial, mechanics implementations, and more. See you there!

Stay safe out there and see you in the next one!

References

Fast Unit Testing for Unity Projects

Testing is a crucial part of game development and testing Unity projects can take some time if you have to refresh the editor every single time you want to test even the slightest change in your code. In this tutorial, I’ll share with you a faster way of testing your code so you can spend more time bug fixing instead. *wink*

[EDIT]

Follow this thread if you’re experiencing a language version error which looks something like this:

Invalid option ‘8.0’ for /langversion; must be ISO-1, ISO-2, 3, 4, 5 or Default

[/EDIT]

As usual, if you want to jump ahead, you can click on a specific topic here and there are references at the end of the tutorial:

Setup

NUnit is the unit-testing framework that we will use for the rest of this tutorial. I am currently using the following applications and versions:

You can follow this link, for installing JetBrains Rider as your IDE in Unity.

Let’s now start with creating our test folders in Unity. This folder will contain all our test files for different utility classes, mechanics, or systems you might need to test for your application. For organization, it’s better to have 2 separate test folders for your editor extension codes and your game code.

Adding a test folder under Editor, and a test folder under Game/Scripts.
If you want all test files in one folder, it’s up to you

Add an Assembly Definition inside your test folders with the following settings:

Assembly definition for the test folder

Check the “Override References” boolean to allow us to add the “nunit.framework.dll” under Assembly References. Add “UNITY_INCLUDE_TESTS” under Define Constraints, this will signal Unity’s build system NOT to include this assembly when building your game. For the Assembly Definition References, both “UnityEngine.TestRunner” and “UnityEditor.TestRunner” assemblies are required for later when we run our tests in Unity. You can add other assembly references here for utility classes, systems, etc. that you want to test. As for the platforms, uncheck everything except Editor since we will be using the Unity Editor for testing and a Standalone NUnit Session later.

This is the manual way of creating test assembly folders in your game’s repo. You can create a test folder automatically via Unity’s Test Runner:

Opening Unity's Test Runner
Open the Test Runner under the General tab in the Window tab of the toolbar
Creating a test folder from the Test Runner
You can create a Test Assembly Folder from here and it will basically create what we manually did earlier

Cool, now we’re all set-up to test inside Unity.

Before we do, I’d like to briefly introduce the concept of Assertions. Assertion-based testing is simply checking if your program works as intended by setting effects, behaviors, and outcomes that are known to be true in the program. For example, when testing a program that adds two numbers, the boolean expression 2 + 2 == 4 should be true. If it’s not, the test would fail and we need to go back to the code and check for errors. More on this later under the Use Cases portion of this tutorial.

NUnit Attributes and Running Test Files

Let’s now create our first test file inside the test folders we created earlier. For simplicity, let’s create a couple of test methods that explains the most common test attributes for using NUnit:

using NUnit.Framework;
using UnityEngine;

public class TestAttributesExamples : MonoBehaviour {

    [Test]
    public void YourTestMethod() {
        // This [Test] attribute tells the framework that this method is a test method which makes it
        // accessible in the Test Runner inside the Unity Editor,
        // and inside the Explorer under JetBrains Rider's Unit Tests tab.
        Debug.Log("Hi! I'm from YourTestMethod.");
    }

    [SetUp]
    public void AwakeStartLikeMethod() {
        // The [SetUp] attribute is called before the methods with the [Test] attribute. 
        // This pretty much acts similarly as your Awake() or Start() methods in Unity's MonoBehaviour.
        Debug.Log("Wait! Let me set up first.");
    }

    [TearDown]
    public void OnDestroyLikeMethod() {
        // The [TearDown] attribute is called at the end of the testing lifetime.
        // This pretty much functions similarly as Unity MonoBehaviour's OnDestroy() event method.
        Debug.Log(("I guess that's it. Nothing lasts forever..."));
    }
}

In order to run this in the Unity Editor, open up the Test Runner window (under Windows > General > Test Runner), right click on the test method, and press Run:

Running test files from the Test Runner

Running our test code above yields this result (notice the order of Debug.Log calls):

Test files output from Unity's test runner

You can also see these logs inside JetBrains Rider’s Unity Log window (in the toolbar, View > Tool Windows > Unity):

Checking Unity logs inside JetBrains Rider

The last attribute for this basic NUnit testing is the Category attribute:

public class TestAttributesExamples : MonoBehaviour {
    [Test]
    [Category("Basic Attributes Testing")]
    public void GroupedTestMethod() {
        // This [Category("")] attribute helps keep your test methods organized both in the
        // Unity Editor's Test Runner window, and in JetBrains Rider's Unit Tests Explorer
        Debug.Log("I belong in a group!");
    }
}
Filtering Test files by category inside Unity's Test Runner

This is good but we’re still refreshing Unity! Let’s remedy that by creating a Standalone NUnit Testing Session inside JetBrains Rider so that we don’t need to leave the IDE anymore when testing.

Open Rider’s Unit Tests tool window in the bottom toolbar or by pressing Alt+8. Then, you should see the methods with [Test] attributes in the explorer window. Right click one of them and click on Create New Session or press Alt+Shift+Insert.

Creating a test session in JetBrains Rider's Unit Tests

With the new Session opened, click on the dropdown and select Standalone NUnit Launcher.

Assigning the Standalone NUnit Launcher as Rider's test environment

Likewise, in the top tab, edit the Run/Debug Configurations and select the name of your test method. This will allow us to attach to the session if we want to add breakpoints and debug the code line by line.

Attaching Rider to the test Session

To run the test method, right click the method name in the Session window, and click on Run Selected Unit Tests. If you want to debug, you can click on Debug Selected Unit Tests and if you followed the previous step, Rider will automatically attach to the session.

Running test files from the created session

This will run the test but will throw an error. This is because we are running MonoBehaviour (inheriting MonoBehaviour and calling Debug.Log) outside of Unity.

Security error from running MonoBehaviour inside Rider's Unit Test session

To fix this, let’s use Console.WriteLine() instead in place of our Debug.Log() calls.

Seeing results of the test file in Rider's Unit Test Session

Cool, now that we can create our test files, run our test files, and see the console without leaving the IDE, let me share some of my use cases for this way of testing. I mainly use this method when testing new algorithms, data structures, and when testing newly created utility classes. After passing all the tests, I then apply these classes in the actual system that we’re using, then refactor.

Use Case #1 – Testing Algorithms (Example: grid generation and tile querying)

For the past couple of days, I’ve been trying to implement my own version of HPA (Hierarchical Pathfinding Algorithm). And before I start generating the grids visually in Unity, I want to make sure that the data (like the coordinates, parent cell, etc.) of each tile/cell is correct. This way, I would lessen the headache of debugging in the future. Here is my test file with a few modifications for readability:

using System;
using System.Globalization;
using NUnit.Framework;
using UnityEngine;

public class ClusterIndexComputationTest {
    /// <summary>
    /// I'm trying to generate the whole grid for HPA with all the tiles and their cluster resolved,
    /// in one loop for x and y, without iterating separately to generate the clusters.
    /// </summary>
    [Test]
    public void ClusterIndexComputationTestSimplePasses() {
        // Use the Assert class to test conditions
        GenerateTileGrid(8, 8, 3);
    }

    /// <summary>
    /// Performs the generation
    /// </summary>
    /// <param name="xTotalTiles">The maximum tiles in the x-axis</param>
    /// <param name="yTotalTiles">The maximum tiles in the y-axis</param>
    /// <param name="clusterSize">The size of a cluster in terms of number of tiles in both x and y axes</param>
    private void GenerateTileGrid(int xTotalTiles, int yTotalTiles, int clusterSize) {
        // This is the current number of generated clusters. In HPA, the tiles are further grouped into
        // clusters which helps in making pathfinding faster.
        int clusterCount = 0;

        // This is the size of each tile in world units
        const int TILE_SIZE = 1;

        // Half of the tile size, used in finding the center tile in world units
        const float HALF_TILE_SIZE = (float) TILE_SIZE / 2;

        // We start the grid at the origin
        Vector2 cellStartCenterWorldPos = new Vector2(0, 0);

        for (int y = 0; y < yTotalTiles; ++y) {
            // Some math magic to get the cluster id based on where we are currently in the y axis
            int yOffset = y / clusterSize * clusterSize;

            for (int x = 0; x < xTotalTiles; ++x) {
                // We use the tile size above and where we are in the grid to get this tile's center in world units
                Vector2 tileCenterPos = new Vector2(
                    cellStartCenterWorldPos.x + HALF_TILE_SIZE + x,
                    cellStartCenterWorldPos.y + HALF_TILE_SIZE + y
                );

                // From the center and using half of the tile size, we can get the lower left coord in world units 
                Vector2 tileMinPos = new Vector2(
                    tileCenterPos.x - HALF_TILE_SIZE,
                    tileCenterPos.y - HALF_TILE_SIZE
                );

                // Likewise, from the center and using half of the tile size, we can get the upper right coord in world units
                Vector2 tileMaxPos = new Vector2(
                    tileCenterPos.x + HALF_TILE_SIZE,
                    tileCenterPos.y + HALF_TILE_SIZE
                );

                // Using the x and y coordinated of the current tile, we can determine in which cluster this tile belongs
                int currentClusterId = x / clusterSize + yOffset;

                // I wanted to know the current index of the current tile since I'll be storing all of these tiles in a single array.
                // Then we can use the x and y coordinated to resolve the tile's index in that array using this formula.
                int currentInt = y * yTotalTiles + x;

                // If the current cluster Id where this tile is, is greater than what we already know, then it's a new cluster.
                if (currentClusterId >= clusterCount) {
                    // Increase the count of known clusters. This is also the index of the clusters in a separate array of clusters.
                    // Take note that clusters in HPA are collections of smaller tiles.
                    // Think of clusters as tiles of a higher order grid.
                    ++clusterCount;

                    // Similar to tile sizes, we use the cluster size to get the lower left tile coordinate 
                    Vector2 clusterMinCoord = new Vector2(x / clusterSize * clusterSize, y / clusterSize * clusterSize);

                    // Similar to tile sizes, we use the cluster size to get the upper right tile coordinate.
                    // We prevent the upper right coordinate here from going out of bounds of the grid size that we want.
                    Vector2 clusterMaxCoord = new Vector2(Mathf.Min(clusterMinCoord.x + clusterSize - 1, xTotalTiles - 1),
                        Mathf.Min(clusterMinCoord.y + clusterSize - 1, yTotalTiles - 1));

                    // Like every testing/debugging good boi, we display where we are in the code.
                    // I separated the whole sentence in multiple lines here to make the code easier to read.
                    Console.WriteLine($"{currentInt.ToString()} Coordinate ({x.ToString()}, {y.ToString()}) "
                                      + $"is in cluster {currentClusterId.ToString()}. "
                                      + $"Center {tileCenterPos.ToString()}. Min {tileMinPos.ToString()}. Max {tileMaxPos.ToString()}. "
                                      + $"Size {(tileMaxPos - tileMinPos).ToString()}"
                                      + $"\nCluster Min Tile {clusterMinCoord.ToString()}. Cluster Max Tile {clusterMaxCoord.ToString()}. "
                                      + $"Cluster Width {(clusterMaxCoord.x - clusterMinCoord.x + 1).ToString(CultureInfo.InvariantCulture)}. "
                                      + $"Cluster Height {(clusterMaxCoord.y - clusterMinCoord.y + 1).ToString(CultureInfo.InvariantCulture)}.\n");

                    // The continue here is simply to separate the Console.WriteLine() of when generating clusters and tiles
                    continue;
                }

                Console.WriteLine($"{currentInt.ToString()} Coordinate ({x.ToString()}, {y.ToString()}) is in cluster {currentClusterId.ToString()}.");
                Console.WriteLine($"Center {tileCenterPos.ToString()}. Min {tileMinPos.ToString()}. Max {tileMaxPos.ToString()}. "
                                  + $"Size {(tileMaxPos - tileMinPos).ToString()}\n");
            }
        }
    }
}

In my actual grid generation system, I fixed the variable names and made some of them constants for a better code structure. For now, let’s run this test code and see if our data is correct:

Test results of the grid generation test file

Looks good. Notice here that the test output is too long. We can press the hyperlink in the output window to open the full log of the test.

Now that we can generate the grid, let’s try to query a tile using the index and see if the index is correct by solving it using the coordinates. Let’s also try some assertions to see if a small sample of tiles are in the correct cluster. Let’s use this code:

[Test]
public void TestTiles() {
    TestTile testTile1 = this.tiles[0];
    Assert.IsTrue(testTile1.X == 0 && testTile1.Y == 0 && testTile1.ClusterId == 0);
            
    // Given that MAX_X_TILES = 8 and MAX_Y_TILES = 8, it's an 8x8 grid.
    // And each cluster is a 3-tiles by 3-tiles grid.
    // index = (MAX_Y_TILES * yCoord) + xCoord
    TestTile testTile2 = this.tiles[7];
    Assert.IsTrue(testTile2.X == 7 && testTile2.Y == 0 && testTile2.ClusterId == 2);
            
    TestTile testTile3 = this.tiles[29];
    Assert.IsTrue(testTile3.X == 5 && testTile3.Y == 3 && testTile3.ClusterId == 4);
}
Assertion tests for testing the grid generation algorithm

Let’s test this generation code and look at the results. We can see in the Session window that all of the assertions were evaluated as expected thus making the test a success.

Testing this generation code inside the IDE saved me a lot of time instead of changing the code, refreshing the Unity editor, and running it inside of Unity. Yes, you can use Unity’s Test Runner, but you will still need to refresh the Unity Editor. And if you have a big project, that can take some time.

Use Case #2 – Testing Native Containers (for cases when NUnit can’t find the right dll files)

I’ve also been doing a couple of tests using Unity’s DOTS and trying to use the native containers that comes with Unity.Collections. Before moving forward, let’s change our assembly definition to allow unsafe code and let’s add Unity.Collections to the assembly references to give us access to the native containers.

For the sake of simplicity in this example, let’s try to populate a NativeHashMap and let’s try running this test code:

using NUnit.Framework;
using Unity.Collections;
using UnityEngine;

public class NativeHashMapTest {
    private NativeHashMap<int, FixedString32> stringMap;

    private const int MAX_COUNT = 10;

    [SetUp]
    // Let's simply populate the hash map
    public void SetUpStringMap() {
        this.stringMap = new NativeHashMap<int, FixedString32>(MAX_COUNT, Allocator.Persistent);

        for (int i = 0; i < MAX_COUNT; ++i) {
            this.stringMap.Add(i, new FixedString32($"Index_{i.ToString()}"));
        }

        Debug.Log("StringMap initialized.");
    }

    [Test]
    public void NativeHashMapTestMethod() {
        Assert.IsTrue(this.stringMap.IsCreated);

        for (int i = 0; i < MAX_COUNT; ++i) {
            Debug.Log($"{this.stringMap[i].ToString()}");
        }

        Debug.Log("Finished printing stringMap.");
    }

    [TearDown]
    public void DisposeTestStringMap() {
        this.stringMap.Dispose();
        Debug.Log("StringMap disposed. Let's prevent those memory leaks.");
    }
}
Error for using Native Containers inside Rider's standalone test session

Notice that running this inside the test Session in JetBrains Rider will throw an error: “System.Security.SecurityException : ECall methods must be packaged into a system module“. This also happens with Unity.MonoBehaviour classes. For example, earlier when we tried to run the Debug.Log() calls inside our test session. A simple workaround I’ve tried so far is to switch environments and use Unity’s Test Runner.

NativeHashMap throwing errors when running it inside Rider's standalone test session

Unfortunately, for testing MonoBehaviour or DOTS-related code, we still need to go to Unity, refresh the editor, and run the test files inside of Unity’s Test Runner.

This is just a basic use case of NUnit in the context of making systems for your Unity projects – you can even make conditional test attributes if you want to make more complex tests. If you want to learn more, you can visit the documentation here.

That is all for now. As seen in this tutorial, testing this way has sped up my process when experimenting. That said, stay tuned for more tutorials in the coming weeks. You can follow me on Twitter and let me know if you have questions, corrections, and/or suggestions.

See you in the next one!


References:

More Lessons after Developing Academia: School Simulator

It’s been a couple of weeks since the release of Academia: School Simulator. A game that has been in development for 5 years – 4 of which was in Steam’s Early Access – and, as Marnel listed in his blog, there are a lot of lessons from those years of development.

The context of this blog is from my experience of having had part-time, freelance jobs in the game dev industry before joining Squeaky Wheel, my first permanent and regular job in the industry – and on programming a strategy game that has multiple systems running simultaneously and with hundreds of agents.

Below are shortcuts if you want to jump to a specific topic and as usual there are references at the end of the blog for further reading:

No-Garbage Programming

Well, not always but as much as possible. This is probably what I always oversee during my first years in the team (I still do every now and then) and you’ve probably seen these codes before. Garbage-generating code can look something like this:

public class GarbageExample : MonoBehaviour {

    public List<int> intList;

    public void Update(){
        if (Input.GetMouseButtonDown(0)){
            // Oops, garbage here every time the button is clicked
            this.intList = new List<int>();
        }
    }
}

Or a more common example with delegates:

public class DelegateExample : MonoBehaviour {

     // Applies different kind of damages to an entity
     private delegate void DamageEffect (int damage);

     public void Update() {
          // This generates garbage every frame
          ApplyDamage(PoisonDamage);
     }

     private void ApplyDamage (DamageEffect damageEffect){
          // Apply the damage here
     }

     private void PoisonDamage (int damageOverTime) {
          // Apply poison damage over time
     }
}

These blocks of code look harmless at first but; in the first one, a new object of type List is always being created every frame while the previous List is being released to be collected later by the Garbage Collector (GC); in the second example, what happens under the hood is a new delegate PoisonDamage is being created every frame and being passed to ApplyDamage(). Likewise with the first example, the previous delegate instance is being released to be collected later by the GC.

This is an issue because garbage collection is being done in the main thread and may look to the player as if the game was lagging if there are a lot of garbage to be collected in the current frame.

One of the ways of dealing with this is enabling Unity’s Incremental Garbage Collection. Another way is to improve your code. Here are a couple of guidelines that we follow to prevent garbage-generating codes:

  • Avoid these every frame or inside your Update method: GetComponent(), Find(), AddComponent(), Camera.main, transform, Debug.Log, and other built-in Unity methods
    • Reason being is that they are expensive and involves boxing. Solution here is to cache the return values of these methods
    • In the case of Debug.Log, these are still being called in the production build which may not be your intention. In our case, we remove these altogether after unit testing, or enclose these inside “#if UNITY_EDITOR” blocks
  • Pool your instances/objects and don’t instantiate/destroy objects every single frame. Cache the instances that you know you will reference multiple times in its lifetime
  • Move repeated computations that returns the same value outside of loops

These are just some of the examples and our ways of dealing with garbage-generating code and I’m sure there are a couple more. If you’re interested, Academia uses a signaling system to decouple different mechanics, and here’s one that Marnel made that doesn’t generate garbage.

Comment, Comment, Comment

This one I’ve realized midway into development when I was given bigger tasks that involve making systems from scratch. When I had to turn my attention to more urgent tasks such as bugs for hotfixes, then return to the system, I already forgot how half of the system works. Another benefit of adding comprehensive comments and summaries to your code, is this allows other programmers to understand your code without having to DM you about how a certain piece of code works. Sounds simple and will be beneficial in the long run.

Write your code as if it’s for the Asset Store

This is one of the first things that Marnel told me during our on-boarding period. This is related to the previous point of adding comments to your code. But not only that, your systems should work without a lot of dependencies with other systems. This is where design patterns come in. More specifically, the Component pattern or other decoupling patterns.

Writing your code in a way that they can be attached as components for Unity objects (or ECS entities) is a great way to decouple your codes and prevent spaghetti code and the infamous Gordian knot. This way of writing also allows programmers to work independently without worrying about breaking other programmer’s work.

Another way to separate systems from one another is creating a querying system and a signaling system for your game.

Read the code of existing systems

This one is crucial especially if you join the team in the middle of development – spend some time reading the backend codes of existing systems. I do this when I have extra time in-between tasks and when I’m curious on how a mechanic was implemented. This way, you will learn a lot about how your application works and thus, how best to implement and integrate new systems with existing ones.

In terms of communication, this also saves time when a question needs to be answered and your tech lead is not available.

Read and study new technologies

This might be daunting at first especially if you’ve been making the game for quite a while but, you don’t need to learn each and every new technology out there (you can if you want, though). You can skim over some of them, and study only those you are sure will help you improve your game. In our case, Unity’s new Data-Oriented Technology Stack or DOTS is definitely a need to speed up Academia’s simulations (Needs and Satisfaction, rendering, A* pathfinding, etc.).

Ask Questions – lots and lots of questions

So, you’ve been reading the backend of existing systems and reading about new technologies. That is all good and well. But, it’s sometimes better to start a discussion with your colleagues. Not only fellow programmers if you’re one, but, also with your designers and artists. This will open your mind to different disciplines in the industry and help you understand them a lot more.

By asking questions, I learned a lot from our designers which help me in designing code and tools that will help them create better content for Academia. Learning from our designers also helped me understand and visualize the mechanics in the game.

Be Clear and Specific in Communicating

Our CEO and artist, Ryan Sumo, wrote an article that pretty much sums up our daily communications. Basically, we avoid a lot of ambiguous and/or confusing definitions and terms that doesn’t translate well across different disciplines. When trying to explain programming pitfalls when we’re discussing new mechanics, I try not to use jargons that only programmers understand and explain implications in terms of actual in-game scenarios and examples. That’s just one way of making our conversations more streamlined, and there are more examples and tips in Ryan’s article.

Ask to be criticized every once in a while

This one is probably personal preference but, in order to further grow as a programmer and as a person in general, I ask my colleagues every once in a while how I’m doing in the company. Tangental to this, I take notes on common code review comments from our tech lead, usual terms and things that confuse our designers, and life advices I receive and observe from my colleagues.

This is not an exhaustive list of the lessons I learned from being part of Squeaky Wheel, developing Academia: School Simulator. But, I hope you picked up a thing or two from this list that may help you in your game dev journey.

That said, thank you and feel free to share this with your friends. Starting next week, I’ll start writing more programming-related blogs – See you in the next one!


References:

A Simple Generic Timer System for Unity ECS

Timers are used in different ways in video games such as to allow the players to fast forward in strategy games, or to be used by systems for computations like damage per minute type of effect, and much more. In my experiment project using Unity’s pure ECS, I needed a timer for setting how long an NPC will be on idle.

In this quick tutorial I’ll show you how I implemented this timer system. As usual, there are references at the end of the blog for further reading. Enjoy!

The Timer Component Tag

Let’s start with the Timer tag that we will add to the entities that we want the timer system to affect. Keep in mind that we will be implementing a generic system later that will take this timer tag as the system’s data type. The tag will look like this:

public struct Timer<T> : IComponentData where T : struct {
    // Note that we don't reset the values here since
    // we will remove this component when we're done anyways

    public float ElapsedTime;
    public float TargetDuration;

    public Timer(float targetDuration) : this() {
        SetDuration(targetDuration);
    }

    public bool IsDone {
        get {
            return this.ElapsedTime >= this.TargetDuration;
        }
    }

    private void SetDuration(float targetDuration) {
        this.ElapsedTime = 0;
        this.TargetDuration = targetDuration;
    }
}

I admit that this code looks weird because we introduce a type T, but never use it anywhere in the struct. But, this will help us differentiate the different timer systems later. This is done this way as a workaround to the fact that we can’t inherit structs and structs can’t derive from classes.

The Generic Timer System

For the system, we’ll implement a generic timer system. This will allow us to extend the timer system and have different timers for different parts of the game (such as animations, idle, game speed, etc.). This is what it looks like in code:

public class TimerBaseSystem<T> : SystemBase where T : struct, IComponentData {
    private EntityQuery timerQuery;
    private EntityCommandBufferSystem entityCommandBufferSystem;

    private const float TIME_SCALE = 1f;

    /// <summary>
    /// We set the TimeScale as virtual so that subclasses can have their own timescales if needed.
    /// A use case for this is for faster speeds or faster enemies in strategy games.
    /// </summary>
    protected virtual float TimeScale {
        get {
            return TIME_SCALE;
        }
    }

    /// <summary>
    /// This is the scaled time - applying the Timescale to the delta time.
    /// </summary>
    private float ScaledTime {
        get {
            return this.Time.DeltaTime * this.TimeScale;
        }
    }

    protected override void OnCreate() {
        base.OnCreate();

        this.entityCommandBufferSystem = this.World.GetOrCreateSystem<EntityCommandBufferSystem>();

        // The main idea here is that everything that has the Timer tag of type T will only be processed
        this.timerQuery = this.EntityManager.CreateEntityQuery(
            ComponentType.ReadWrite<Timer<T>>()
        );
    }

    protected override void OnUpdate() {
        UpdateTimerJob job = new UpdateTimerJob {
            EntityTypeHandle = GetEntityTypeHandle(),
            TimerTypeHandle = GetComponentTypeHandle<Timer<T>>(),
            CurrentTimeInterval = this.ScaledTime,
            CommandBuffer = this.entityCommandBufferSystem.CreateCommandBuffer().AsParallelWriter()
        };

        this.Dependency = job.ScheduleParallel(this.timerQuery, this.Dependency);
        this.entityCommandBufferSystem.AddJobHandleForProducer(this.Dependency);
    }

    // BURST IT!!! YAAS!
    [BurstCompile]
    private struct UpdateTimerJob : IJobChunk {
        [ReadOnly]
        public EntityTypeHandle EntityTypeHandle;

        [ReadOnly]
        public float CurrentTimeInterval;

        public ComponentTypeHandle<Timer<T>> TimerTypeHandle;

        public EntityCommandBuffer.ParallelWriter CommandBuffer;

        public void Execute(ArchetypeChunk chunk, int chunkIndex, int firstEntityIndex) {
            NativeArray<Entity> entities = chunk.GetNativeArray(this.EntityTypeHandle);
            NativeArray<Timer<T>> timers = chunk.GetNativeArray(this.TimerTypeHandle);

            for (int i = 0; i < entities.Length; ++i) {
                Timer<T> timer = timers[i];

                timer.ElapsedTime += this.CurrentTimeInterval;

                if (timer.IsDone) {
                    int sortKey = firstEntityIndex + i;
                    this.CommandBuffer.RemoveComponent<Timer<T>>(sortKey, entities[i]);
                }

                timers[i] = timer;
            }
        }
    }
}

Now, if you want to extend the timer system – say, you want another one with a faster timescale, it will look like this:

public struct FastTimeScaleTag : IComponentData {
}

public class FastTimeScaleTimerSystem : TimerBaseSystem<FastTimeScaleTag> {
    protected override float TimeScale {
        get {
            return 2f;
        }
    }
}

We first create a new tag that we will then use as the type for the new timer system. Then inside the timer system, we override the TimeScale and set it higher (faster) than the default 1 inside the base class.

A caveat however, if you run this now, you will get an ArgumentException error. This is because in ECS, all ComponentTypes should be known during compile time. To remedy this you can create a separate file, say AssemblyInfo.cs and add the following:

[assembly: RegisterGenericComponentType(typeof(Timer<NormalTimeScaleTag>))]
[assembly: RegisterGenericComponentType(typeof(Timer<FastTimeScaleTag>))]

You can also add this in the TimerBaseSystem class right after declaring your using directives if that is more convenient for you.

To further make it easier to track all the timer systems, we can make a separate system group for all the timers. Then update our timer systems inside that group.

// Depending on your use case, you can choose when your timers should update
[UpdateBefore(typeof(EndSimulationEntityCommandBufferSystem))]
public class TimerSystemsGroup : ComponentSystemGroup {
}

[UpdateInGroup(typeof(TimerSystemsGroup))]
public class TimerBaseSystem<T> : SystemBase where T : struct, IComponentData {
// Rest of the timer system code
}

Now, we are almost set. We just need to add the timer tags to our entities. My use case for this timer is for how long an NPC should wait (be idle) before moving. That said adding the components for me would look something like:

// This will make the NPC wait for 3 seconds at a normal time scale.
// More or less 3 seconds in real life.
this.CommandBuffer.AddComponent(firstEntityIndex, npcEntity,
    new Timer<NormalTimeScaleTag>(3f)
);

// This will make the NPC move earlier than the one above with a
// faster timescale which is twice of the normal time scale
// which is about 1.5 seconds in real life.
this.CommandBuffer.AddComponent(firstEntityIndex, npcEntity,
    new Timer<FastTimeScaleTag>(3f)
);

To demonstrate this I made the following setup:

  • Two NPCs with different time scales (1f and 2f), but the same idle wait time of 3 seconds; and,
  • A MovementSystem that would move the two NPCs after waiting

And it looks something like this (note that timing might differ since I just captured this with a screen to gif tool):

Unity Pure ECS Generic Timer System Example
Don’t worry, they still met in the end and lived happily ever after. *wink*

And there you have it. For further improvement, I’m thinking of adding a query in the base system that the subclasses can override, so that other parts of the game can get the scaled time from any respective timer systems. I already got it working and if you want to read more about query systems, Marnel from Squeaky Wheel wrote a simple query system. He made a better version of that system that doesn’t involve boxing but I can’t seem to find a reference about it online, maybe soon.

If you have questions you can reach me via Twitter or Instagram – That’s all for now and see you in the next one!

References:

P.S. It took a lot longer for me to release this blog because of something great happening soon – Academia: School Simulator is releasing in just a couple of weeks and boy are we nervous in Squeaky Wheel. Please check it out on Steam and let us know what you think. Thank you again, have a good one, and stay safe!

Farewell Blog for 2020

Happy New Year! Oh, 2020. You’re one tough b*tch. Despite the challenges of last year, I still made sure that I don’t become stagnant and still learn a thing or two. This blog is going to be a compilation of all my ventures for last year, mistakes and failures, and the lessons I learned along the way. I won’t be listing them by month but by category instead. Enjoy and I hope you can also learn from my mistakes.

I realized after writing this blog that it’s crazy long. So, here are the links to jump to certain parts:

Gags N Geeks

Let’s start with the video production (skits, reviews, etc.) and gaming studio my friends and I started back in 2019 – Gags N Geeks. The year opened up with us breaking the 5000+ followers barrier on Facebook. Although, this metric doesn’t necessarily constitute to engagement, it is still a milestone for the studio.

Bring out the drinks and let’s celebrate!

But, alongside the growth of our community, comes the internal struggles. A lot has happened since we started last June 2019. One of those things is that each of the original cast started growing apart – there was a lack of openness and not everyone is engaging proactively in the discussions that would help the studio grow. Frankly and personally speaking, I struggle and despise working with non-proactive people (it’s ok to be friends with them but work is different). But, I digress. This misunderstanding resulted in a decision to change how we work internally and recast. This time I made sure that I will be working alongside people who have high respect for professionalism and constructive criticism.

To achieve this, we created an agreement that contains our responsibilities in the studio, expectations, and a couple of guidelines to ensure that we share the same vision. We also shrunk down the number of members from 8 to just 6, to make communication easier and to reduce costs. That said, we welcomed a new member – a passionate musician and anime-lover, Clarisse!

She performs live on GNG’s Twitch

We also didn’t see a lot of organic growth on Facebook Gaming which prompted us to migrate to Twitch. There, we found new family and new friends that share the same interests. We stream video games, our pinoy homebrew Dungeons & Dragons campaign (we finished the first season just this December!), music nights, and one of our top performing content – Chikatitos, a pinoy geeky podcast where we talk about anything we want. We also started publishing exclusive podcasts for Spotify also called Chikatitos.

From our newly-built relationships, we also started doing collaborations:

We also started giving back and helping out in charities. One instance was when there was a call to action for the victims of Taal volcano eruption. We streamed for a week and matched whatever our community pooled for that whole week. You can watch that journey here.

We spend the whole day and night buying (haggling) for supplies and repacking

Everything was going well, then the pandemic happened and our country went on lockdown. This was a double-edged sword for us since now we can just work from home and produce our videos remotely, which worked well. But, that also means we won’t be able to use the studio’s equipment and we won’t be able to record our boardgame sessions nor have a live Dungeons & Dragons session. The lockdown also affected our personal lives that some of the casts lost their jobs and/or couldn’t find jobs (up until around November and December). All of these combined made our schedule a mess despite having a spreadsheet of who’ll do what, and despite having multiple iterations of our schedule. To be honest, up until now, we are still looking for a way to have a final schedule since most members of GNG have night-shift jobs.

That said, we still enjoy what we do and will definitely solve these hurdles soon. Here’s a clip before the lockdown when we acted like the little kids that we are inside.

Squeaky Wheel

Lots – and I mean, LOTS – of updates. There were a lot of new mechanics added to Academia: School Simulator such as Food Fights, Teacher Traits, More Customizable School Settings, School Shutdown, Events, Student Roster, and a lot more!

Squeaky Wheel also took part in helping out everyone affected by this pandemic.

Simon Carless also wrote an in-depth behind-the-scenes analysis of Academia’s Steam sales with the help of our CEO, Ryan Sumo. This was an interesting read since they discussed what contributed to the game’s revenue spikes, the effects of algorithm changes in platforms such as Steam, and the difference of being a game developer here in the Philippines compared to other countries.

Two of the biggest news from the studio last year was the Ruinarch announcement (now out on early access!),

and that Academia: School Simulator is now graduating to Version 1 this 2021!

This year is going to be a blast, so be sure to follow us on Twitter for updates.

Music

I bought a piano as a holiday gift for myself around December of 2019. And since then, I devoted a good amount of time every week to play the instruments I have. Here are some of the tunes I just had to play to free my mind:

Aside from the piano, I also got my hands on a dizi or a Chinese bamboo flute. I also got an ocarina during our online Christmas party with Squeaky Wheel. I’ve always been curious with wind instruments because ever since I was a kid I’ve only played string and percussion instruments. That said, having a dizi and an ocarina gave me some opportunities to learn more last year – it was relaxing and made me really happy.

With those new instruments added to my arsenal at home – alongside a bass guitar (I also played live on Twitch), an electric guitar, 4 acoustic guitars (different strings and tunes), electronic drum kit, cajon, and a violin – I have to say, I probably played days worth of music last year.

Lastly, even though I was a bit embarrassed at first, I started sharing my singing videos on Instagram. I usually do this when I’m taking a break from work or when Academia: School Simulator is compiling and I have some time to play around.

Art

My true passion since I was a kid was creating – be it writing short stories, poems, music, programming, or in this case charcoal and graphite drawing. I didn’t have any formal education or training regarding drawing. I only watched my older brother as he also draws (mostly with graphite and color pencils) and paints (with acrylic) when I was a kid. And, of course lots of YouTube videos and, Instagram and Deviantart browsing. That said, here are a couple of my old works (on Deviantart):

And here are my 2020 drawings (on Instagram. Yes, these are mostly animes because I spend my holidays and weekends watching movies or animes…if I’m not coding):

Lastly, I also dedicated some of my nights and my weekends improving the D&D maps for our homebrew campaign using Inkarnate.

Personal Health

Mental Health

First off – mentally, last year has been quite challenging. I won’t get into a lot of personal details but letting these out helps loosen the weight, even just for a little bit. If you feel like this might trigger you, please feel free to skip this part by clicking here.

Let’s start with people around me judging me for acting professional (following a process and schedule) and for sharing my thoughts. I’ve been called a lot of names – poser, feeling comedian (acting like a comedian for cracking jokes here and there during our comedy show. Ironic, I know.), and a lot more. All of these combined made me think if I’m still doing the right thing or if I’m even on the right road towards where I want to be; and because of this spiral of thoughts, I developed impostor syndrome. I even felt dumb while making games despite having almost half a decade’s worth of experience in the industry. I even expressed how bad of a leader I am (I think…I still do.) to my friends. And, even if they tried to tell me otherwise, I just don’t see it or couldn’t. I’m not sure.

Next thing I realized last year, is the harsh effects of toxic positivity. Yes, being positive all the time hurts more than it helps. Let me explain. I know a couple of people who says positive things and encourages with positive speeches…without offering anything of actual value. And that will just impose a false belief that you’ve already solved the problem, or at least you already have the steps and solution for your problems, even though you actually don’t and you are still lost like you were before you heard those toxic positive speeches.

With those mentioned above (these are just some), I stayed away from social media for weeks and refrained from sharing my thoughts and plans with anyone. Yes, including my family. I also stopped journaling. My thought process turned to “I’ll just do it myself and see the results. Maybe then, they will see.”.

But, after bottling all these inside, I ironically turned to Twitter. And, believe it or not, I felt lighter discovering I’m not the only one experiencing these. So far Twitter has helped me more than it damaged me – unlike Facebook. I also turned to my mentors to ask for guidance and they helped put things into perspective.

Lastly, I turned to playing shogi and chess. My older brother (the same one who plays music and draws) taught me how to play chess as a kid, and going back to the game mid-2020s surely made me happy. Shogi, on the other hand, was something I learned mid-2020. I like shogi because there are a lot more things that could happen compared to chess, since you can put captured pieces back on the board. This kept me busy for hours and it was fun.

Physical Health

I worked out quite regularly last 2019 (used to hike with friends). But, with the lockdown this 2020, I had to improvise. Luckily – a good friend of mine from GNG – Louis, is a licensed physical therapist and he offered to create a workout program for me. He also gave me elastic bands as a holiday gift which helped since I don’t really want to buy huge workout equipment. That said, I still workout regularly. Well, almost regularly – there are just times when I don’t want to get out of the zone when programming.

I also switched from 3-in-1 instant coffee to brewed coffee. Japet – also from GNG – started a coffee business last 2020 and I get my grinded coffee from him.

Then, around December of 2020, I ran out of coffee and Japet couldn’t drop by for delivery. So, I turned to blending fruits and veggies. I have to say, this is more refreshing and boosts my mood.

Finance

Oh boi, finances. 2020 was the year I realized all my financial mistakes and learned from them the hard way. This is the year when I drowned myself in debt, withdrew about 95% of my investments to pay those debts, and almost zeroed my savings (just a couple of bucks left). Luckily, my eldest brother (not the one who draws) helped me pay my debts and my mentor (Ryan Sumo of Squeaky Wheel) helped me with better handling my expenses and my investments. A couple of people on Twitter also gave some tips on living a frugal life.

I’m currently still in the process of building up my investments back up and I am taking financing a lot more seriously now. I even got my hands on a very reliable app called Bluecoins since, my custom-made Google spreadsheet is full of errors and I sometimes forget to update it accurately – which honestly beats the purpose of having it in the first place.

That said, I’m still exploring different types of investments and other sources of income. We’ll see what else I’ll venture into this 2021.

Other stuff going on

I upgraded my programming setup as a holiday gift to myself for 2020. This is going to by my last expense for the next couple of months.

I also started writing guides for game developers out there – mainly about Unity and ECS for now since I, myself, am studying it. That said, I started working on a personal project/research regarding the effects of personality traits in relationships. But, I’m still working on the design and programming so, I can’t really share anything of value yet, aside from this (a sprite rendering system and movement system written in pure ECS with burst):

Lastly, please excuse me for adding this, but I seldom win in raffles. I won something during Electronic Sports and Gaming Summit (ESGS) 2020!

That’s all the note-worthy things that happened to me last 2020. It was a really, really challenging year for everyone and here’s to a better year this 2021 – cheers! Oh, please wash your hands first.

Thank you and stay safe!

How I got into the Game Industry…

We now live in the time where video games or gaming in general is becoming more than just for entertainment. Games are now being used in different kinds of researches[1][2][3], we now have athletes who play videos games for a living[1][2], universities are now offering scholarships for esports athletes[1], and a lot more. Other fields are also starting to blend and are now becoming more involved in a game’s development process – expertise from programmers to psychologists[1][2].

But, how exactly do you even start in the industry? Here, I’ll share different tips that helped me land my first game dev job – these may not be applicable for everyone but these worked for me and might work for you too.

My Background

To give you more context on the tips ahead, note that I’ve been making games/prototypes since I was in elementary with Macromedia Flash, then with Unity in high school up to when I was in college. That said, let me briefly share with you my history in the industry so far (most of my previous works were in Unity and/or Blender):

  • I started freelancing last 2016 and my first job was a private tutor (basics of Unity)
  • 2D Animator
  • 3D Generalist
  • Writer for VGamerz
  • Game Programmer

And now, I’m a programmer with Squeaky Wheel working on Academia: School Simulator – which, by the way, is graduating out of early access next year! Please check our game out – we’re really excited…and nervous. Anyways, that out of the way let’s start with why would you even think of entering the game industry.

Why enter the Game Industry?

First – a great casual culture! Well, I can’t speak for all the studios and game development companies out there. But, in the ones I worked with, I never had to follow a strict dress code, nor do I have to work a fixed strict number of hours a day. Now, that doesn’t mean I can slack off and start work at 4 PM and logout at 6PM. What I mean is that we only have a specific time in the day – usually around 11 AM to 3PM – where you should be online just in case there are questions that needed to be answered or a team member needs help with a task. We also work from home which is a huge plus since travelling in Manila is not the easiest thing in the world. We do meet about 2-4 times a month depending on if there’s an urgent and important issue that should be discussed face-to-face.

Next reason to join the industry is the number of new technologies that you’ll get to try – virtual reality, augmented reality, new algorithms, and more! If you’re a really curious person that loves learning new technologies, you might find a home in the game industry.

That said, there are studios also that doesn’t develop games for the sole purpose of entertainment. As mentioned in the intro of this article, there are companies out there that are focused on using video games as a research tool[1]. There are even game designers being hired by healthcare companies to gamify their systems or applications[1][2].

Lastly, you’ll be making games! One of the things I love about this job is receiving comments/messages such as these,

Originally tweeted by Academia Game (@academia_game) on June 29, 2020.

My two personal favorites,

Originally tweeted by Academia Game (@academia_game) on January 1, 2020.
Originally tweeted by Academia Game (@academia_game) on November 24, 2019.

And of course, watching various YouTubers have fun!

Now, the tips!

  1. Don’t Stop Learning

True to almost any jobs in the tech industry, there are a lot of new technologies, techniques, and innovations in the games industry. Which is why, you should never limit yourself to what you already know – always be curious. But how?

Nowadays, there are a lot of information out there – forums, YouTube videos, online courses, etc. Whichever works for you – grab a copy, watch, or enroll to learn more about a technology or a skill that you feel you’re lacking. There are also workshops that you can attend to have a more hands-on learning opportunity.

Chatting with game development students during the Electronic Sports and Gaming Summit 2018

One more thing that I encourage you to do is to attend meetups. Most often than not, there will be people there showcasing their works, and you can learn from their progress. Meetups are also a great way to connect and meet with people in the industry. You can ask around about internships, job openings and other opportunities that you would otherwise not even hear anywhere.

Another thing I learned from Tobie Abad, the Creative Director of Taktyl Studios and a creator of table-top games, is to explore everything – including those that you hate. If you don’t like mobile matching games, still play them. You never know what you might learn from the game itself…and why you don’t like it.

Lastly, the best way to learn is – JUST. START. CREATING! Download your preferred game engine and start creating. I also encourage you to try out the different engines out there and choose the one that suits your workflow.

  1. Build Your Portfolio

Most often than not, your portfolio will speak louder than your CV. If you’re just starting out, don’t worry. You can use your personal projects (prototypes, game jams, etc.) for your portfolio as long as your work can show what you can do and show what you can provide for the company/studio. If you’re freelancing, include those as well.

Now, there are different kinds of portfolios for different roles:

  • If you’re an artist, fill your portfolio with the style that you are comfortable working on
  • For programmers, don’t worry if your games lack a specific art style. Just show the different systems you worked on, the tools and languages you used, etc.
  • For the designers out there, include the different prototypes showcasing the different mechanics you worked on, and;
    • For the more specific design role, the level designers, include different levels that you worked on (platformer prototypes, gray boxing, etc.). Also, put what you think is your best work, first

Lastly, make your portfolio accessible and easy to navigate. The last thing you want is to make your potential employer click multiple links just to get to ONE of your works.

  1. Be Active in the Community

Now that you are working on your personal projects, share them with the community! If you’re afraid, here’s one thing that Gwendelyn Foster, the Regional Coordinator for IGDA APAC and the Business Development Director of Special Projects at SUPERHOT, told me when I told her that I didn’t feel confident sharing my knowledge, when I was asked to give a talk in a university, “No matter how little experience you think you have, it’s still experience. And experiences are worth sharing, especially if there are lessons to learn.”

That said, you should also start attending conventions (after the pandemic, please), seminars, workshops, etc. And, while you’re in one, don’t be afraid to ask questions to the different people attending the event.

If you can, you may also volunteer in your local game developer groups. They may need a helping hand in organizing different activities for the community. That’s a great way to be closer to the community and meet people in the industry.

Gam Jams – oh, the beauty of game jams (Ludum Dare, Global Game Jam, itch.io jams, etc.). I can’t express how much participating in game jams helped me challenge myself and harness my skills. One great thing about game jams is that you can also partner up with other game developers out there. You’re a programmer and in need of an artist? Just ask in the game jam board or discussion forum, and you’ll be surprised at the number of artists out there looking for a game jam buddy.

So, go out there and introduce yourself!

  1. Don’t Give Up

Like most things in life, this is not exactly going to be a walk in the park. But, let me share with you a list of why that “fear” you’re feeling is completely normal. From Dr. Susan Jeffers’s book, “Feel the Fear and do it anyways“:

  • If you feel fear, you’re growing.
  • You’ll feel better if you do it.
  • Everyone experiences it (fear).
  • Even if you fail and feel like you lost, it’s still better than feeling helpless or regret because you didn’t even try.

Ever since reading Dr. Jeffers’s book, I’ve always kept it in my mind not to give in to fear – with proper preparations, of course.

One instance was applying for my first freelance job. Yes, I did a lot of prototypes already during that time. But, I never had any experience in the industry yet. And for TWO WHOLE MONTHS, no one was accepting my proposals and job applications. This may sound cliche, but when I was about to give up, I received an email from someone looking for a private tutor for Unity.

Another instance is when I applied for another job, the job requirement stated “at least 2 years of experience developing games”. At that point in time, I’ve only been creating games professionally for a little more than a year. I was so nervous when I submitted my application but when they gave me a chance for an exam, I passed.

Just remember – all, if not most, of game developers out there experienced far worse than you will experience. Just do it and if you fail, then there’s a lesson to learn.

  1. After all of that, what to do next?

Do your homework regarding your target studio/company. Are you sure you like the games they make – the art style, the story, the gameplay, etc.? Also, not only about the ins and outs of the games they make or the tools they use but, familiarize yourself with their culture, feedback from former employees, mentorship opportunities, etc. You never know, maybe you’ll have to work with them for years. You have to make sure you can actually maintain your sanity with the studio/company.

Keep learning, and practice or train yourself to be a good team player. It’ll help you not only in your career, but in life. Learn to understand other people’s work ethics. That said, you should also be used to receiving criticisms. Yes, there will be people who will love your work from the bottom of their hearts. But, there will also be people who will curse you for even thinking of making such an abomination of a game. You should learn how to filter different criticisms and only take in those that can further improve you not only as a developer, but also as a person.

And there you have it. The tips and tricks that I did to get in the game industry. If you want to see the deck I used for seminars, here’s the link. If you have questions, you can reach me via Twitter or Instagram.

Thank you for reading – start creating, and stay safe out there!

Different game developers from the Philippines gathered to drink, share stories, play games, and have fun!

Working with Scriptable Objects and Blob Assets, and creating a Utility Class

So, you want to convert scriptable objects to data that you can use in your ECS systems – but, you can’t directly access SOs using pure ECS. Today, I’m going to share with you how to convert scriptable objects to Blob Assets and also share a utility class that I created while studying Blob Assets.

First off, let’s quickly define what is a blob asset – it’s an immutable data that can be accessed by your systems across multiple threads. Meaning, you can use these in running parallel jobs, which is really important for creating performant systems using Unity’s DOTS. It’s also important to note that you can only use blittable types in your blob assets, and BlobString or FixedString if you want to use strings.

If you want to learn more about getting started with blob assets, Marnel from Squeaky Wheel wrote a guide to help you out. And Code Monkey created an easy-to-understand video, “What are Blob Assets?”. Also, check Unity’s test scripts regarding Blob Assets, they help a lot in understanding how things work.

Before we start – for context, I’m making an NPC generator as a test project for studying ECS. The code here is stable with the packages – Entities 0.16.0-preview.21 and Hybrid Renderer 0.8.0-preview.19.

Jumping in, the best use case for Blob Assets is converting Scriptable Objects (designer-friendly and can be edited in Unity’s editor) to data that can be used in your jobs with burst.

[EDIT – Sept. 12, 2021]

If you’re encountering this error (I encountered this with the packages – Entities 0.17.0-preview.42 and Hybrid Renderer 0.11.0-preview.44 – other dependent packages should update accordingly):

error ConstructBlobWithRefTypeViolation: You may not build a type TBlobAssetType with Construct as TBlobAssetType is a reference or pointer.  Only non-reference types are allowed in Blobs.

Unity is already aware of this issue (see this thread for more info), but the fix is included in Entities 0.18, of which there is no ETA yet as of the time of writing of this edit block. In the meantime you can implement this workaround from this post:

"For now, you can comment out loop on line 149 in BlobAssetSafetyVerifier.cs"

I’ll see if I can find another workaround, until then I’ve implemented the workaround above and the project in this tutorial should still work.

[END OF EDIT BLOCK]

Converting Scriptable Objects

Let’s first create the Scriptable Object that we want to convert. Keeping it simple, let’s add an integer for the maximum number of NPCs we want to generate and, for fun, a maximum number of friends an NPC can have.

[CreateAssetMenu(fileName = "NpcManagerData", menuName = "Game/NpcManagerData")]
public class NpcManagerData : ScriptableObject {
    [SerializeField]
    private int totalNumberOfNpcs;

    [SerializeField]
    private int totalFriends;
  
    public int TotalNumberOfNpcs => this.totalNumberOfNpcs;

    public int TotalFriends => this.totalFriends;
}

We also need a gameobject that will hold this scriptable object,

public class DataContainer : MonoBehaviour {
    [SerializeField]
    private NpcManagerData npcManagerData;

    // Accessor for the conversion system
    public NpcManagerData NpcManagerData => this.npcManagerData;
}

In order to convert this to a blob asset, we need to define the structure of the blob asset. For our purposes, the structure will be pretty similar. You can have computations or a specific conversion logic in the conversion system later, if the need arises.

public struct NpcDataBlobAsset {
    public int TotalNumberOfNpcs;
    public int TotalFriends ;
}

At this point, it’s also important to note that Scriptable Objects are “scene data” – meaning they exist in the “game object” world of Unity. That said, we need a way to convert these “scene data” to DOTS. We can achieve this by using a GameObjectConversionSystem,

[UpdateInGroup(typeof(GameObjectConversionGroup))]
public class TestGameDataSystem : GameObjectConversionSystem {
    // We made this static so that other systems can access the blob asset.
    // We'll modify this later to work with job systems. 
    // For now, let's keep it simple.
    public static BlobAssetReference<NpcDataBlobAsset> NpcBlobAssetReference;
    
    protected override void OnCreate() {
        base.OnCreate();

        // Let's debug here to make sure the system ran
        Debug.Log("Prefab entities system created!");
    }

    protected override void OnUpdate() {
        // Access the DataContainer attached to a gameObject here and copy the data to a blob asset
        this.Entities.ForEach((DataContainer container) => {

            // We use a using block since the BlobBuilder needs to be disposed after using it
            using (BlobBuilder blobBuilder = new BlobBuilder(Allocator.Temp)) {

                // Take note of the "ref" keywords. Unity will throw an error without them, since we're working with structs.
                ref NpcDataBlobAsset npcDataBlobAsset = ref blobBuilder.ConstructRoot<NpcDataBlobAsset>();

                // Copy data. We'll work with lists/arrays later.
                npcDataBlobAsset.TotalNumberOfNpcs = container.NpcManagerData.TotalNumberOfNpcs;
                npcDataBlobAsset.TotalFriends = container.NpcManagerData.TotalFriends;
                
                // Store the created reference to the memory location of the blob asset
                NpcBlobAssetReference = blobBuilder.CreateBlobAssetReference<NpcDataBlobAsset>(Allocator.Persistent);
            }
        });

        // Print to check if the conversion was successful.
        // Note that we have to access the "Value" of where the reference is pointing to.
        Debug.Log($"At prefab entities initialization: total npc count is {NpcBlobAssetReference.Value.TotalNumberOfNpcs.ToString()}");
    }
}

If you are not familiar with the code above, check Unity’s talk during Unite Copenhagen 2019 on “Converting scene data to DOTS”. It’s important to note that GameObjectConversionSystems work in the world in between the GameObject/Scene world (where gameobjects exist like Prefabs, Scriptable Objects, etc.) and the Entity or “DOTS world” (where your systems are). I’m probably oversimplifying here since you can have multiple worlds. In that case, the GameObjectConversionSystems still lie between the GameObject/Scene world and your worlds.

Before we test the code, make sure that you have the DataContainer (the one where you put the references to the scriptable object) in a subscene. Because subscenes convert the gameObjects in them to Entites when you “close” them in the Inspector. See Unity’s Unite Copenhagen talk for more info. Here’s what the hierarchy looks like in the editor,

Running the game will print these in the console,

Yey, it works!

Cool, now we converted the Scriptable Object to a Blob Asset that can be accessed using the static BlobAssetReference in our TestGameDataSystem. Let’s add two more things – an entity with the blob asset reference that can be accessed in our job systems, and the promised blob asset utility class.

Accessing Blob Assets in DOTS/ECS Systems

First, we need a component data that we will attach to the entity,

// This will be used by job systems to access blob asset data,
// since we cannot access static non-readonly fields in jobs
public struct BlobAssetReferences : IComponentData {
    public BlobAssetReference<NpcDataBlobAsset> NpcManager;
}

Next, let’s add this component to a new entity which we’ll create right after generating the NpcDataBlobAsset, in our GameObjectConversionSystem earlier,

        // ...the rest of the GameObjectConversionSystem earlier

        Debug.Log($"At prefab entities initialization: total npc count is {NpcBlobAssetReference.Value.TotalNumberOfNpcs.ToString()}");

        // We use the default world here since this is attached to a gameobject in a subscene which is in itself, a World.
        // We have 3 worlds at this point: Default, Subscene, and Subscene entity conversion world
        EntityManager defaultEntityManager = World.DefaultGameObjectInjectionWorld.EntityManager;
        
        Entity gameDataEntity = defaultEntityManager.CreateEntity();
        BlobAssetReferences blobAssetReferences = new BlobAssetReferences {
            NpcManager = NpcBlobAssetReference
        };
        defaultEntityManager.AddComponentData(gameDataEntity, blobAssetReferences);
    }
}

Be careful when creating entities in GameObjectConversionSystems since there are 2 EntityManagers there, since we’re working with 2 worlds while in the GameObjectConversionSystems – one that is used in the conversion world, and one that is used in the default world. If you are creating an entity that you want to use in the default world, use the World.DefaultGameObjectInjectionWorld.EntityManager and not the EntityManager in the GameObjectConversionSystems.

Now, let’s create a simple system to see if we can access the blob asset from a job system and run the game,

[UpdateInGroup(typeof(SimulationSystemGroup))]
public class TestSystem : SystemBase {
    protected override void OnUpdate() {
        if (!TestGameDataSystem.NpcManager.IsCreated) {
            // Don't do anything if the NpcManager is not yet created
            return;
        }

        this.Entities.ForEach((Entity entity, int entityInQueryIndex, ref BlobAssetReferences blobAssetReferences) => {
            NpcDataBlobAsset npcDataBlobAsset = blobAssetReferences.NpcManager.Value;

            for (int i = 0; i < npcDataBlobAsset.TotalNumberOfNpcs; i++) {
                // you can now access the NpcDataBlobAsset here
            }
        }).ScheduleParallel();
    }
}
You can see here that we can now use the BlobAssetReferences component in our systems

Blob Asset Utility Class

Cool! Next, let’s create another blob asset, but this time let’s refactor the BlobBuilder in our TestGameDataSystem to a utility class, so that we can simplify our code and make it easier to read,

public static class BlobAssetUtils {
    private static BlobBuilder BLOB_BUILDER;

    // We expose this to the clients to allow them to create BlobArray using BlobBuilderArray
    public static BlobBuilder BlobBuilder => BLOB_BUILDER;

    // We allow the client to pass an action containing their blob creation logic
    public delegate void ActionRef<TBlobAssetType, in TDataType>(ref TBlobAssetType blobAsset, TDataType data);

    public static BlobAssetReference<TBlobAssetType> BuildBlobAsset<TBlobAssetType, TDataType>
        (TDataType data, ActionRef<TBlobAssetType, TDataType> action) where TBlobAssetType : struct {
        BLOB_BUILDER = new BlobBuilder(Allocator.Temp);
        
        // Take note of the "ref" keywords. Unity will throw an error without them, since we're working with structs.
        ref TBlobAssetType blobAsset = ref BLOB_BUILDER.ConstructRoot<TBlobAssetType>();

        // Invoke the client's blob asset creation logic
        action.Invoke(ref blobAsset, data);

        // Store the created reference to the memory location of the blob asset, before disposing the builder
        BlobAssetReference<TBlobAssetType> blobAssetReference = BLOB_BUILDER.CreateBlobAssetReference<TBlobAssetType>(Allocator.Persistent);

        // We're not in a Using block, so we manually dispose the builder
        BLOB_BUILDER.Dispose();

        // Return the created reference
        return blobAssetReference;
    }
}

As for our TestGameDataSystem, the OnUpdate function will look like,

protected override void OnUpdate() {
    this.Entities.ForEach((DataContainer container) => {
        // Use the Utility class here - pass the container data, then the conversion logic as an action
        NpcBlobAssetReference = BlobAssetUtils.BuildBlobAsset(container.NpcManagerData, delegate(ref NpcDataBlobAsset blobAsset, NpcManagerData data) {
            blobAsset.TotalNumberOfNpcs = data.TotalNumberOfNpcs;
            blobAsset.TotalFriends = data.TotalFriends;
        });
    });

    // ...the rest of the code
}

Looking clean already. Now, to give you more idea on the use cases of Blob Assets, let me share a simple library of names (using lists) I created and converted to a blob asset for my NPCs. Starting with the Scriptable Object,

[CreateAssetMenu(fileName = "NamesData", menuName = "Game/NamesData")]
public class NamesData : ScriptableObject {
    public List<string> firstNames;
    public List<string> lastNames;
}

Now the blob asset,

public struct NamesBlobAsset {
    // Blob arrays are memory location offsets from the original Blob Asset Reference.
    // At least, that's how I understood the manual.
    public BlobArray<FixedString32> FirstNames;
    public BlobArray<FixedString32> LastNames;
}

Lastly, the creation logic in the TestGameDataSystem,

protected override void OnUpdate() {
    this.Entities.ForEach((DataContainer container) => {

        // ...the NpcBlobAssetReference generation code here

        NamesLibraryReference = BlobAssetUtils.BuildBlobAsset(container.NamesData, delegate(ref NamesBlobAsset blobAsset, NamesData data) {
            // Cache the blob builder from the utility class so we can generate blob arrays
            BlobBuilder blobBuilder = BlobAssetUtils.BlobBuilder;

            BlobBuilderArray<FixedString32> firstNamesArrayBuilder = blobBuilder.Allocate(ref blobAsset.FirstNames, data.firstNames.Count);
            BlobBuilderArray<FixedString32> lastNamesArrayBuilder = blobBuilder.Allocate(ref blobAsset.LastNames, data.lastNames.Count);

            for (int i = 0; i < data.firstNames.Count; ++i) {
                // Copy the data from the list to the BlobBuilderArray
                firstNamesArrayBuilder[i] = new FixedString32(data.firstNames[i]);
            }

            for (int i = 0; i < data.lastNames.Count; ++i) {
                lastNamesArrayBuilder[i] = new FixedString32($" {data.lastNames[i]}");
            }
            
            // We don't have to worry about "storing" the created array to the blob asset here 
            // since that is already handled in the BlobAssetUtils. This is just the creation logic
            // that is passed to the utility class.
        });
    });

    // ...the rest of the code
}

And that’s it. Blob Assets are a great way of storing data when working with Unity’s DOTS and there are still a lot to learn. I did stumble into some hurdles and errors here and there while trying to make a simple NPC generator. I’m still working on it but I’ll make sure to write another article/guide when I make any significant progress. See you in the next one!

References: