Testing is a crucial part of game development and testing Unity projects can take some time if you have to refresh the editor every single time you want to test even the slightest change in your code. In this tutorial, I’ll share with you a faster way of testing your code so you can spend more time bug fixing instead. *wink*
[EDIT]
Follow this thread if you’re experiencing a language version error which looks something like this:
Invalid option ‘8.0’ for /langversion; must be ISO-1, ISO-2, 3, 4, 5 or Default
[/EDIT]
As usual, if you want to jump ahead, you can click on a specific topic here and there are references at the end of the tutorial:
- Setup
- NUnit Attributes and Running Test Files
- Use Case #1 – Testing Algorithms (Example: grid generation and tile querying)
- Use Case #2 – Testing Native Containers (for cases when NUnit can’t find the right dll files)
Setup
NUnit is the unit-testing framework that we will use for the rest of this tutorial. I am currently using the following applications and versions:
- Unity – version 2020.2.2f1
- Unity’s Custom NUnit Package – version 1.0.6
- Unity’s Test Framework Package – version 1.1.20
- JetBrains Rider – version 2020.2.5
You can follow this link, for installing JetBrains Rider as your IDE in Unity.
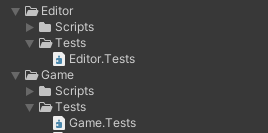
Let’s now start with creating our test folders in Unity. This folder will contain all our test files for different utility classes, mechanics, or systems you might need to test for your application. For organization, it’s better to have 2 separate test folders for your editor extension codes and your game code.
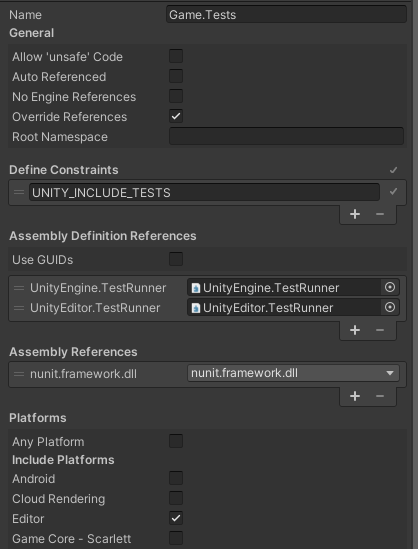
Add an Assembly Definition inside your test folders with the following settings:
Check the “Override References” boolean to allow us to add the “nunit.framework.dll” under Assembly References. Add “UNITY_INCLUDE_TESTS” under Define Constraints, this will signal Unity’s build system NOT to include this assembly when building your game. For the Assembly Definition References, both “UnityEngine.TestRunner” and “UnityEditor.TestRunner” assemblies are required for later when we run our tests in Unity. You can add other assembly references here for utility classes, systems, etc. that you want to test. As for the platforms, uncheck everything except Editor since we will be using the Unity Editor for testing and a Standalone NUnit Session later.
This is the manual way of creating test assembly folders in your game’s repo. You can create a test folder automatically via Unity’s Test Runner:

Cool, now we’re all set-up to test inside Unity.
Before we do, I’d like to briefly introduce the concept of Assertions. Assertion-based testing is simply checking if your program works as intended by setting effects, behaviors, and outcomes that are known to be true in the program. For example, when testing a program that adds two numbers, the boolean expression 2 + 2 == 4 should be true. If it’s not, the test would fail and we need to go back to the code and check for errors. More on this later under the Use Cases portion of this tutorial.
NUnit Attributes and Running Test Files
Let’s now create our first test file inside the test folders we created earlier. For simplicity, let’s create a couple of test methods that explains the most common test attributes for using NUnit:
using NUnit.Framework;
using UnityEngine;

public class TestAttributesExamples : MonoBehaviour {

    [Test]
    public void YourTestMethod() {
        // This [Test] attribute tells the framework that this method is a test method which makes it
        // accessible in the Test Runner inside the Unity Editor,
        // and inside the Explorer under JetBrains Rider's Unit Tests tab.
        Debug.Log("Hi! I'm from YourTestMethod.");
    }

    [SetUp]
    public void AwakeStartLikeMethod() {
        // The [SetUp] attribute is called before the methods with the [Test] attribute.
        // This pretty much acts similarly as your Awake() or Start() methods in Unity's MonoBehaviour.
        Debug.Log("Wait! Let me set up first.");
    }

    [TearDown]
    public void OnDestroyLikeMethod() {
        // The [TearDown] attribute is called at the end of the testing lifetime.
        // This pretty much functions similarly as Unity MonoBehaviour's OnDestroy() event method.
        Debug.Log(("I guess that's it. Nothing lasts forever..."));
    }
}
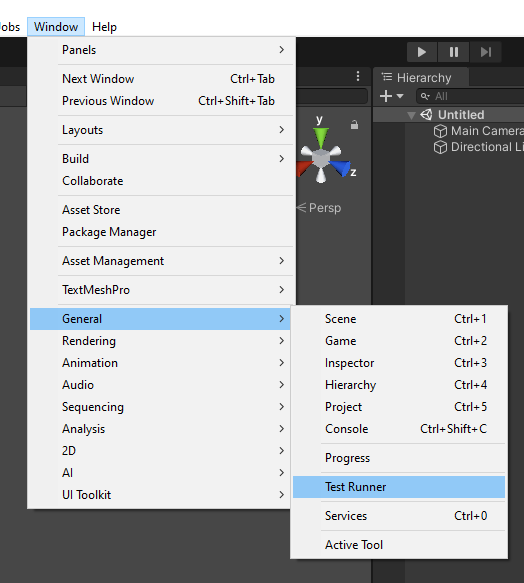
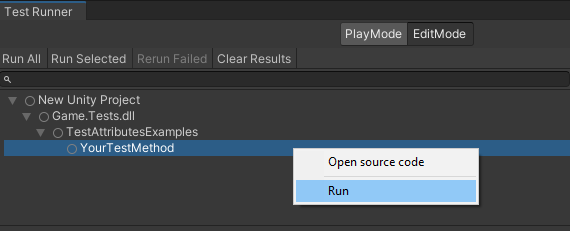
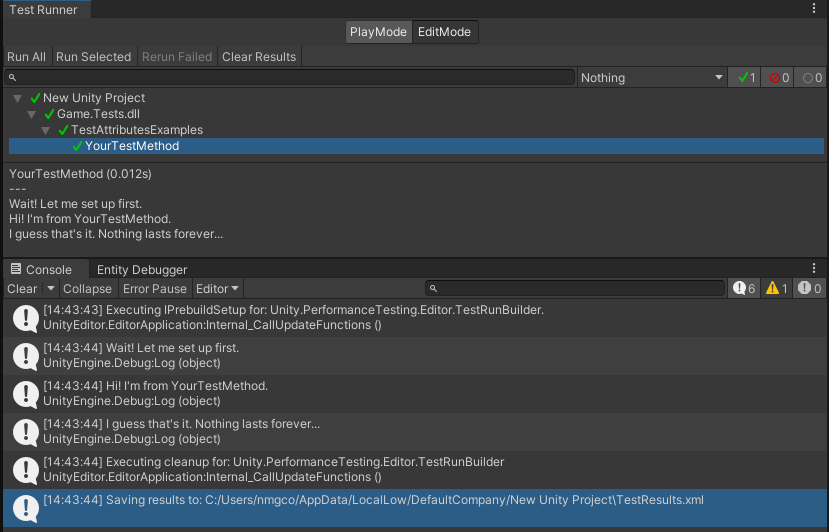
In order to run this in the Unity Editor, open up the Test Runner window (under Windows > General > Test Runner), right click on the test method, and press Run:
Running our test code above yields this result (notice the order of Debug.Log calls):
You can also see these logs inside JetBrains Rider’s Unity Log window (in the toolbar, View > Tool Windows > Unity):
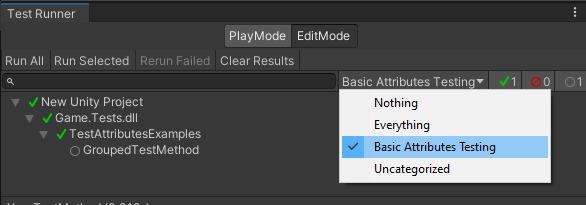
The last attribute for this basic NUnit testing is the Category attribute:
public class TestAttributesExamples : MonoBehaviour {
    [Test]
    [Category("Basic Attributes Testing")]
    public void GroupedTestMethod() {
        // This [Category("")] attribute helps keep your test methods organized both in the
        // Unity Editor's Test Runner window, and in JetBrains Rider's Unit Tests Explorer
        Debug.Log("I belong in a group!");
    }
}
This is good but we’re still refreshing Unity! Let’s remedy that by creating a Standalone NUnit Testing Session inside JetBrains Rider so that we don’t need to leave the IDE anymore when testing.
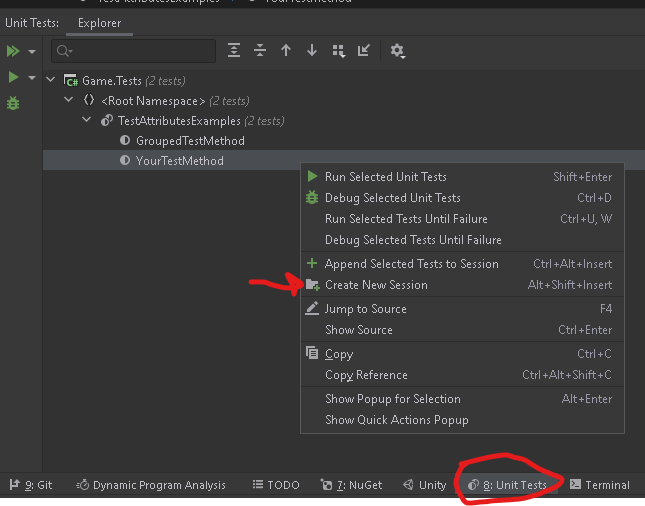
Open Rider’s Unit Tests tool window in the bottom toolbar or by pressing Alt+8. Then, you should see the methods with [Test] attributes in the explorer window. Right click one of them and click on Create New Session or press Alt+Shift+Insert.
With the new Session opened, click on the dropdown and select Standalone NUnit Launcher.
Likewise, in the top tab, edit the Run/Debug Configurations and select the name of your test method. This will allow us to attach to the session if we want to add breakpoints and debug the code line by line.

To run the test method, right click the method name in the Session window, and click on Run Selected Unit Tests. If you want to debug, you can click on Debug Selected Unit Tests and if you followed the previous step, Rider will automatically attach to the session.
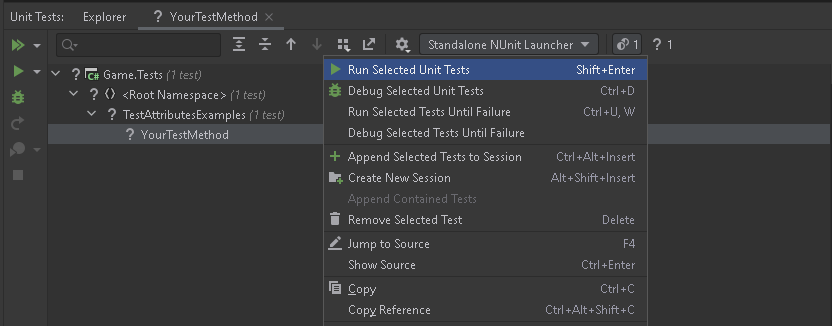
This will run the test but will throw an error. This is because we are running MonoBehaviour (inheriting MonoBehaviour and calling Debug.Log) outside of Unity.
To fix this, let’s use Console.WriteLine() instead in place of our Debug.Log() calls.

Cool, now that we can create our test files, run our test files, and see the console without leaving the IDE, let me share some of my use cases for this way of testing. I mainly use this method when testing new algorithms, data structures, and when testing newly created utility classes. After passing all the tests, I then apply these classes in the actual system that we’re using, then refactor.
Use Case #1 – Testing Algorithms (Example: grid generation and tile querying)
For the past couple of days, I’ve been trying to implement my own version of HPA (Hierarchical Pathfinding Algorithm). And before I start generating the grids visually in Unity, I want to make sure that the data (like the coordinates, parent cell, etc.) of each tile/cell is correct. This way, I would lessen the headache of debugging in the future. Here is my test file with a few modifications for readability:
using System;
using System.Globalization;
using NUnit.Framework;
using UnityEngine;

public class ClusterIndexComputationTest {
    /// <summary>
    /// I'm trying to generate the whole grid for HPA with all the tiles and their cluster resolved,
    /// in one loop for x and y, without iterating separately to generate the clusters.
    /// </summary>
    [Test]
    public void ClusterIndexComputationTestSimplePasses() {
        // Use the Assert class to test conditions
        GenerateTileGrid(8, 8, 3);
    }

    /// <summary>
    /// Performs the generation
    /// </summary>
    /// <param name="xTotalTiles">The maximum tiles in the x-axis</param>
    /// <param name="yTotalTiles">The maximum tiles in the y-axis</param>
    /// <param name="clusterSize">The size of a cluster in terms of number of tiles in both x and y axes</param>
    private void GenerateTileGrid(int xTotalTiles, int yTotalTiles, int clusterSize) {
        // This is the current number of generated clusters. In HPA, the tiles are further grouped into
        // clusters which helps in making pathfinding faster.
        int clusterCount = 0;

        // This is the size of each tile in world units
        const int TILE_SIZE = 1;

        // Half of the tile size, used in finding the center tile in world units
        const float HALF_TILE_SIZE = (float) TILE_SIZE / 2;

        // We start the grid at the origin
        Vector2 cellStartCenterWorldPos = new Vector2(0, 0);

        for (int y = 0; y < yTotalTiles; ++y) {
            // Some math magic to get the cluster id based on where we are currently in the y axis
            int yOffset = y / clusterSize * clusterSize;

            for (int x = 0; x < xTotalTiles; ++x) {
                // We use the tile size above and where we are in the grid to get this tile's center in world units
                Vector2 tileCenterPos = new Vector2(
                    cellStartCenterWorldPos.x + HALF_TILE_SIZE + x,
                    cellStartCenterWorldPos.y + HALF_TILE_SIZE + y
                );

                // From the center and using half of the tile size, we can get the lower left coord in world units
                Vector2 tileMinPos = new Vector2(
                    tileCenterPos.x - HALF_TILE_SIZE,
                    tileCenterPos.y - HALF_TILE_SIZE
                );

                // Likewise, from the center and using half of the tile size, we can get the upper right coord in world units
                Vector2 tileMaxPos = new Vector2(
                    tileCenterPos.x + HALF_TILE_SIZE,
                    tileCenterPos.y + HALF_TILE_SIZE
                );

                // Using the x and y coordinated of the current tile, we can determine in which cluster this tile belongs
                int currentClusterId = x / clusterSize + yOffset;

                // I wanted to know the current index of the current tile since I'll be storing all of these tiles in a single array.
                // Then we can use the x and y coordinated to resolve the tile's index in that array using this formula.
                int currentInt = y * yTotalTiles + x;

                // If the current cluster Id where this tile is, is greater than what we already know, then it's a new cluster.
                if (currentClusterId >= clusterCount) {
                    // Increase the count of known clusters. This is also the index of the clusters in a separate array of clusters.
                    // Take note that clusters in HPA are collections of smaller tiles.
                    // Think of clusters as tiles of a higher order grid.
                    ++clusterCount;

                    // Similar to tile sizes, we use the cluster size to get the lower left tile coordinate
                    Vector2 clusterMinCoord = new Vector2(x / clusterSize * clusterSize, y / clusterSize * clusterSize);

                    // Similar to tile sizes, we use the cluster size to get the upper right tile coordinate.
                    // We prevent the upper right coordinate here from going out of bounds of the grid size that we want.
                    Vector2 clusterMaxCoord = new Vector2(Mathf.Min(clusterMinCoord.x + clusterSize - 1, xTotalTiles - 1),
                        Mathf.Min(clusterMinCoord.y + clusterSize - 1, yTotalTiles - 1));

                    // Like every testing/debugging good boi, we display where we are in the code.
                    // I separated the whole sentence in multiple lines here to make the code easier to read.
                    Console.WriteLine($"{currentInt.ToString()} Coordinate ({x.ToString()}, {y.ToString()}) "
                                      + $"is in cluster {currentClusterId.ToString()}. "
                                      + $"Center {tileCenterPos.ToString()}. Min {tileMinPos.ToString()}. Max {tileMaxPos.ToString()}. "
                                      + $"Size {(tileMaxPos - tileMinPos).ToString()}"
                                      + $"\nCluster Min Tile {clusterMinCoord.ToString()}. Cluster Max Tile {clusterMaxCoord.ToString()}. "
                                      + $"Cluster Width {(clusterMaxCoord.x - clusterMinCoord.x + 1).ToString(CultureInfo.InvariantCulture)}. "
                                      + $"Cluster Height {(clusterMaxCoord.y - clusterMinCoord.y + 1).ToString(CultureInfo.InvariantCulture)}.\n");

                    // The continue here is simply to separate the Console.WriteLine() of when generating clusters and tiles
                    continue;
                }

                Console.WriteLine($"{currentInt.ToString()} Coordinate ({x.ToString()}, {y.ToString()}) is in cluster {currentClusterId.ToString()}.");
                Console.WriteLine($"Center {tileCenterPos.ToString()}. Min {tileMinPos.ToString()}. Max {tileMaxPos.ToString()}. "
                                  + $"Size {(tileMaxPos - tileMinPos).ToString()}\n");
            }
        }
    }
}
In my actual grid generation system, I fixed the variable names and made some of them constants for a better code structure. For now, let’s run this test code and see if our data is correct:

Looks good. Notice here that the test output is too long. We can press the hyperlink in the output window to open the full log of the test.
Now that we can generate the grid, let’s try to query a tile using the index and see if the index is correct by solving it using the coordinates. Let’s also try some assertions to see if a small sample of tiles are in the correct cluster. Let’s use this code:
[Test]
public void TestTiles() {
    TestTile testTile1 = this.tiles[0];
    Assert.IsTrue(testTile1.X == 0 && testTile1.Y == 0 && testTile1.ClusterId == 0);

    // Given that MAX_X_TILES = 8 and MAX_Y_TILES = 8, it's an 8x8 grid.
    // And each cluster is a 3-tiles by 3-tiles grid.
    // index = (MAX_Y_TILES * yCoord) + xCoord
    TestTile testTile2 = this.tiles[7];
    Assert.IsTrue(testTile2.X == 7 && testTile2.Y == 0 && testTile2.ClusterId == 2);

    TestTile testTile3 = this.tiles[29];
    Assert.IsTrue(testTile3.X == 5 && testTile3.Y == 3 && testTile3.ClusterId == 4);
}
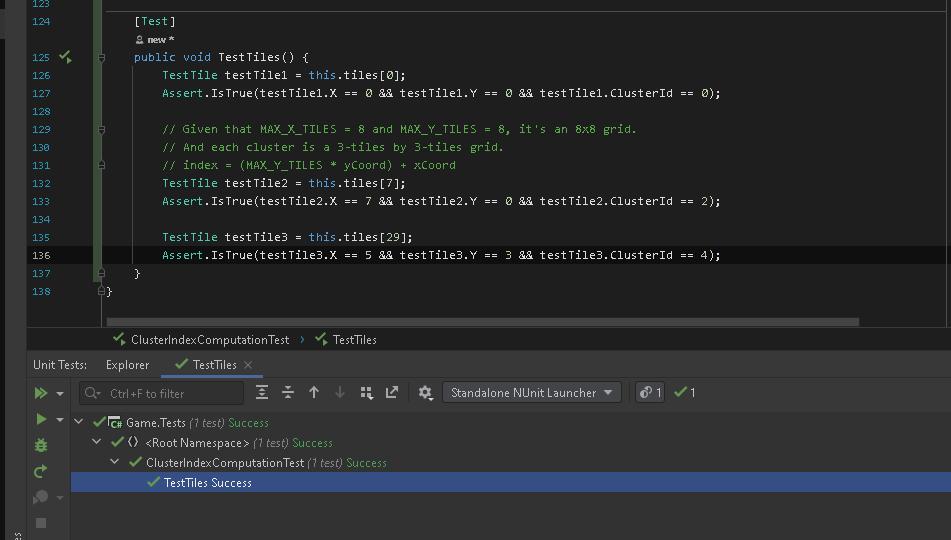
Let’s test this generation code and look at the results. We can see in the Session window that all of the assertions were evaluated as expected thus making the test a success.
Testing this generation code inside the IDE saved me a lot of time instead of changing the code, refreshing the Unity editor, and running it inside of Unity. Yes, you can use Unity’s Test Runner, but you will still need to refresh the Unity Editor. And if you have a big project, that can take some time.
Use Case #2 – Testing Native Containers (for cases when NUnit can’t find the right dll files)
I’ve also been doing a couple of tests using Unity’s DOTS and trying to use the native containers that comes with Unity.Collections. Before moving forward, let’s change our assembly definition to allow unsafe code and let’s add Unity.Collections to the assembly references to give us access to the native containers.
For the sake of simplicity in this example, let’s try to populate a NativeHashMap and let’s try running this test code:
using NUnit.Framework;
using Unity.Collections;
using UnityEngine;

public class NativeHashMapTest {
    private NativeHashMap<int, FixedString32> stringMap;

    private const int MAX_COUNT = 10;

    [SetUp]
    // Let's simply populate the hash map
    public void SetUpStringMap() {
        this.stringMap = new NativeHashMap<int, FixedString32>(MAX_COUNT, Allocator.Persistent);

        for (int i = 0; i < MAX_COUNT; ++i) {
            this.stringMap.Add(i, new FixedString32($"Index_{i.ToString()}"));
        }

        Debug.Log("StringMap initialized.");
    }

    [Test]
    public void NativeHashMapTestMethod() {
        Assert.IsTrue(this.stringMap.IsCreated);

        for (int i = 0; i < MAX_COUNT; ++i) {
            Debug.Log($"{this.stringMap[i].ToString()}");
        }

        Debug.Log("Finished printing stringMap.");
    }

    [TearDown]
    public void DisposeTestStringMap() {
        this.stringMap.Dispose();
        Debug.Log("StringMap disposed. Let's prevent those memory leaks.");
    }
}

Notice that running this inside the test Session in JetBrains Rider will throw an error: “System.Security.SecurityException : ECall methods must be packaged into a system module“. This also happens with Unity.MonoBehaviour classes. For example, earlier when we tried to run the Debug.Log() calls inside our test session. A simple workaround I’ve tried so far is to switch environments and use Unity’s Test Runner.
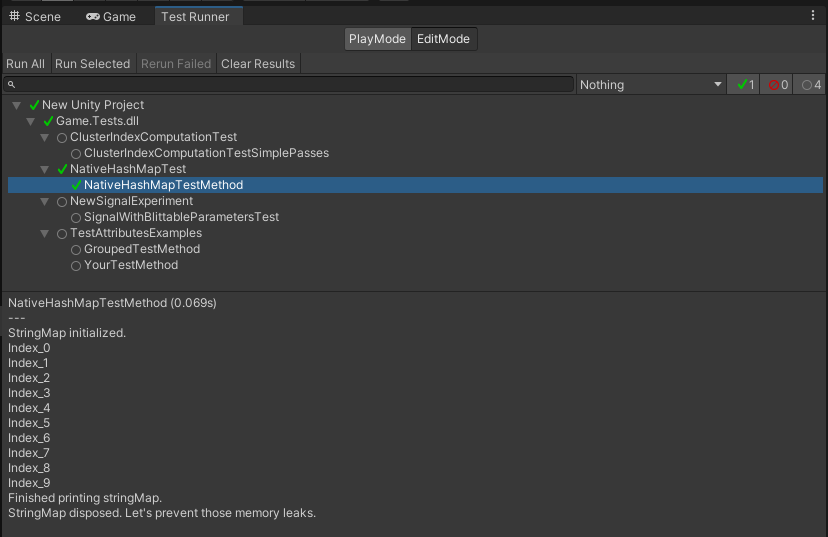
Unfortunately, for testing MonoBehaviour or DOTS-related code, we still need to go to Unity, refresh the editor, and run the test files inside of Unity’s Test Runner.
This is just a basic use case of NUnit in the context of making systems for your Unity projects – you can even make conditional test attributes if you want to make more complex tests. If you want to learn more, you can visit the documentation here.
That is all for now. As seen in this tutorial, testing this way has sped up my process when experimenting. That said, stay tuned for more tutorials in the coming weeks. You can follow me on Twitter and let me know if you have questions, corrections, and/or suggestions.
See you in the next one!
References:
- Excluding test files from the build
- NUnit Basics: 1 and 2
- Unity’s Test Framework


