Neil Creates: Dice Hunter

Master tactical dice battles! Enjoy the clever combination of skill and luck. Dice Hunter is a turn-based role playing game with collectible dice. Play now for FREE!
Become the Dicemancer and assume the incredible ability to capture creatures into dice. Hunt dice and wield them to save the Land of Chance from the marauding minions and evil allies of the wicked Snake Eyes. – Greener Grass, Dice Hunter: Quest of the Dicemancer Google Play Store Page

Start To Finish Video:

Part 1: Making the Dice

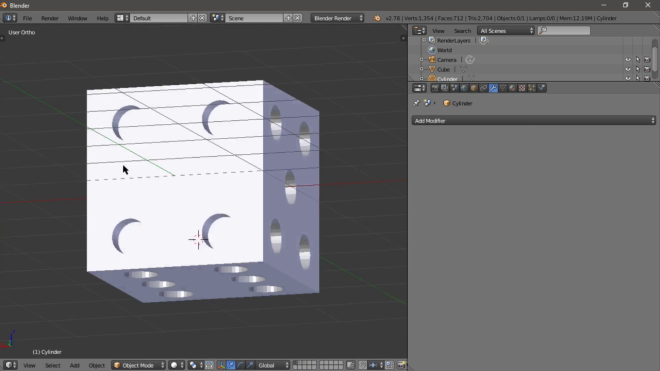
First off, I made the dices using Blender (which you can get on Steam now). I used the default cube that’s already on the scene upon startup. Then, I added a cylinder and duplicated it (in edit mode).

NC2_Blender_MakingCylinders

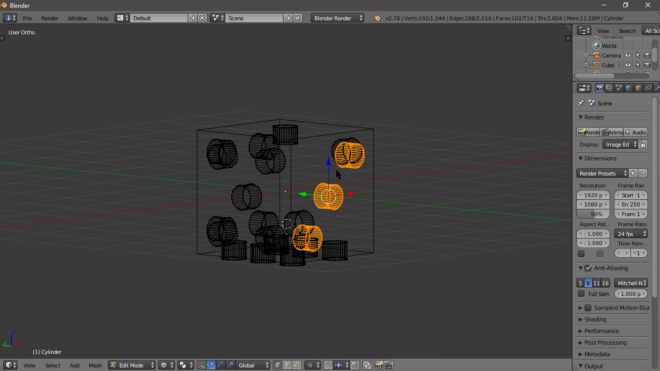
After that, I applied a Boolean modifier to the cube and set the object parameter to the cylinder that I’ve created in the previous step; Finally, I set the operation parameter to Difference. This way, Blender will ‘subtract’ the area of the cylinder that intersects with the cube and close the inside of the ‘holes’ made.

NC2_Blender_BooleanOperation
Before the operation
NC2_Blender_AfterOperation
After the operation

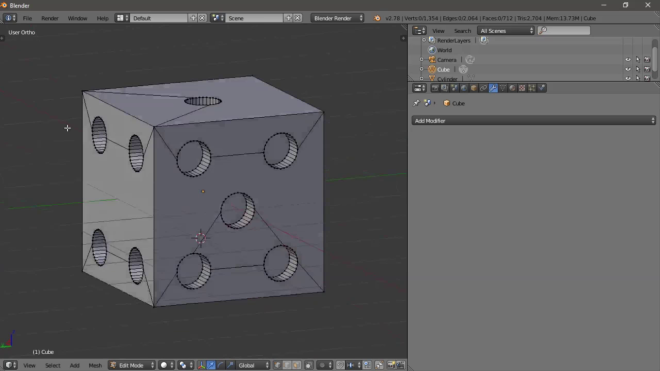
After that, you’ll notice that there were some ugly faces on the cube (in edit mode). This is because the boolean operation doesn’t take any consideration about triangles or quads. It’ll just perform the operation and connect the vertices of the main object and the ‘holes’ made during the operation.

NC2_Blender_Solved!

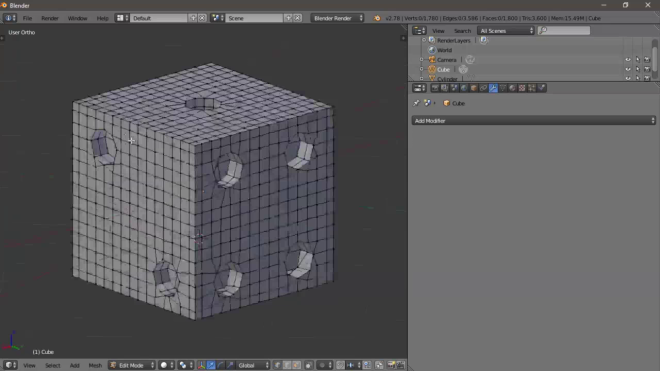
In order to fix this, I applied another modifier to the cube – Remesh. This modifier re-solves the mesh and figure out another way of distributing the vertices of that mesh. You can see it here, after applying the remesh modifier, I came up with a cube with these vertices:

NC2_Blender_RemeshedCube
Neat!

After that, in order to get rid of the sharp edges (real life dices doesn’t have those sharp edges. Well, not that I know of.), I applied another modifier – Yes, I love modifiers – to the mesh, a Subsurf modifier.

NC2_Blender_Subsurf

After that, you can add another modifier, a Decimate modifier, in order to reduce the number of vertices. Or, you can just reduce the number of subsurf steps. After making the cube, I exported it to a FBX file and imported it in Unity.
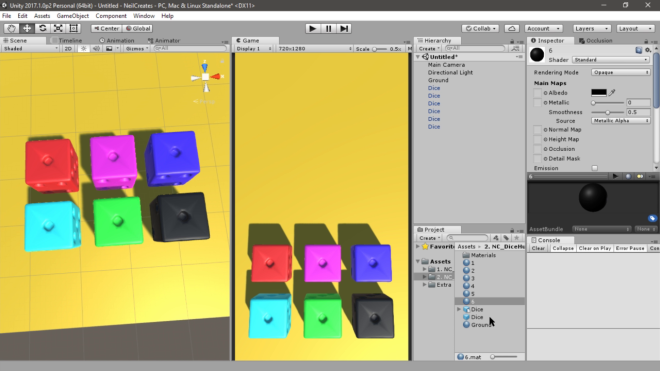
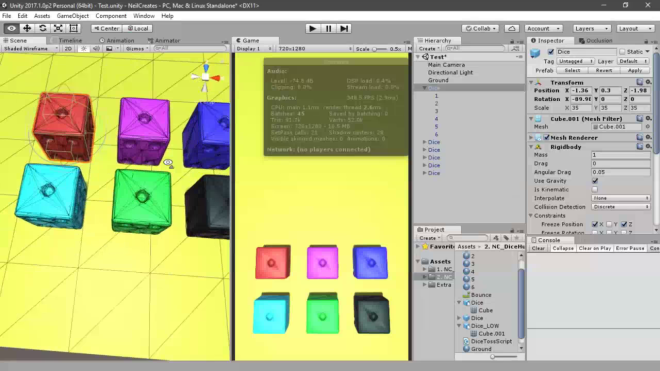
Part 2: Unity Setup

In Unity, I made a simple scene with a plane (for the ground) and six dices, just like in Dice Hunter.

NC2_Unity_Setup

Part 3: PROGRAMMING!!!

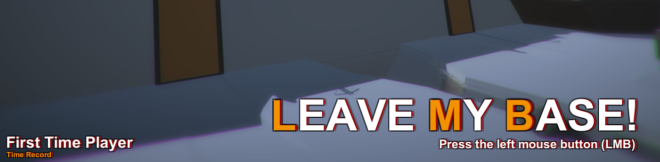
To start off, I added a RigidBody component to each of the die. This is because I want to make the dices react or have a realistic motion/physics. After that I made a variable referencing the RigidBody component and applied a force to the dices every time the left mouse button is pressed.


using UnityEngine;
public class DiceTossScript : MonoBehaviour {
private static float force = 150f;

private Rigidbody rb;

private void Start() {
 rb = GetComponent<Rigidbody>();
}

private void FixedUpdate() {
 if (Input.GetMouseButtonDown(0)) {
   rb.AddForce(Vector3.up * force);
 }
}
}

The reason why I used Vector3.up instead of transform.up is because, the latter one will change when the object rotates while the former is constantly pointing to the ‘up of the world’, the global up, whatever you call it, the up of everything.

After that I added another piece of code in the FixedUpdate function which will add a torque (or rotation force, if you will) to the cube which will make it rotate randomly.

private void FixedUpdate() {
if (Input.GetMouseButtonDown(0)) {
//This generates a random point to apply the torque
//This way, the dices will rotate randomly
var temp = new Vector3(Random.Range(-1f, 1f), 0f, Random.Range(-1f, 1f));

rb.AddForce(Vector3.up * force);
rb.AddTorque(temp * 1000f);
}
}

I also added a physics material that has a bounciness in it. Then, I set the friction to minimum in order to prevent the dices from ‘standing’ on their edges. This happens because of the friction between the edges and the ground which makes the dice fall super slowly, which does not happen in real life (well, maybe…).

Then for determining which face is up, I added triggers on each side of the die. The main logic I thought of is that, the trigger will check if it’s hitting the ground; if it does, the die will return the number of the opposite side.

NC2_Unity_

After that, I wrote a script that will be applied on each of these triggers with will perform the logic stated above.

using UnityEngine;

public class SideIndicator : MonoBehaviour {
private void OnTriggerStay(Collider other) {
if (other.transform.name == "Ground") {
var parent = transform.parent.GetComponent<DiceTossScript>();
var temp = int.Parse(transform.name);
DiceTossScript.combination[parent.diceIndex] = temp;
}
}
}

I also added a static array of integers in the DiceTossScript in order to hold the combination of the faces up. Just like in Dice Hunter, this can be used in order to determine how many ‘attack’ faces are up for combos and other power ups.

After that, I also added a diceIndex on each die which corresponds to an index in the array of integers. That is, die 1 is mapped to array[0], die 2 is mapped to array[1], and so on.

//Declaration of the int array and the diceIndex variables
public static int[] combination;
public int diceIndex = 0;

private void Start() {
rb = GetComponent<Rigidbody>();

//Initialization of the array that has six elements
//Each element corresponds to each dice
combination = new int[6];
}

Then, I noticed that there was unnecessary rotation in the y-axis when the dices land, which does not happen in Dice Hunter. This is fixed by multiplying the angularVelocity of the RigidBody to 0, which basically stops it, when the dices are already close to their initial y-position. I did this in the update function, you can also perform this checking in the LateUpdate function, if you want to.

private void Update() {
 if(transform.position.y &lt; 0.35f)
 rb.angularVelocity *= 0f;
}

And that’s it. Moving on from here, you can use the combination array in order to build more on a game mechanics.

Here are the final codes:

For the DiceTossScript.cs:

using UnityEngine;

public class DiceTossScript : MonoBehaviour {
private static float force = 150f;
public static int[] combination;

public int diceIndex = 0;
private Rigidbody rb;

private void Start() {
rb = GetComponent<Rigidbody>();
combination = new int[6];
}

private void Update() {
if(transform.position.y < 0.35f)
rb.angularVelocity *= 0f;
}

private void FixedUpdate() {
if (Input.GetMouseButtonDown(0)) {
var temp = new Vector3(Random.Range(-1f, 1f), 0f, Random.Range(-1f, 1f));rb.AddForce(Vector3.up * force);
rb.AddTorque(temp * 1000f);
}
}
}


And for the SideIndicator.cs:

using UnityEngine;

public class SideIndicator : MonoBehaviour {
  private void OnTriggerStay(Collider other) {
   if (other.transform.name == "Ground") {
    var parent = transform.parent.GetComponent<dicetossscript>();
    var temp = int.Parse(transform.name);
    DiceTossScript.combination[parent.diceIndex] = temp;
   }
  }
}

There you have it, I hope you enjoyed the tutorial. There were errors here and there and that is the beauty of learning – we make mistakes and we learn from them.

If you have comments, suggestions, recommendations, and questions, comment them down below and let’s have a healthy discussion.

Thank you and see you in the next one!

Neil Creates: Don’t Starve

Don’t Starve is an uncompromising wilderness survival game full of science and magic. Enter a strange and unexplored world full of strange creatures, dangers, and surprises. Gather resources to craft items and structures that match your survival style. – Klei EntertainmentDon’t Starve Steam Page

Part 1: Set Up

First off, I made the sprite sheet for the game first in order to have something to work with, using Photoshop.

Capture.PNG

As you might notice, I only used one sheet for both the player and the environment assets. I did this only for the sake of the tutorial. If you’re going to make a game, it’s a great practice to separate the static (mostly environment and props) sprites from those with animations (characters, effects, etc.).

Capture

After finishing up with the sheet on Photoshop. I made a separate PNG file which I will then manipulate in Unity. Now, Unity can actually read .psd files right off the bat. But, I kept the .psd file of my sheet separate from what I actually used in Unity (I also do this with FBX and .blend files when doing 3D). This may add another step in the pipeline and I can’t really say any benefits from doing this, but for me, it’s another great practice to backup and keep all ‘raw’ or original files separate from the one being used in the engine.

Capture.PNG

As for slicing the sheet, you can use Unity’s built-in sprite editor or use a 3rd party application, whichever you feel more comfortable working with (I used Unity’s built-in sprite editor). Then, you can automate this process and you can also slice manually, especially if you have a specific requirement with the sprites. Also, I kept the pivot points of the sprites in the middle – this is not usually the case, especially with characters that have different sprites for different parts of their body.

For example, you have a character which is composed of separate sprites (shoulder, arms, hands, etc.) and you will be applying inverse kinematics where the hand is the target from the shoulder. In a character’s arm, you don’t want the pivot of the shoulder to be in the middle of the sprite ‘cut’; this will make it difficult to manipulate, because the rotation of the shoulder will be relative to where the pivot is, in this case, the shoulder will rotate weirdly. Instead, you want the pivot to be where the shoulder joint is; this way, the shoulder will ‘naturally’ move. It’s important to keep requirements like this in mind when slicing up sprite sheets in order to avoid going back and making changes which will be a pain, especially if you’re already in the middle of production.

Capture

I then added an Animator component to the character; this will hold the parameters (that we will be accessing via code) which will determine which animation will be played (idle, walking, and attacking). For producing the animations, I used Unity’s animation tab to cycle through my sprites.

You can say that, Unity pretty much has it all *wink*.

Capture

In order to control the animations, I set up the parameters and the transition logic of the animations in Unity’s Animator tab. I used a float as a parameter to transition between the ‘idle’ and the ‘walk’ animations, which may not be the best option since you can use a boolean to determine if the character is moving or not. But, I suggest that you get used to using floats because you can have a walking animation and a running animation, which will be determined via the speed/velocity – which is mostly a float – of your character. Then for the attack, I used a boolean because the player can be ‘attacking’ or ‘not attacking’.

Part 2: Programming

As mentioned in the video, there are multiple ways of moving objects in Unity:

  • transform.Translate()
  • RigidBody (Forces, VelocityChange, and MovePosition mostly)
  • Character Controller
  • Unity’s NavMesh (I don’t think this is a good idea, in main characters, but GREAT WITH AI)
  • Changing the object’s Transform component via code (works sometimes, but not advisable)

For our player, I added a rigidBody component and moved the sprite around in 3D space via VelocityChange.

Here are the codes:

For the player,


using UnityEngine;
public class PlayerScript : MonoBehaviour {

[SerializeField] //These are used to make the variables show up in the inspector
private float moveSpeed;
[SerializeField]
private float hitDistance;
private float currentSpeed;
private Animator anim;
private Rigidbody rb;

private int woodCount = 0;

private float maxAttackSpeed = 1.2f, attackTimer = 0;

void Start () {
   anim = GetComponent<Animator>();
   rb = GetComponent<Rigidbody>();
}

private void Update() {
 if (Input.GetMouseButton(0)) {
  interact();
  anim.SetBool("isAttacking", true);
 } else {
  anim.SetBool("isAttacking", false);
 }
}

void FixedUpdate () {
 if (Input.GetButton("Horizontal")) {
  currentSpeed = Input.GetAxis("Horizontal") * moveSpeed * Time.deltaTime;

  if(currentSpeed < 0) {
   GetComponent<SpriteRenderer>().flipX = true;
  } else {
   GetComponent<SpriteRenderer>().flipX = false;
  }

  rb.AddForce(currentSpeed * transform.right, ForceMode.VelocityChange);
 }else if (Input.GetButton("Vertical")) {
  currentSpeed = Input.GetAxis("Vertical") * moveSpeed * Time.deltaTime;
  rb.AddForce(currentSpeed * transform.forward , ForceMode.VelocityChange);
 } else {
  anim.SetFloat("Speed", 0f);
  rb.velocity *= 0.5f;
 }

 if(currentSpeed != 0) {
  anim.SetFloat("Speed", rb.velocity.magnitude);
 }
}

private void interact() {
 RaycastHit hit;

 if(attackTimer > maxAttackSpeed) {
  if(Physics.Raycast(transform.position, Mathf.Sign(currentSpeed) * Vector3.right, out hit, hitDistance)) {
   if (hit.transform.CompareTag("Tree")) {
    woodCount++;
   }
  }

  attackTimer = 0;
 } else {
  attackTimer += Time.deltaTime;
 }
}
}


For the Camera,


using UnityEngine;

public class CameraFollowScript : MonoBehaviour {

private Transform player;
[SerializeField]
private float panSpeed;
[SerializeField]
private float height;
[SerializeField]
private float distance;

private RaycastHit hit;
private Ray rayFromCamera;

void Start () {
player = GameObject.FindGameObjectWithTag("Player").transform;
}

void Update () {
rayFromCamera = new Ray(transform.position, transform.forward);

if(Physics.Raycast(rayFromCamera, out hit, 3f)) {
if (!hit.transform.CompareTag("Player")) {
var obstacle = hit.transform.gameObject;
if (obstacle.GetComponent<SpriteRenderer>() != null) {
obstacle.AddComponent<ChangeAlpha>();
}
}
}

var newPosition = new Vector3(player.position.x, player.position.y + height, player.position.z - distance);
transform.position = Vector3.Lerp(transform.position, newPosition, panSpeed * Time.deltaTime);
}
}

For changing the alpha of the object between the camera and the player,


using UnityEngine;

public class ChangeAlpha : MonoBehaviour {

private SpriteRenderer currentSprite;

void Start() {
currentSprite = GetComponent<SpriteRenderer>();

var currentColor = currentSprite.color;
currentColor.a = 0.8f;

currentSprite.color = currentColor;
}

void Update() {
var currentColor = currentSprite.color;
currentColor.a = 1f;

currentSprite.color = currentColor;
Destroy(this);
}
}

There is a flaw in my logic here. You might have noticed that when you play the game, it the ChangeAlpha code works. But, it is not efficient – this is a wrong implementation, if I will be honest.

Why? Because, the script is CONTINUOUSLY adding and removing the script on the object that is between the camera and the player which consumes a lot of resources. This is also the reason why you can’t see the component in the inspector.

Short explanation: the ChangeAlpha script is being added to the object in the CameraFollowScript then it is being removed in the Update function (which runs every frame) in the ChangeAlpha script.

Having triggers behind the obstacles may be a better option. Triggers that detects if the player (tagged as “Player) is behind the object, then changing the alpha of the obstacle, if so.

There you have it, I hope you enjoyed the tutorial. There were errors here and there and that is the beauty of learning – we make mistakes and we learn from them.

If you have comments, suggestions, recommendations, and questions, comment them down below and let’s have a healthy discussion.

Thank you and see you in the next one!

I Made a Game: Leave My Base! (Part 2)

July 15-16, 2017 – Yeah….I didn’t sleep.

I woke up around 7AM to have my early coffee and read a book I had for a while now, The Finishers by Ezra Ferraz. It’s a book about Filipino entrepreneurs and founders. After preparing my mind for the day, I went on to my station and continued my work on the game.

I started where I left of the day before, the aiming and shooting system for the weapons (the ballista and the cannon). I spent about 3 or 4 hours improving this system because this will what the player will interact with in most of the gameplay.

I also realized that this is what makes making first-person games difficult – you need to make everything look and feel right, because the character BECOMES the player. If something is off, the whole immersion will be broken.

After that, I went back to Blender and design the units. As mentioned in the previous part of this post-mortem, I was planning on making the graphics like Superhot, and I’m also inspired by Final Fantasy 7’s Fort Condor Mission. With those in mind I designed the units along with the enemies.

Units_WP
This was the original scale of the bosses which I had trouble spawning in the game. As a solution, I scaled them down a bit.

After modeling the units and the enemies, I imported them to Unity and started writing the spawning scripts.

I didn’t really have any trouble here, thanks to Unity’s navigation system. I just needed to properly write the behavior of the enemies, make sure that they have the right reactions when needed. As for the player’s units, I just need them to spawn at the right location (where the player clicked), and instantiate with a NavMeshAgent component while properly placing themselves on the NavMesh in the scene. As for the unit’s behavior: when they spawn, they will roam around until they see an enemy in range, if that happens, engage the enemy.

I also didn’t have enough time to animate the units and the enemies, so I settled with make them ‘wiggle’ a little bit when attacking. I also added some particle effects when both the units and the enemies die to simulate blood, and also when the cannon balls hit the ground or a target, to simulate explosion.

For the finishing touches, I added Unity’s water standard asset where the enemies spawn to give the feeling that they are coming from “the void”.

For the tutorial and the quit button, I didn’t have any time to make a main menu to put the tutorial in, so I incorporated them in the game world just like in the Dead Space series.

Then, I worked on the audio. I composed a solemn tune with my guitar for the background music and then I used BFXR (I love this app) for the sound effects.

After that, I added some image (post processing) effects on the camera which yields these results:

I playtested the game a couple of times more then I packed everything up around 11 AM of July 16.

Then I submitted the game around 12 noon.

Which is wrong. My greatest mistake for this jam. I forgot that I started the jam almost around 3PM of July 14; that means, I’ll be hitting my 48-hour mark at 3PM of July 16; which means, I still have about 3 hours more to improve the game when I submitted it. Crap.

Conclusion and realization:

Take note when you start the jam and when you’ll hit your n-hour mark. Plan when you will be sleeping and plan what to eat ahead of time (I thrived on chips, packed rice and beef, and peanuts…lots of peanuts). Like always, the next one will be better.


Thank you for reading, here’s the first part of the post-mortem, and you can check the game out here (click on the image, it will open a new tab):

ForWebsiteGamePage

I Made a Game: Leave My Base! (Part 1)

Yey! Another game jam. This time, it’s the first ever game jam by Mark BrownGame Maker’s Toolkit Jam. It was a 48-hour game jam where your game must be made from scratch. That is, everything – art assets, hundreds (if not thousands) of lines of code, and sounds – must be made in or under 48 hours. The theme will be based on one of Mark’s videos which are mainly about innovations in video games and game design.

As for the start and end of the jam, Mark was lenient. He allowed the developers to start at 6PM, Friday, in their own respective timezones which means that you don’t need to stay up late in order to start at the same time with the rest of the world. That also means that your 48 hours will only start when it’s already 6PM in your timezone.

ForPostMorted
GMTK-Jam’s banner in the itch.io gamejam page

July 14, 2017

I woke up early to get the theme early and start right away but, Mark seemed to encountered some problem, he was sick the day before, which I think caused the delay. The jam page on itch.io has a countdown which told us (me and the other participants) that the theme will be announced around 1PM. This made me excited and all. But due to the delay, the theme was announced around 2:30PM which, I think, is just fine.

The theme was: Downwell’s Dual Purpose Design.


At first, I found it hard to think of something to do with the theme because I’ve never played Downwell before. I’ve been watching Stefanie Joosten’s playthrough of Final Fantasy 7 and I’ve been a huge fan of Monster Hunter since early high school. And, yes, that’s Stefanie Joosten or better known as Quiet from Metal Gear Solid V: The Phantom Pain. When Stef was playing the Fort Condor Mission in Final Fantasy 7, I thought, “this mini-game has always caught my attention ever since I was a kid, watching my brothers play and I can add that mechanic to my other favorite, Monster Hunter”. Then, I thought of how would that combination of mechanics fit into the theme – use only one button to do everything in the game.

I went with that idea and jumped on to Pinterest to look for inspiration and to further visualize my idea. After gathering enough images for my Pinterest board, I picked up my pencil and my sketchpad to try to “make the game on paper” (I have to take an image because my sketchpad doesn’t fit my scanner).

IMG_20170719_182659
Here’s the first draft of the game with check marks on the things that I implemented in the game with 2 which didn’t make the game due to time constraints
IMG_20170719_182715
Here’s my first draft of the battlefield which is very close to the final product in the game.

You can see that there are a lot of scribbles there and numbers; the scribbles are just me writing down what I’m thinking, it helps especially when I’m in the zone, it helps when you can see what you’re thinking. As for the numbers, majority there are just spawn coordinates, height and radius of the colliders, and some ratio and proportions of some stuff.

Writing down things really does help. For me, it cleared my head somehow, which allowed me to process other things – freeing up mental space, if you will.

Level Design. Usually, I start with a prototype of the core gameplay to see which works and which doesn’t but, this time I started with designing the level. I started with some basic assets like the floor and some blocks just to have a general ‘feel’ and size of the in-game environment. My target for the graphics was the same with Superhot. Simple. Lowpoly. Easy and quick to make. After finishing the floor for the game with the appropriate size, I went on to design the ammo containers which will play a major role in the game. I also designed the weapons to be used in the game – a pair of both ballista and cannon.

I also started with how the battlefield will look like (see sketch above). I made 2 paths to make the game quite difficult, and also a bridge between the paths to make the enemies travel farther and to make the player sort of predict where the enemies will go based on where they spawned.

This is how the game looked like. After designing the scene, I went on to programming the ballista. Well started to program, since I encountered some problems with collisions with the bullet and the ground. I really really want to make the bullets stick to whatever it hits, but I keep on seeing a problem in the future with the navmesh. I solved this by adding a separate trigger just before the ground, specifically, for the bullets (ballista ammo and cannonball).

With this, I went on to bed to have the only sleep I got for this jam, a 6-hour sleep.

Here’s the next one where I tackle how I made the enemies go from their spawn point to the gate of the base and attack the player’s units if they come in range. I also discussed some finishing touches for the game.


I Made a Game : Fyrelette (Part 2)

July 1, 2017

I woke up early to start with the first thing on my list – a working, playable prototype in, at most, 8 hours. It took me about 13 hours.

The main problem I had was the optimization of the game, especially during the prototyping stage, my laptop “blue screen”ed three times; because I was trying to randomly generate a tile map with a separate particle system for each tile.

Now to give you an idea on how messed up my system was; this was just during the prototyping phase. I didn’t have any sophisticated assets yet, I have a cube for the character and the enemy and a 1×1 (Unity unit) plane fore each tile. Still, my laptop couldn’t handle it.

I couldn’t think of any solution back then, so I just minimized the particles emitted by the particle system, removed the shadows of the particles, and removed the emission property of the particles. I’m left with a simple tile emitting a red square for the fire tiles and a dark purple square for the dark tiles. I settled with this and moved on.

After the writing the code for the tile map generator, I write the code for the player; it was just a simple character movement controller using Unity’s rigidbody instead of the character controller, because why not. Just kidding, because I need to simulate realistic physics collision and gravity. Also, I have two camera modes as of this stage, a 3rd person over-the-shoulder camera and a top-down view camera, because I was not sure yet what to do.

I didn’t really allotted a lot of time in the player controls because I know that I will have trouble with something else – artificial intelligence.

AISS

Honestly, I’m not really good with artificial intelligence. I like reading about AI, but there is something about writing it that just throws me off. You can see that the picture above is the only thing I wrote when I was planning how the AI of the enemies will work; the rest I just implemented as I go through writing the AI. Also, the check marks on the images are just made by me when I finished a certain part of the plan and yes, I still haven’t done any player and enemy data (health, experience, damage, etc.) when I reached this point in development.

The first thing I did with the AI was to figure out how the enemy will stay within the bounds of the tile map that was generated when the game started. I fixed this by randomly generating a Vector3 position using the bound of the tile map generator, which I called xTile and yTile. Meaning I just generate a random position from 0 to the maximum tile in the map, both for x- and y- axes. It was a simple implementation and it worked, it also solved the problem I had with how will the enemy go around the map in order to turn the tiles into dark tiles because I was aiming a Splatoon-like gameplay.

The next thing was to make the enemy chase the player. I implemented this in two ways: the enemy will chase the player if the player is in a certain range from the enemy, and the enemy will chase the player if the player was away from the enemy in a certain amount of time. The first one was implemented by Raycasting from the enemy to the player and if the distance of that ray is less than or equal to a certain number, the enemy will start chasing the player. The second one was implemented by writing a timer for each enemy, then, if the timer reaches zero, the enemy will chase the player, then it will reset after a certain amount of time chasing the player.

Applying the functionalities above pretty much built up the artificial intelligence I need for the enemy, but, I also added a functionality on the enemies – I made them jump. This again is random, I was planning to remove this before final build but, as I tested the game, I noticed that the jumping made the enemies look cute, so I kept the jumping motion of the enemies.

After the artificial intelligence I moved to planning how the pointing system will work and how bonuses will work, basically I planned how the win-lose system will work.

winLoseSS

pointSystemSS

After planning these, I began to write the data class.

dataSS

Now, a lot of these changed as I continue to iterate. That’s the beauty of developing a game, the plans are just there to give you something to start with, but most often if not always, you will end up with something far, in one way or another, from the plan.

This day was pretty much focused on just prototyping how things will work, at the end of the day, I ended up with something like this:

build01build02

July 2, 2017

This day I was planning on finishing the data class, implement it, add a save/load functionality, and start with the graphics for the game.

Making a data class was not a problem for me, it’s just a singleton that will persist through the scenes and it’s only consists of variables and properties. The problem I encountered during this stage was THE FREAKING SAVE/LOAD FUNCTIONALITY ISN’T WORKING. I reviewed the past lessons I read about the topic and still couldn’t get it to work. The save functionality was solved pretty quickly, but I could not get the loading functionality work. Then I realized (this may sound funny), about 2 hours in, that I wasn’t saving the loaded information properly to the variables of to the instance of the singleton. That was a noob mistake and I laughed and facepalm’ed myself.

After messing around with the data for the win-lose system, I jumped to Blender and Photoshop to make the assets for the game.

UISS

I started with the blocking where the UI elements will sit on the screen. At this time I still don’t have an art for the main character but, from my Pinterest board, I have a ‘general’ feel in mind, so I jumped to Blender and started modelling the main character and the enemies; and ended up with these:

This days was focused more on aesthetic design and at the end of the day I ended up with this:

July 3, 2017

This day was full of balancing, modifying some of the UI elements, adding post-processing effects for the ‘high’ quality option, and not staying in front of my laptop for pretty much the whole day.

I submitted the game 10 minutes and 13 seconds before the submission deadline,

deadline

Conclusion and realizations:

This jam was fun. Quite challenging but I got through it with proper time management. That is, breaking down the game into small pieces as I can then prioritizing which task will come first. Like most games and developers out there, the next one will be better.

I’ll join the next one for sure! 🙂

Thank you for reading, you can play the game here:

https://itch.io/embed/155801

I Made a Game : Fyrelette (Part 1)

72 Hours. Total of 6 hours of sleep. 3 days of designing, programming, chocolates, and coffee. Hear my story of when I joined TairaGames‘s Dev Squad Jam from June 30, 2017 to July 3, 2017.

TairaGames banner in the itch.io gamejam page

June 30, 2017

The game jam started around 8:00 PM (GMT+8). I didn’t start right away with programming or asset design because I wasn’t at home when the jam started. I was about 2-3 hours late. Instead, I started with game design on my way home and for the next couple of hours after I arrived home.

The rules for the jam are simple: “your game need to conform with the given theme and your game should use two items which will be announced at the start of the jam”. The theme was “Darkness” and the items were “fire” and “map”.

The first thing that came to my mind when I first read this was a survival game or a walking simulator; because of two things. They are both relatively easy to make, I could just make a first person game, design a map or area to walk around (a house, maybe), then write a compelling story and compose a emotionally-striking music; and survival and walking simulator games doesn’t really require a complicated gameplay mechanics. Don’t get me wrong, I love these genres, but, I feel like challenging myself a little more.

RuunerSS.PNG

Another idea came to me, an endless runner. Now, I have an endless runner in my portfolio and I believe that I can make one that might be better than my last. Endless runners are common, people love it; there’s a big replay value for this genre; the mechanics are quite easy; the only problem that I saw was I need to make the artwork and soundtrack of the game, to very compelling in order to compensate for the repetitive gameplay. Or, add another mechanic that will compliment the general endless runner mechanic.

I played around with these ideas for a while then I stumbled into the idea of  the “darkness taking over light” cliche…and Splatoon.

SplatoonSS

As first I wanted to modify the “occupy as much of the map as you can” mechanic of Splatoon by making it a tile-based-turn-based game with 3-dimensional isometric cell-shaded art style. That didn’t sound bad, especially if I add the dice mechanics of the mobile that I was hooked on, Dice Hunter: Quest of the Dicemancer. Each dice has an action which the player can choose during his turn. In each turn, the player ‘tosses’ the dices then the actions (move, defend, attack, cast magic, use an item, dance, etc.) on the ‘board’ are the only actions that the player can perform during his turn. Then, each tile on the map that the player steps on will be ‘his’. The same goes for the enemy, whether AI or human.

Again, I played around with this idea for a while in my head. But, I couldn’t make out the algorithm for the 3D dices. I thought of making the dices rigid (rigidBody in Unity), then just add a force when the player ‘tosses’ the dices, but, I wanted a more code-based approach, and I failed. I can just print the actions in a button or something 2D on the screen but, that will not be as immersive as an ‘actual’ 3D spinning on the screen.

CombinedSS.PNG

My last idea was my last hope. I stayed with the “occupy as much of the map as you can” mechanic of Splatoon and I added a different approach. At the time of writing this blog, the game Nex Machina is gaining popularity. It is an “intense arcade style twin-stick shooter” by Housemarque. I like the top-down or isometric camera angle in games because you can hide some areas in your map, if you restrict the player from rotating the camera; and I grew up playing different shooter games.

I started with sketching how the game would work using Paint. I drew various camera angles (above), some key core components of the game, mechanics to incorporate in the game, some win-lose criteria, and drew random artworks that I might use. I also browsed Pinterest to look for more inspiration in the general look and feel of the game, character designs, and environment/map design. Here’s the Pinterest board I made for this jam.

I was happy with my progress so far; I pretty much designed about a third of the game on paper and in my mind when I woke up for the next day. I plotted the things that I will do regarding the jam for the next couple of days and went to bed.

Thank you for reading, click here for the next one where I tackled writing the AI, the core game mechanics, and making the art assets for the game.

Do not go gentle…

I was supposed to make a model of a woman wearing winter attire then I remembered Dylan Thomas. Yep, it was weird. So, I decided to create an old man going gentle into that goodnight.


Here’s the poem by Dylan Thomas:

Do not go gentle into that good night,
Old age should burn and rave at close of day;
Rage, rage against the dying of the light.

Though wise men at their end know dark is right,
Because their words had forked no lightning they
Do not go gentle into that good night.

Good men, the last wave by, crying how bright
Their frail deeds might have danced in a green bay,
Rage, rage against the dying of the light.

Wild men who caught and sang the sun in flight,
And learn, too late, they grieved it on its way,
Do not go gentle into that good night.

Grave men, near death, who see with blinding sight
Blind eyes could blaze like meteors and be gay,
Rage, rage against the dying of the light.

And you, my father, there on the sad height,
Curse, bless, me now with your fierce tears, I pray.
Do not go gentle into that good night.
Rage, rage against the dying of the light.

– Dylan Thomas

Lastly, here’s the timelapse of how I made the Old Man:

Thank you and do comment down below what you think of the model. Feel free to share the piece, too. Cheers!

Should I Embrace Silence?

First off, below is the original charcoal-on-canvas I did last 2014 (left) and the 3D render I did with Blender (right).

Here’s a short backstory:

Back in 2014, I thought of re-learning how to draw using charcoals and I also would like to tackle some issue or something sensitive. Now, a lot of topics came to my mind and I settled with how, despite the current state of the world’s education and culture, there are still some instances when women are not given the chance to be heard. That became my inspiration to draw the piece.

You can see in her eye that she is looking a little bit to the left of whoever is in front of her and that her eye reflects sadness and despair. Then, there’s the cloth in her mouth symbolizing the silence imposed upon her.

Lastly, here’s a video of how I made the model:

Hope you guys like it. If you have other interpretation about the piece, suggestions, questions, and other stuff, please comment them down below. Feel free to like and share this post and/or the video, too. Thank you!

Bonus gif!
Bonus gif!


Ice Princess Nix

“I learned that courage was not the absence of fear, but the triumph over it. The brave man is not he who does not feel afraid, but he who conquers that fear.”
Nelson Mandela

Some of you may know already that I love learning and I love art. I started drawing when I was still a kid, around 4 or 5 years old, I guess. And like every one else, I was not that confident with my work. I always think of the idea or fear of showing your creations out in the world then receiving criticisms about things that you might have done if you only have more time to iterate.

I still remember the first time I showed my work back in the 5th grade, during our art class. It was a pastel portrait of the Iron Man suit. Some of my classmates liked it and praised me for doing a good job. But, majority pointed out the proportional mistakes of the portrait. I’m fine in receiving criticisms now – I’m actually looking for it – but back then, it hurt like hell.

Well, that story aside, I “come and go” in doing art because I also make games and there are times when I just want to program and make a prototype instead of making art; and there are also times that I just want to write poems, shorts stories, and other stuff to clear my head.

Initial artwork using pencil and a bond paper

This piece is one of my drawings during our break time at the university. The signature was cropped when I scanned the image, but the date is 4/27/2017. During break times, I usually go to the library or the computer laboratory to study about game design, psychology of games, and other game related stuff. Or, I go anywhere with a power outlet and make random game prototypes with my laptop. Or, if I’m burnt out because of hours and hours of working, I go out with my friends to play or just have fun.

I actually don’t know what I was thinking when I was drawing this. I just zoned out and drew a girl standing near a cliff. From there, I thought of making it look like she was about to commit suicide but then, I added a Godzilla-like creature and noticed that it was more interesting. So, I went with it.

I was actually planning on making a digital version of this using Photoshop but, my tablet broke. So, I decided to make it in 3D using Blender instead.

First render without mist

The original setting of the scene was supposed to be on a green mountain; but, I had a hard time doing a shader that looks like realistic soil, so I went with snowy mountains instead.

The stars look fine but, I felt like something was missing. I tried adding vignette (because people love those), but it wasn’t filling the gap that I felt. Then I thought of Uncharted, Tomb Raider, and Skyrim. The idea kicked in and I was like: “Oh! Mist!”

Final render with mist. There are still stars there...somewhere.
Final render with mist. There are still stars there…somewhere.

Then I came up with this, there was still something missing but, I ignored it and just moved on with the story for the scene. Here’s a snippet of what was going on in my mind:

Nix, the Ice Princess of Crystalia, the city hidden in the snowy mountains, is a very kind and charming girl. The people of the city admires her sweet and gentle smile every time she walks around the city.


But, one day, his loyal knight, Steiner, rushed to her door and woke her up. “Princess! It’s your father.”, said the knight panting.


They went to the castle clinic and saw King Ashura covered with his own blood and his arm bitten off. The clinic was full of soldiers half dead. “They went on to hunt the great winter beast.”, said a young nurse. The princess fell deep into agony until one night, she woke up to a loud growl which sounds like a mixture of a man yelling, an ice mountain lion’s roar, and the echo of death. It was the winter beast, Frigore.


The princess and her loyal knight, Steiner, went out to hunt the beast themselves. Although the princess was feeble and weak with the sword, she was well versed in the arcane arts of magic.


They approached the location where the sound most likely came from and as they got closer, the sound became louder and louder until they arrived at a cliff and there they saw it.


A shadow hidden by the mist of the valley as big as the mountains themselves. The beast stood on two feet and its tail swung with a booming sound. It turned around and growled so loud that Steiner was stunned. Nix waved both of her arms in a circular manner; then a huge sphere of pure magic covered them both just in time to block the shards of ice that flew towards them. The shield protected the princess very well, but Steiner was not so lucky. A small shard hit his helmet so hard that he fell unconscious. After another loud growl, the beast faced the princess and walked towards her.


“The Ice Princess – Nix Koud of Crystalia. You dare stand before the great Frigore?!”, said the beast without moving its jaw. The beast stared straight into the princess’s eyes like it was ready to suck her very soul with just its glance.


“Telepathy. So, you can understand, winter beast.”, yelled the princess before creating a sign with her hand that caused her hair to grow longer, her eyes to turn red, and the ground around her to tremble.


“The secret arts of the dragon slayers! How did you- who are you?!”, said the beast followed by a growl.


“I am Nix Koud von Crystalia, the Ice Princess. Daughter of Ashura Koud von Crystalia. Master of the arcane arts of magic – and a Winterhold Dragonborn. Prepare to die, beast!”, yelled the princess while staring at the beast’s eyes.

There, just random words and names that popped up in my head while writing. Anyways, thank you and if you want to see how I did this, you can check it out here:

I am a Freelancer.

Hi there! First off, thank you for stopping by and I apologize of the late posts.

Now, to the topic – Upwork.

logo-1200x630.png

At first, I didn’t really like to enter or to even approach the world of freelancing, but, when we had this two-month long summer break from college, I couldn’t bear seating around doing nothing (I went out with my friends, but, most of the time I’m was at home doing my own thing). Yes, I still made prototypes and 3D designs during that two-month period, but, it still felt like I was missing on something big. Plus, I was, and still am, worried about my scholarship and my other expenses. So, I thought of looking for a summer job, but, I’m kinda lazy to go to an office everyday, so I looked up freelancing.

Enough with the “but’s” and let us fast forward to a more recent event.

Here, I am finished with my Upwork account and polished my website to act as my portfolio, and everything was going fine until I submitted proposals for 20++ jobs and two weeks had gone by and I still don’t have a job. I felt like quitting because I’ve already invested some of my time to this and still nothing.

So, here I am about to quit, then when I turned on my wifi at home, I noticed this email notification. It was from Upwork, telling me that I have an invitation for a job interview. Now, at this point, I’ve already received quite a number of invitations for interviews but when I submitted my resume/portfolio, none of them contacted me again, so, I didn’t have high hopes for this one. Still, I sent my portfolio to the guy who invited me for an interview.

Then, one night (around 11 pm), I was programming a little prototype I had in mind when I receive an invitation for a video call. I was shocked and surprised that I literally jumped of my chair and rushed to set up my desk for the interview (you need to understand, I have a very very messy table). The call was from my client, Jeff H. (I have a separate blog for my experiences with Jeff)

My first client, everything went well, I can’t really say that something went wrong. Everything went smoothly, I did what I was asked to do (with some extras) then I got paid. It was not that big, but it’s something, especially for a student like me.

From then on, I realized that, wow, this [Upwork/freelancing] is just like life itself, everything might not be how you expected it to be at first, but, if you persevere and be patient, greatness or success will surely come to you. Another take away is that if you ever feel like quitting or like giving up, look back…look back to the reason why you started doing whatever it is you’re doing.


Thank you for your time! 🙂

With the story above, Looking for a freelancer for your game/project?

You can check me out here in these sites: Upwork and Fiverr